A weboldal inaktív, archivált üzemmódban működik, csökkentett funkciókkal.


Dokumentáció
Kézikönyv kezdőknek 6: Kezdeti beállítások
Szerző: jojodee Időpont: 2004. Június 18.A Xaraya telepítése utáni elsődleges beállítások áttekintése: Adminpanelek, Alap, Levélküldés, Grafikák, Modulok, Szerepkörök modulok beállítása.
Ez a fejezet a telepített weboldal legfontosabb moduljainak alavető beállítását mutatja be. Nem részletezzük a különböző beállítási lehetőségeket, csak rámutatunk a legfontosabbakra, amelyekek minden új Xaraya oldal telepítésekor be kell állítani. Az oldal elrendezésével és általános elemeivel kapcsolatos beállításokat is megvizsgáljuk.
1. Modul áttekintések - Mik ezek?
 A telepítési fájlok törlésére emlékeztető blokk ugyan idővel magától lejár és eltűnik, általában mégis ennek a manuális törlésével kezdünk egy telepítés után (természetesen csak a benne foglalt biztonsági műveletek elvégzése után).
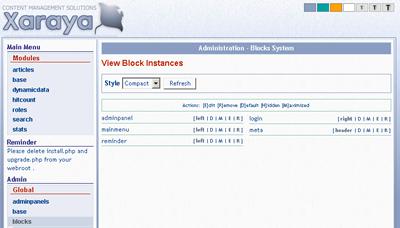
Kattintsunk a Blokkok elemre az Adminpanelen. A következőket láthatjuk:
- Az Adminpanelen megjelenik a Blokkok almenü a Blokkok modulban elérhető lehetőségekkel.
- A középső modulterületen egy Áttekintési oldalt olvasható. Az adminisztrálási menü minden modulja tartalmaz egy Áttekintés képernyőt, amely rövit bevezetést nyújt a modul lehetőségeibe. Az áttekintő oldalak megjelenése a későbbiekben kikapcsolható.
2. Blokkok - Az emlékeztető blokk törlése
 Katintsunk a Blokkok megjelenítése almenüre a Blokkok modul menüjében. Ekkor a modulterületen a Blokkok megjelenítése oldalt láthatjuk.
Ezen a képernyőn láthatjuk azokat a „blokkokat” amelyek jelenleg a weboldalon szerepelnek. A lisán megtaláljuk az Emlékeztető (reminder) blokkot és más olyan blokkokat is amelyek már ismerősek lehetnek: bejelentkezés, adminpanel, főmenü.
Kattintsunk a Törlés lehetőségre a „reminder” blokk mellett. Egy megerősítő kérdés fog megjelenni, melynek elfogadásával törölhetjük a blokkot.
A blokkok listájának a megjelenését az oldal tetején látható lenyílómezőben választhatjuk ki.
3. Adminpanelek - Az áttekintések kikapcsolása
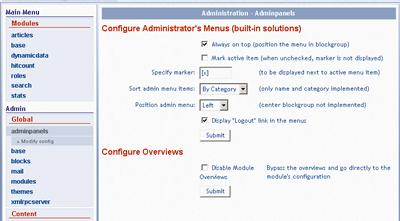 Eleinte inkább ne töröljük az Áttekintéseket, mert hasznos információkkal szolgálhatnak, ettől függetlenül hasznos ismerni a kikapcsolásuk módját. Kattintsunk az Adminpanelek - Beállítások menüre:
- A képernyő felső része lehetőséget biztosít az adminisztrálás menü megjelenésének egyszerű testreszabására.
- Az alsó részen láthatunk egy jelölőnégyzetet az Áttekintések kicskapcsolására.
4. Alaprendszer modul - Az oldal megjelenésének beállításai
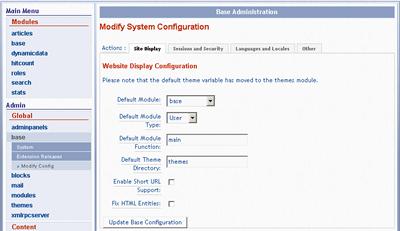 Az Alaprendszer modul felelős a weblap több fontos globális beállításáért. Ide tartoznak például az alapvető megjelenítési, a nyelvi és a biztonsági beállítások. Kattintsunk az Alaprendszer - Beállítások menüre.
Az oldal tetején megjelenő fülek alá rendezve találjuk a különböző lehetőségeket, ez általánosan igaz a Xaraya moduljaira. Az Alaprendszer modulban 4 különböző csoportba sorolva, négy fül alatt találjuk az elérhető beállításokat.
Weblap megjelenés
- Meghatározhatjuk a főoldalunkon megjelenő modult, amit a látogatók a weblap címének http://weblap.cime.hu beírásakor láthatnak.
- A Rövid URL támogatás minden modulban külön be- és kikapcsolható, de itt találunk egy fő beállítást, amellyel ennek működését engedélyezhetjük.
- Hasznos lehet a HTML elemek javítása is, amellyel az & formátumú elemeket alakíthatjuk a megfejelő karakterre, ami ebben az esetben &.
Munkafolyamat és biztonság
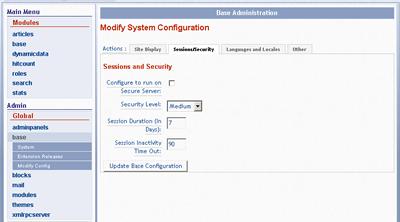 Kattinsunk a Munkafolymat és biztonság fülre.
Ezen az oldalon találjuk a felhasználók belépéshez kapcsolódó biztonsági beállításokat.
Nyelvi beállítások
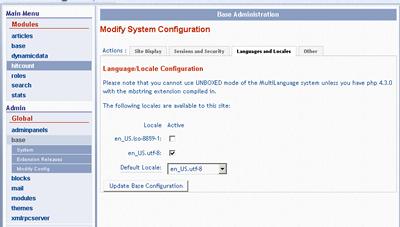 Kattintsunk a Nelyvi beállítások fülre. Itt a weboldal nyelvi és területi beállításati találjuk.
Láthatjuk a telepített nyelvi csomagokat, illetve kiválaszthatjuk az alapértelmettet.
5. Grafikák modul - Site Display Variables
Kattintsunk a Grafikák - Beállítások elemre az adminisztrálás menüben a weboldal megjelenés beállításainak szerkesztéséhez. Ezen az oldalon a következő lehetőséget találjuk:
- Default theme - but they will only appear here if you activate them first (in View Themes)
- Set Site Name, Site Slogan, Copyright and Footer Notice All these can be inserted as variables into your theme
- Page Title You can choose here how the dynamically generated page title can appear
- Debugging options The main option here is the Cache Templates which allows a little speeding up of your site. All other options here are very useful when debugging templates.
6. Roles - Setting User Default Options
The Roles module is very powerful and has many options and functions available. We will review some of the basic settings you should check when setting up your site, namely those on the first two Tab options.
General Tab Options
The Page and Site Admin options are important to set early on in your site configuration.
- You can set the number of Users listed per page, and also here is where you should set short URLs on or off. They will only work here if you have the master short URL checkbox checked in the Base module.
- Terms of Service and a Privacy policy are supplied with Xaraya. You can set them on or off for display. Both of these documents are dynamically generated, so not only the documents themselves but any references to Privacy or Terms of Service will by dynamically included only if checked here for display.
- Designated Site Administrator - the site administrator designated here can never be accidentally deleted from the Roles module. By default, and unless you have setup other Administrator roles, it is set to Admin.
Registration Options
There are many options here to review and set for your site. Some of the more important include:
- Default Group for new users: If you allow user registration on your site, they will automatically be allocated to the group specified here, by default Users. However you can setup alternative user groups if you wish.
- Allow registration: this will determine whether visitors will be allowed to register on your Xaraya site or not.
- Require Validation of New User: checking this option will require newly registered users to validate their email, prior to having their account activated.
Review the other options. They are also important and refer to finer details of how a new user account is registered, activated and user notified about that registration.
7. Mail - Check default mail settings
The Mail module handles mail functions for your site, including mailing for other modules that may need to email. Click on Mail - Modify Config to display the main Configurations settings for the Mail Module.
Check all the options are set to your requirements and then use the Test Configuration option from the Mail module submenu to test it works as you need.
8. Modules - Installing and Hooking Functionality
The Module module has two very important functions:
- To list all modules and installation, activation, deactivation and uninstall options.
- To extend the functionality of each module by hooking extra functions to each or any of the existing modules.
Viewing all site Modules
To start, click on Modules - View All. In a few seconds all modules available to your site will be listed. Some important points:
- Each module is listed with any available options. You can click and install a module, or deactivate existing modules (except for core modules. Note that if you Remove a module- the module is removed from view at your site and ALL associated data in the database is removed. So be careful!
- Notice along the top of the list you have a number of drop down boxes including Style, View and Sort. Try these, but when checking available modules on your site make sure the View filter is not filtering out modules and is set to All Modules.
Hooking in Functionality
Let's look at the second important feature of the Modules Module. Click on Configure Hooks from the Module modules' subitems in the Admin Menu
We'll use Articles as an example, and the Comments module as both of these should be installed by default. We are going to see how we can allow Users to add Comments to articles that are published on your site.
- Click on Comments in the listing on the Module Hooks Configuration screen.
- By default you should note that all articles is ticked in the checkbox - meaning that comments will be available on all article 'itemtypes'. If for example you only wish users to comment on News article itemtypes, uncheck the all articles, and click to check the News articles itemtype.
That's it - you have just added the ability of users to comment on News articles on your site. By hooking one modules functionality to another, you can extend much of your sites functionality. Eg comments, mail, categories, scheduling and so on.
