Installing & Configuring a Xaraya Community Site
Released earlier as Guide version: 0162. Built 25-April-2004.
Copyright © 2002-2003 Drew Vogel drew@xaraya.com.
Copyright © 2003-2006 The Digital Development Foundation
The Official Xaraya user Guide is licensed and distributed under the GNU Free Documentation License.
Parts are copyright (c) 2003 mikespub
<postnuke@mikespub.net>. Used with permission.
Parts are copyright (c) 2003 Skribe
<skribe@plug.linux.org.au>. Used with permission.
Parts are copyright (c) 2003 Mahmood Al-Yousif
<mahmood@alyousif.tv>. Used with permission.
Parts are copyright (c) 2003 John Cox
<niceguyeddie@xaraya.com>. Used with permission.
Parts are copyright (c) 2004 Chris Dudley
<miko@xaraya.com>. Used with permission.
Permission is granted to copy, distribute and/or modify this document under the terms of the GNU Free Documentation License, Version 1.2 or any later version published by the Free Software Foundation; with the Invariant Sections being "Introduction by John Cox", "Document Thanks", "About the Author", and "Dedications", no Front-Cover Texts, and no Back-Cover Texts. A copy of the license is available at http://www.gnu.org/licenses/fdl.html.
| Revision History | ||
|---|---|---|
| Revision 1.0 | 3 Aug 2006 Start to review the guide and prepare for post 1.0 release. | |
| Revision History | ||
|---|---|---|
| Revision 1.1 | 6 Aug 2006 Split up the document with includes so different chapters and sections can be maintained seperately. | |
Abstract
This Guide provides instruction on obtaining the Xaraya software and installing, configuring, and maintaining a Xaraya website.
The Xaraya Project is dedicated to the memory of Greg Allen (adam_baum), March 6, 1973-June 16, 2002. Xaraya is his legacy.
Table of Contents
- 1. Introduction & Information about Xaraya
- 2. Getting Xaraya
- 3. Installing Xaraya
- 4. General Configuration
- 5. Templates in Xaraya
- 6. Categories in Xaraya
- 7. Modules in Xaraya
- 8. Hooks in Xaraya
- 9. Articles in Xaraya
- 10. Publication Types
- 11. Dynamic Data in Xaraya
- 12. Roles: Users & Groups
- 13. Privileges: Building Blocks for Site Access
- 14. Xaraya Authentication Modules
- 15. Managing Content in Xaraya
- 16. Transforming Content in Xaraya
- 17. Maintaining Your Xaraya Site
- 18. Using Web Services with Xaraya
- 19. Miscellaneous Xaraya Modules
- 20. Conclusion
- A. Creating the Xaraya database via phpMyAdmin
- B. Enabling Short URL support in Apache
- C. Creating a Xaraya Theme
- D. Converting from PostNuke to Xaraya
- E. Installing & Configuring Red Hat 9.0 to run Xaraya
- F. Standards Compliance
- G. Xaraya configuration File
List of Figures
- 1. Powered by Xaraya
- 3.1. Language selection.
- 3.2. Xaraya license agreement
- 3.3. System Settings Check, part 1.
- 3.4. System Settings Check, part 2.
- 3.5. System Settings Check, part 3.
- 3.6. Database Settings Collection.
- 3.7. Xaraya has encountered a database.
- 3.8. Start of initialisation
- 3.9. Administrator Account Creation
- 3.10. Available Configurations
- 3.11. Choose Configuration Options
- 3.12. Installation complete!
- 3.13. Xaraya's interface after installation.
- 3.14. Xaraya's standard footer
- 4.1. Base administration
- 4.2. Theme listing
- 5.1. Blocks administration
- 6.1. Overview of Categories
Table of Contents
This chapter will give you an introduction to Xaraya, it's features, the format of this Guide, and the assumptions under which this Guide was written. Also included is a handy Xaraya pronunciation guide!
Building a better mouse trap has always been a desire for inventors since the beginning of time.
For the Xaraya team that was the motivation. Our desire and drive came from the idea of doing something that has not been done before, which in my opinion has been accomplished. Xaraya is the culmination of the work of several of the world's best software designers working within the PHP language at this time.
The Official Xaraya Installation & Getting Started Guide will introduce you to concepts that are, most likely, unfamiliar to you. Having complete control over the output of the software is the nirvana that most designers of Open Source Content Management Systems only dream of. Beyond the control of the output, though, is the control of the input as well, which to my knowledge has not been attempted.
Xaraya will ask you to re-examine your expectations as to what Content Management Systems can -- and should -- offer you.
The Official Xaraya Installation & Getting Started Guide itself is the culmination of well over a year's worth of work to not only document what can be done, but to explain in common terms and phrases what Xaraya will do for you. It is not only the comprehensive guide to Xaraya, but it is a narrative which will walk you through the collective knowledge of the Xaraya team. The guide has been written by Drew Vogel (and others) who have likely spent more time documenting than others have spent coding.
Welcome to the Official Xaraya Installation & Getting Started Guide.
And welcome to Xaraya -- the next generation of Content Management Systems.
- John Cox
While every reasonable precaution has been taken in the preparation of this document, neither the author nor the Xaraya development team assumes responsibility for errors or omissions, or for damages resulting from the use of the information contained herein.
The information contained in this document is believed to be accurate. However, no guarantee is provided. Use this information at your own risk.
If you feel that parts of this guide are inaccurate, then please contact the documentation team or post a bug for this document at http://bugs.xaraya.com.
This Guide will assist you with installing, configuring, running, and maintaining a Xaraya Community Site. It is intended for Xaraya installers or those individuals interested in Xaraya installation and configuration issues.
This Guide is designed to be read from start to finish. Certain sections may be skipped (for example, if you're upgrading, you may not need to read the first-time installation instructions). However, reading this entire Guide from start to finish will provide the maximum educational benefit.
Throughout the Guide, there are examples for you to follow. The examples add new features or illustrate concepts and are all designed to work together. Generally, the examples include Animals, Music, or Food but the concepts that they teach can be customized to your particular tastes.
Throughout this Guide, we use several terms that you should understand.
"Anonymous users" are defined as users that have not registered/logged into an account on the site.
"Registered users" are defined as users that have registered for an account on the site and have logged into the site with their username and password.
"Site Administrators" are defined as one or more individuals who have administrative access to the site. Many sites have only one site administrator while some sites have an site administration team.
<webdir>: This is the local directory on your site from which pages are served by the webserver. For example, if you're using a modern Red Hat installation your <webdir> is usually /var/www/html. Consult your operating system manual for information on determining your <webdir>.
<xarroot>: This is the local directory on your site in which Xaraya is installed. If you choose to install your <xarroot> into your <webdir>, then the two terms have the same meaning -- they point to the same directory. However, if your <webdir> is /var/www/html, and you install Xaraya into a sub-directory called "xaraya", then your <xarroot> is /var/www/html/xaraya.
<theme_dir>: This is the local directory on your site in which Xaraya themes are stored. This directory location is defined in the Admin->Base->Modify config, Default Theme Directory field.
<theme_name>: This is the name of a theme on your Xaraya site.
http://www.mywebsite.com: This URL is used as a stand-in for your site's URL. If you install Xaraya into a sub-directory of <webdir>, your site's URL will include the sub-directory. So, for example, if your <webdir> is /var/www/html, and you install Xaraya into a sub-directory called "xaraya", then your site's URL will be http://www.mywebsite.com/xaraya.
Xaraya was written by the Xaraya Team. Xaraya is, as with many successful open-source projects, a huge collaborative effort relying on many talented contributors from across the globe. Without their vision, this document would not exist.
This guide is built on version 0162 (Built 25-April-2004) of The Official Xaraya Installation & Getting Started Guide , mainly written by Drew Vogel.
<authorblurb>Drew Vogel has been involved with Xaraya since its inception -- when it was known by the code-name "ProjectX". In fact, Drew hosted the first-ever ProjectX Summit (August 23-28, 2002) in Cincinnati Ohio.
Drew earned a Bachelor of Fine Arts in Theater Directing & Performance with a minor in English Literature focusing on Shakespearean literature from Northern Kentucky University (1991). He works at the University of Cincinnati College of Pharmacy as Manager of Professional Programs. His outside interests include gourmet cooking, fine dining, scuba diving, urban exploration, sports cars, computer technology, animals, reading, movies, travel, music, and humor. And more.
Drew's interest in documentation is an effort to bridge the gap between developers and users of software. He acts as an intermediary between these groups with their seperate needs.
When not working on documentation projects, Drew is typically reading cookbooks or other food-related books & magazines, or creating culinary masterpieces in his home kitchen.
Drew lives in Cincinnati, Ohio with his fiancee Wendy, four cats, and two dogs. His website is at http://www.drewvogel.com.
</authorblurb>The Official Xaraya Installation and Getting Started Guide was written by Drew Vogel. Abundant thanks to the Xaraya development team for answering Drew's endless questions. Thanks to the contributing authors, reviewers, Greg Allen (adam_baum), John Cox, mikespub, Doug Daulton (Apakuni), Skribe, Craig Hamlin, Chris Dudley (Miko), Carl Corliss (Rabbitt), Mahmood Al-Yousif, Michael Cortez (mcortez), marcinmilan, Joanna Dalle Nogare (jojodee), Marcel van der Boom (MrB), Jason Judge, Marjolein Katsma, SpiritTech, and Pedro Innecco. Special thanks to Gregor Rothfuss (thalinor) for many things.
This document was written in DocBook and then converted using XSLT to various output formats. Thanks to the Linux Documentation project for their docbook utils and stylesheets which made the process much easier.
Thank you to the Xaraya Team for declaring this to be the "Official" guide.
Download the file package from the website: http://xaraya.com/index.php/documentation/c90/ . The following files are included with this guide.
callouts directory -- These are files used by this Guide. It is not necessary to copy these files to your Xaraya installation.
resources directory -- These are files used by this Guide. It is not necessary to copy these files to your Xaraya installation.
html.css -- This file is used by this Guide. It is not necessary to copy this file to your Xaraya installation.
images/recipes/NoPhoto.gif -- Used in the Recipe Publication Type example (see EXAMPLE: Adding a new Publication Type that uses Dynamic Data). Displayed when no recipe photograph is available. Copy to
<xarroot>/images/recipesdirectory, creating directories as necessary.images/recipes/applechestnutsoup.jpg -- Used in the Recipe Publication Type example (see EXAMPLE: Adding a new Publication Type that uses Dynamic Data). Photograph for the
SampleRecipe.txtfile. Copy to<xarroot>/images/recipesdirectory, creating directories as necessary.modules/articles/xartemplates/user-display-recipes.xd -- Used in the Recipe Publication Type example (see EXAMPLE: Adding a new Publication Type that uses Dynamic Data). Template for displaying the new Recipe Publication Type. For a default site-wide template, copy to
<xarroot>/modules/articles/xartemplatesdirectory, creating directories as necessary.modules/articles/xartemplates/user-summary-recipes.xd -- Used in the Recipe Publication Type example (see EXAMPLE: Adding a new Publication Type that uses Dynamic Data). Template for displaying the new Recipe Publication Type. For a default site-wide template, copy to
<xarroot>/modules/articles/xartemplatesdirectory, creating directories as necessary.modules/categories/xarimages/*.jpg -- Category files for use with the categories created in the new Recipe Publication Type (see EXAMPLE: Adding a new Publication Type that uses Dynamic Data). For site-wide use, copy these files to the
<xarroot>/modules/categories/xarimagesdirectory.Tutorials/PubType/SampleRecipe.txt -- Used in the Recipe Publication Type example (see EXAMPLE: Adding a new Publication Type that uses Dynamic Data). A sample recipe to add at the end of the Recipe Publication Type example (and a darned good recipe by Drew Vogel, too!).
As the internet and world-wide web started to emerge as a major repository for storage, retrieval, and display of data, the main avenue for accessing that data was static, hand-coded, HTML (Hyper-Text Markup Language). Static HTML means that each and every web page on a site is created individually; links between content elements are managed by hand; and changes can be made only by a site administrator following a multiple-step process involving the downloading, editing, and uploading of new or modified pages.
For users with moderate technical skills, the creation of web pages using static HTML is fairly easy. But because the content is not separated from the code, a lot of time is spent wrapping the content with HTML code so that it can be presented in a meaningful way. Composing pages in static HTML is time-intensive and can interfere with content; it's comparable to asking a book author to tackle typesetting, printing, and binding, which would certainly detract from the writer's primary goal: to provide content.
Without the separation of code and content, many aspects of managing a static HTML site are difficult. It is complicated to establish the 'look' of a site, and not easy to change that look once set. Searching for information on a site, even one with a limited number of pages, is an inaccurate, time-consuming task. It is impractical to collaborate on pages with colleagues unless additional administrative (FTP) accounts are configured or access codes are shared; both scenarios present a security risk.
For many people, HTML editing programs like FrontPage and DreamWeaver present a better approach to website design, implementation, and maintenance. These programs offer tools for defining a site-wide 'look' using site templates, as well as additional features to make it easier to create and edit static HTML pages. However, even when using these tools, adding or modifying content still requires a combination of writing and coding, which can be tricky and time consuming difficult to accomplish for anyone with lower than moderate technical skills.
For example typical publication cycle for a static HTML site might follow this pattern: An article is written; then passed to the web maintainer who creates a new page (following the site's design) either from a template or from scratch. The article is converted to HTML code and pasted into the new page; which, depending on the maintainer's workload may take several hours or more to be posted on the website. The new page is uploaded to the website and then manually linked to other pages as necessary, with related pages updated as necessary. That's a lot of time and a lot of work.
In a limited number of contexts, static HTML may be quite suitable for a website. If the content on the site does not get updated frequently, is updated by a limited number of individuals, does not need to be searchable, does not require pleasant presentation, and if there is a technical individual who is willing to edit HTML and download & upload changes, you may not need the advanced features of a Content Management System. However, before you put this book down and walk away, understand this: on the same hardware that runs your static HTML site, you can have a full-featured, easy-to-use Content Management System that makes updating content much easier and allows a huge variety of advanced features that simply were not available with static HTML sites.
This represents a glance toward the past -- or maybe this is a look at the way you're currently doing things, and you have found yourself with too much data to manage effectively. But there is a better way. A way that will allow you create and present meaningful content on your website without downloading, coding, and uploading -- from anywhere on the Internet. A way that will allow advanced features -- features like site-wide searches, user accounts, private messages, and much more -- features that are simply not possible with static HTML.
A Content Management System could be the solution to your problems.
The answer to all the wasted time and effort of maintaining static HTML websites is to use a Content Management System. Static HTML was insufficient for the management of content on even a modest website; it was clearly too much data and too much work. Though HTML editing tools streamlined the procedure for maintaining a static HTML site, a better method of data management was necessary.
Web technology unveiled new competitive scenarios for companies: improved customer interaction, better business-to-business communication, and a more vibrant distribution of internal information. Today, many companies are turning to the web as a new playing field for innovation; tapping a wide variety of content and delivering it instantly to users around the globe. Some of the key goals of a Content Management System (CMS) are to provide users with personalized, transparent access to relevant information inside and outside of the organization; and to allow authors to easily contribute information to the knowledge base by managing content in a reliable, secure, and dependable way.
Content Management Systems allow content to be handled and updated dynamically and makes it easy for non-technical people to create and modify content. What is 'dynamic content'? Dynamic content is content that may change frequently, is separated from the display (HTML) code, and is made into an 'element' that can be manipulated by the Content Management System. Dynamic content elements are usually stored in a database which is running the website.
Good Content Management Systems are designed so that nearly anyone can publish, browse, and revise information without knowing much more than how to use a browser or a word processor. The technical details are hidden from site users, thus eliminating their need to learn about software programming, HTML, network protocols, or how and where to publish and retrieve files to work on them. With a click of a button, authorized users can contribute any content to areas of the site to which they have been granted access.
Compared with static HTML, Content Management Systems:
Separate code from content making it easier to focus on content
Offer a consistent, non-technical, easy-to-use interface for both users and administrators. Content contributors log into a secure area of the website, enter the date, title, and body of their news submission, and click submit, and the news article is published to the website with no hassle.
The entire look and feel of a website can be changed very easily. Some CMS packages even allow users to customize the way they see a website -- everything from language to colors to the on-screen placement of features.
Are feature-rich, and support additional, specialized features -- forums, galleries, live chat boards, private messaging, local weather, and more.
Are searchable because they rely on a database. This feature alone makes CMS an exceptional choice when compared to static HTML.
Allow for community involvement and collaboration. While CMS-based sites can be run effectively by one person, the community can easily comment on a website's content without requiring special access.
Gives administrators complete control over what each user or group of users can do within a web site. Administrators can control access to sections of a site, and assign user privileges and permissions to individuals or groups as we'll see in Chapter XX.
Once users have made the transition to a CMS, they will no longer feel incapacitated and unable to contribute to the website community. Often, the availability of all the new features provided by a CMS can be intimidating at first, and the learning curve can appear rather steep when compared to a static HTML page because while a static HTML page does not allow community involvement, CMS readily welcome it. CMS managed sites are simply so much easier to maintain than static HTML sites. To update a CMS site, all you need to do is surf to it and click on links to update the site. So, if you know how to surf the 'Net, you can maintain the site; very little other work is necessary!
So far in this discussion, we have discussed only the most basic functions of a CMS, but there are hundreds of different functions available in an advanced Content Management System like Xaraya. Fortunately, it's fairly easy to learn the main functions, ignoring the rest of the features until you need to use them. This is another advantage of using a CMS instead of ordinary HTML pages: the advanced functionality allows users to search the site, post on forums, leave user information which is easily manageable -- in short, anything that can be done with advanced database management.
A CMS implementation provides a win-win solution for business end-users, webmasters, and business management. It provides a complete environment that brings the power of distributed content management down to the average end-user, while at the same time addressing the most important requirements of the IT department, webmasters, and business management to provide a secure, fast, and effective portal; however commercial CMS packages (like Microsoft Content Management Server, Vignette, Stellent, and Obtree) can be prohibitively expensive. A quick internet search for commercial CMS packages reveals prices ranging from less than $99 through hundreds of thousands of dollars. Fortunately, there are several Open Source Software CMS solutions that cost very little or are completely free to use. Xaraya is a robust, free Content Management System that runs on all platforms that support the PHP scripting language, a web server, and a relational database management system (RDBMS).
Open Source software is software which may be freely distributed and whose programming code is available and also modifiable by anyone, within the terms of a particular license.
The basic idea behind Open Source Software is very simple: When programmers can study, redistribute, and modify the source code for a piece of software, that software evolves. People improve it, people adapt it, and people fix bugs. These modifications can be folded back into the development community, benefiting everyone. And this can happen at a speed that, if one is used to the slower pace of conventional software development, may seem astonishing.
And you guessed it: the Xaraya Content Management System and all the pieces of software required to make it work are Open Source!
In the next section we'll take a closer look at Xaraya and explore some of the many features that it has to offer.
Xaraya is a framework. It is not an out of the box solution, but merely an interface to let you do what you need.
What are the basic building blocks of Xaraya? How do they interoperate?
The Core (the files in the
<xarroot>/includesdirectory) handles each page request. The core is the part that does all interaction with the database, it prepares conten for display and it lets the modules work. Modules provide units of functionality, and can be added, extended, or disabled as required. Some modules are mandatory, meaning that the core expects them to be available on the site. Other modules are optional and can be turned on or off as needed.What is an Article?
One of the first modules you will use is articles. Articles is one of the older modules that will let you publish content. Each block of content in Articles is called an article.
What is a Publication Type?
Publication Types are specific "types" of Articles on the site. A publication type is a set of rules for an Article. You can see it as a format, a template if you like. Examples of publication types are News Articles, Frequently Asked Questions, Pictures, or Recipes. You can see the overview of your publication types via Admin->Articles->Pubtypes.
What is a Template?
A Template is a file that defines how content items on the site are displayed (rendered). A Template receives output from a module and formats the output according to various rules. Templates can be very simple or very sophisticated. A normal page typically consists of many templates, each nested within another.
Each module has a default set of templates that it uses, but templates can be over-ridden by creating a Theme. You can switch Themes at will, and each request for a particular page will check if there is an over-riding Template in the current Theme before using a default template.
What is a Theme?
Themes are a collection of templates, images, etc. that represent a particular Theme (layout, style, or skin) for your site. Typically, you would have at least the page templates in the Theme directory, and possibly some overrides for default module and block templates.
Special themes include the "print" theme, where the page template does not include any blocks and so will only show the output of the main module function, and the "rss" theme, that doesn't generate XHTML at all but XML for syndication by other sites.
Are Articles, Publication Types, and Templates related? If so, how?
Each Publication Type uses a specific template to display content of a particular type. This means each Publication Type can have a different layout or format.
How are Articles sorted into Sections/Categories/Topics?
Articles can be placed into Categories (one or more). The Categories may mean different things from site to site, depending on how they were configured. The default Xaraya installation of the Articles module contains a set of Categories familiar to administrators of other Open Source CMS products (PHP-Nuke, PostNuke, Envolution, etc.) where news articles are categorised in two independent ways (Topics & Categories) and documents are categoriesed into Sections.
New Xaraya sites will often use generic categories across all Publication Types, instead of having separate hierarchies for each of them. See overview on Admin->Articles for more information.
How, and by what, are Articles displayed?
Articles are displayed by the Articles module, in cooperation with a bunch of 'hooked' utility modules (categories, hitcount, ratings, comments, and other modules). The way an article is displayed depends on the settings in the publication type and the formatting in the template.
What do Categories do? Are they the only way of sorting Articles, or are they just an example?
You can organize your Categories however you see fit -- the Categories provided at installation are just an example which may be modified, extended, or completely removed as you require.
Articles can be browsed by Publication Type, by Category, and/or by Author, and sort the results by date, title, and other criteria.
Do Articles need to be sorted into a simple hierarchy or can they be sorted into a multidimensional array with each Article fitting into several independent hierarchies simultaneously or using category flags instead of a hierarchy at all?
Each "base category" is organised as a hierarchy, but several independent base categories (and their hierarchies) can be assigned to each of the Publication Types in Articles.
For instance, a travel site might have one hierarchy with countries and cities, and another hierarchy with particular interests (for example, culture, sports, restaurants, etc.). An Article about a restaurant in Brussels can, for example, be placed in the category "Brussels" and also in the category "Restaurants", and people can then view all articles about Brussels, about restaurants, or about restaurants in Brussels.
And if you work by Publication Type, you could let people browse only through reviews (a particular Publication Type) about restaurants in Brussels.
Xaraya is a buzzword-compliant, extensible, open source web-development software platform written in PHP and licensed under the GNU General Public License. Xaraya utilizes robust permissions, data management, and multilingual systems to dynamically integrate and manage content.
Xaraya's modular, database-independent architecture provides tools which separate form, function, content, and design on the site. Xaraya delivers the requisite infrastructure for a fully dynamic multi-platform Content Management Solution (CMS).
Database-driven website engine (PHP-ADODB compliant)
Extensible through a variety of third-party modules
Powerful security module for multi-level user/administrator logins
Distribute workload using User/Administrator management tools
Robust article management system
Fully editable & manageable News, Links, Downloads, and FAQ Sections
BlockLayout Theme Engine: Display your site your way
News Feed Manager: Access thousands of RSS-compliant news feeds
Provide out of the box RSS feeds
Site Statistics: Tracks browser & operating system, top news & articles, and more
Easy install on most Unix/Linux and Windows platforms
Import information from various other CMS systems like PostNuke and Moveable Type installations
Out of the box short url support, with configurable format
Xaraya is compliant with RSS, CSS, XHTML, and W3C accessibility standards.
Xaraya reduces web site development costs by introducing sophisticated administration tools & services which separate form, function, content, and design. With Xaraya, you work in a simple, structured environment to rapidly develop your website with diverse content, including:
News Articles
Web Links Directory
Job Boards
Frequently Asked Questions
File Downloads
Photo Gallery
Member profiles
Web forums (message boards)
Articles Repository (i.e.: Knowledge base, cooking recipes, product reviews, news articles, etc.)
With more than forty active developers spanning five continents and ten languages, the Xaraya Development Team is a blend of some of the best and brightest developers in the open source community. We expect the best of one another. As a result, you can expect the best from Xaraya.
The name Xaraya was selected by the development team after an internal contest. Submitted by Marty Vance (Dracos), Xaraya does not really mean anything. We were looking for a name which was both interesting and unique. Xaraya certainly fit the bill.
That said, the word Xaraya is reminiscent of 'raya', the Spanish word for Manta Ray. The development team rather likes the nautical feel of that reference, particularly when one thinks of the Internet as an "ocean" of information. The Xaraya logo concept by Marty Vance, logo design by LaDalle Hunt.
It is not as difficult as it may look. In fact, saying Xaraya is actually sort of fun. Phonetically, it looks like this: Zuh-rye-ah.
Xaraya allows unprecedented levels of customization, it is therefore impossible to list every possible configuration. To provide familiarity with how Xaraya functions this Guide makes the following assumptions:
Note that these are purely assumptions for the purposes of this guide and are not limitations of Xaraya itself. All these options are configurable.
* That you plan to run a Community Site with both anonymous and registered visitors and:
Do not permit anonymous users to submit articles or post comments until they register.
Allow ALL users to read all articles & related comments on the site.
Allow Registered users to:
Submit articles to the site.
Post comments.
Site Administrator(s) have complete access to the site.
That you have created a web-readable "
images" directory in your Xaraya installation directory (<xarroot>/images). We will store any non-core and non-module images needed by the site in this directory.
That you already have a working webserver (Apache or IIS), PHP 4.1.2 or higher (4.2.x or higher is strongly recommended), an email subsystem, and a database installed, configured, and operating correctly. The installation and configuration of these tools are beyond the scope of this Guide. See http://www.php.net and http://www.mysql.com for assistance with these issues.
Table of Contents
Xaraya is distributed in three versions, the "Core", the "Base", and "Full". The most current version of Xaraya is always available at http://www.xaraya.com.
The "Xaraya Core" distribution is the absolute minimum installation of Xaraya.
The "Xaraya Base" distribution is the recommended installation for most users because it includes all the files of the "Base" distribution, plus several useful modules.
The "Xaraya Full" distribution contains more modules that further extend the functionality of Xaraya beyond the "Core" or "Base" installation.
Note that the Xaraya Full distribution is mere a convenience distribution. It is created as a snapshot from the current development tree. Use the Xaraya release module on the Xaraya website to get the latest module releases. Modules may be added to your site at any time after installation.
The Xaraya Base, Core, and Full distributions are available in ZIP (Windows) & TAR.GZ (Linux/OSX/BSD/Unix) format.
Download the Xaraya Base distribution distribution from the Downloads section of http://www.xaraya.com.
This document shows how to install & configure the Xaraya Base distribution on your website. Later in this document, you are taught how to integrate additional modules into your Xaraya Base installation.
Using the appropriate unarchiving utility, unarchive the Xaraya Base distribution into a temporary directory. Consult the manual for the unarchiving utility if you're unfamiliar with how to extract archives. For example, on Linux:
"
mkdir /tmp/xar""
cd /tmp/xar""
tar -xzvf
          </path/to/XarayaBase.tar.gz>
"
Rename the configuration file in /var/ from config.system.php.dist to config.system.php.
If you did not unzip or untar the distribution on your server, then move all the files now to your webserver (see below).
Run the installation wizard (see next part)
Go to the install script at /yourinstalldir/install.php
Follow the instructions as explained in the Xaraya installation guide which you can read online at http://www.xaraya.com/index.php/documentation/97
Move Xaraya Base from the temporary directory into your <webdir> (or a sub-directory of your <webdir>) to make Xaraya accessible to the web.
For example, under Linux, assuming that you wish to install Xaraya
into a sub-directory of <webdir> called
"xaraya", that your <webdir>
is "/var/www/html" (as it is on modern Red Hat
systems -- users of other operating systems should check their manual to
find the path to the correct <xarroot> location
and directory), and that you have extracted the XarayaBase archive to a
temporary directory called "/tmp/xar":
"
cd /tmp/xar/html""
mkdir <webdir>/xaraya" (or the correct <xarroot> for your installation)"
cp -r /tmp/xar/html/*
        <webdir>/xaraya
" (or the correct <xarroot> for your installation)
If you need to UPLOAD your site, ensure that the files are transferred in ASCII or Text format.
It may be necessary to set ownership & permissions for the directory where Xaraya is installed.
Now that you've installed the files in the correct place on your
webserver, you need to ensure that all the files can be read by the web
server. This should be the default situation, but if it isn't then consult
your operating system manual for information about changing that. The best
route is to change the group of the file and directories to the same group
used by the web server (NOTE: This presents a reduced security risk).
However the webserver user ID should not own the files, but the
webserver's group ID can have group ownership. This gives the advantage
that not everyone needs to have read access to the files - just those in
the webserver group. It is best if the webserver user ID does not own the
files itself because then the webserver could change the permissions of
the files without your knowledge and that could make it easier to hack the
site. Under Red Hat Linux, check the "User" and "Group" settings in
/etc/httpd/conf/httpd.conf to determine the user
& group values. For example, under Linux and assuming that your
user/group that is used by the webserver is user: "web" and group:
"apache":
"
chgrp -R apache
          <xarroot>
"
There is a file and some directories to which the web server must have 'write' access. They are:
"
<xarroot>/var/config.system.php": Set with "chmod 660 <xarroot>/var/config.system.php""
<xarroot>/var/cache/templates": Set with "chmod -R 770 <xarroot>/var/cache/templates""
<xarroot>/var/cache/rss": Set with "chmod -R 770 <xarroot>/var/cache/rss""
<xarroot>/var/cache/adodb": Set with "chmod -R 770 <xarroot>/var/cache/adodb"
It is likely that these permissions are correct already because the installer checks them for you.
Table of Contents
Once Xaraya has been moved onto your site (either via a copy command or an upload), you must install it before using the site. The most uptodate install guide can be viewed online at the Xaraya website. http://www.xaraya.com/index.php/documentation/97 is the official installation guide. In this chapter, we give a short overview on the installation procedures which might not be the most up to date one.
Note
If you are a Windows user and also use ZoneAlarm, be sure to DISABLE or EXIT ZoneAlarm before installing Xaraya on a Windows machine. ZoneAlarm may cause problems when installing Xaraya on a Windows machine.
From your browser, launch
http://www.mywebsite.com/xaraya/install.php (replace with the correct path
to your Xaraya installation's "install.php"
file).
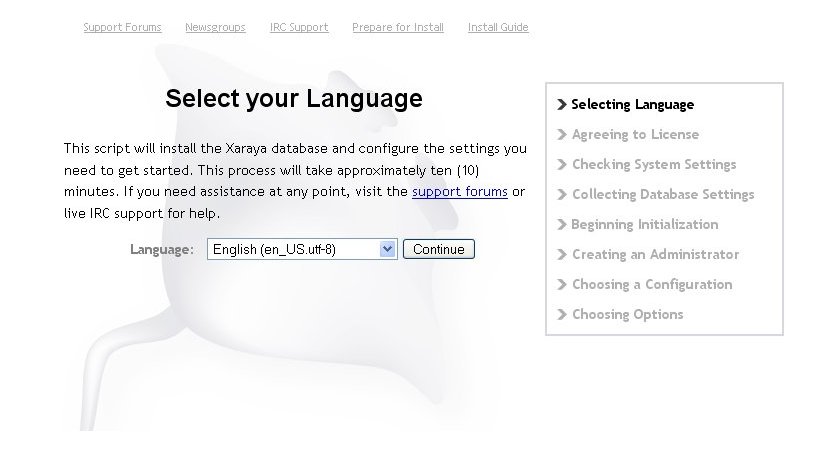
Select your language from the drop-down list. Click "".
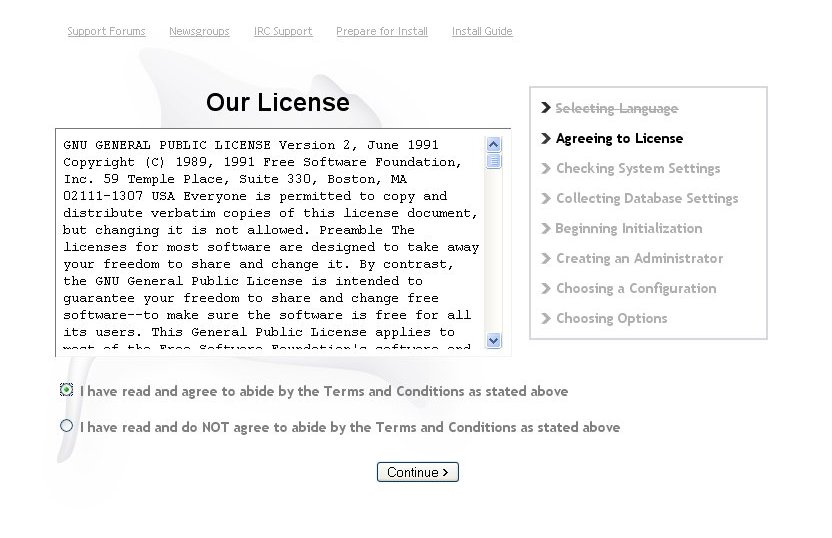
Read & agree to the license. Click "". If you do not agree to the license, you cannot install Xaraya.
This panel tells you if you have set up Xaraya correctly. It runs checks and determines whether you're running the correct version of PHP and whether the permissions are set correctly, and more. If there is a problem then follow the advice given. If no failures or warnings are reported, click "". If an error or problem is reported, fix it before continuing. Once you have fixed any issues, press "" to re-check the system settings.
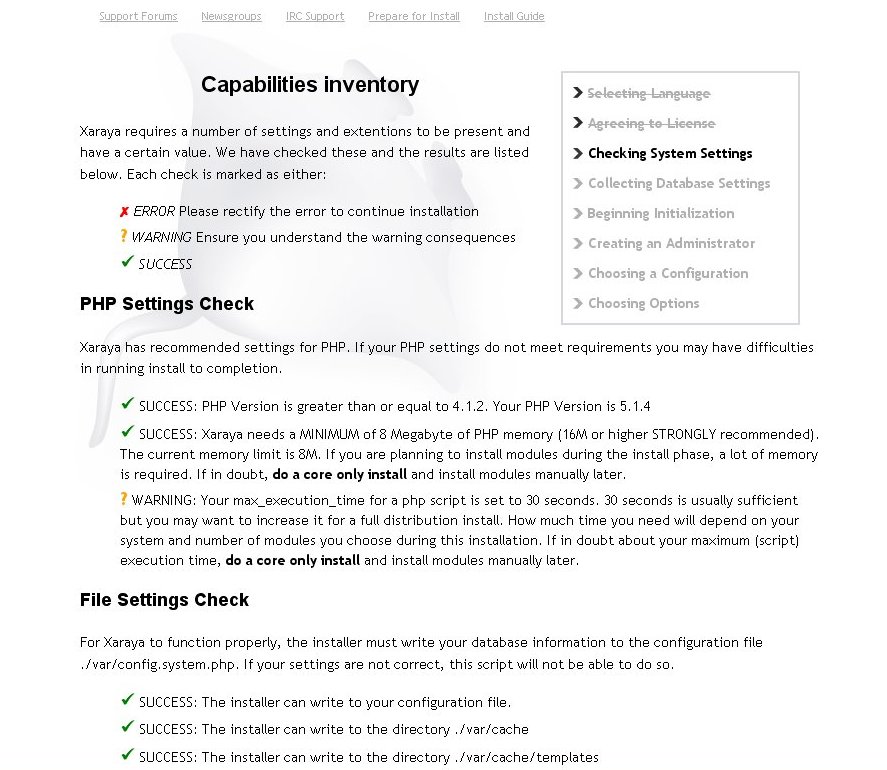
FAILURE: PHP Version is less than 4.1.2.
This error can be fixed by installing an updated version of PHP that is equal to or greater than version 4.1.2.
FAILURE: The installer cannot write to the configuration file. Please verify that your webserver has write access to the var/config.system.php file.
This error can be fixed by changing the permissions of the <xarroot>/var/config.system.php" file, for example, "
chmod 660
          <xarroot>/var/config.system.php
" if you use SSH to your install. If you use an FTP client to get your files onto the server, you can normally change the permissions on this file using that client. Make sure the user and group has write access to the config file during installation.FAILURE: The installer cannot write to var/cache/templates. Please verify that your webserver has write access to the var/cache/templates directory.
This error can be fixed by changing the permissions of the <xarroot>/var/cache/templates" directory, for example, "
chmod 770 <xarroot>/var/cache/templates".FAILURE: The installer cannot write to the var/cache/rss directory.
This error can be fixed by changing the permissions of the <xarroot>/var/cache/rss" directory, for example, "
chmod 770 <xarroot>/var/cache/rss".FAILURE: The installer cannot write to the var/cache/adodb directory.
This error can be fixed by changing the permissions of the <xarroot>/var/cache/adodb" directory, for example, "
chmod 770
          <xarroot>/var/cache/adodb
".
On the same panel as the PHP checks you can see the results from the database check. Xaraya is a system that needs a database to store the content and settings. You have a wide choice of databases you can choose from. The installer checks that you have at least on database connection available.
Warning: you do not have a supported database type available. This warning means that Xaraya has not reckognised your database type. You can continue to the next step, but you will have to edit the database connection settings manually in the config.system.php file.
You are advised to modify your server environment as such that you will have at least one of the mentioned databases available. If this is true, you will get a green light from the installer:

Review (and edit if necessary) the Database Settings on the next panel. The default database settings displayed on this panel come from the 'config.system.php' file we edited above.
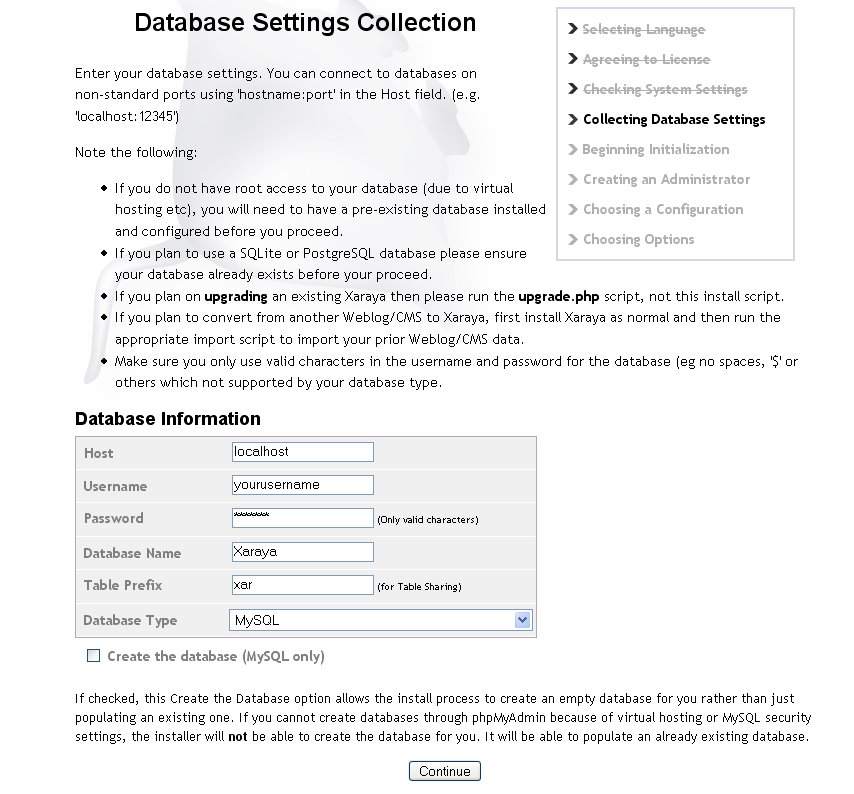
The database types currently supported by Xaraya are MySQL or PostGRESQL. Choose the one that you are using.
Click "" to have the Xaraya installer attempt to create the database. Click "".
If Xaraya cannot create the database for you, see Appendix B: Creating the Xaraya database via phpMyAdmin.
If you press continue, and you have already got your database available, you will see a warning that the installer will overwrite all tables present that have the same prefix:
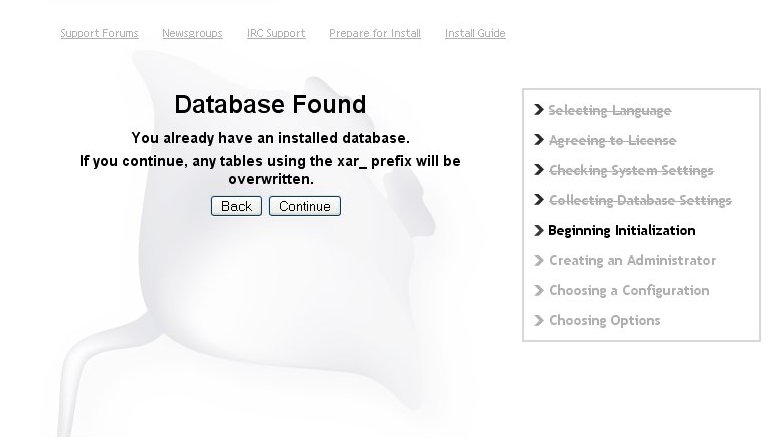
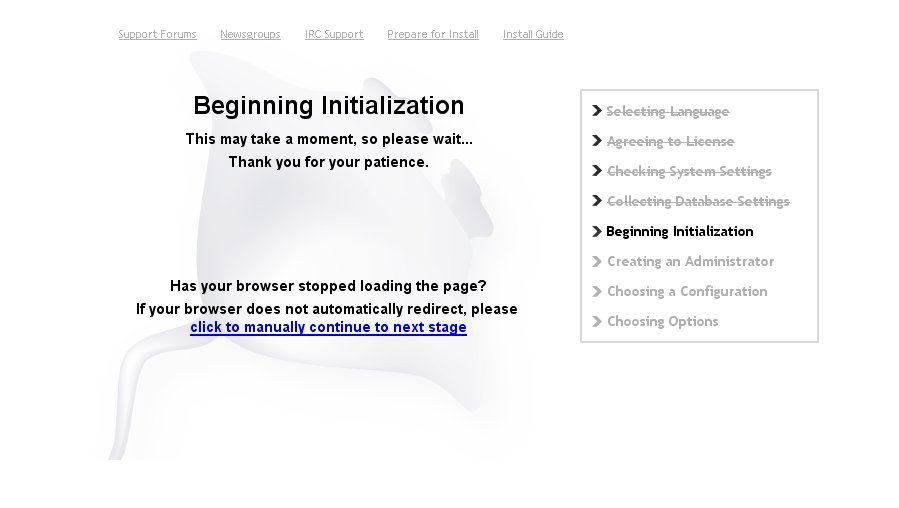
Normally, you should be able to continue, to the initialisation phase:
This panel creates the site Administrator's account. This account has unlimited access to the site and is used to control the site.
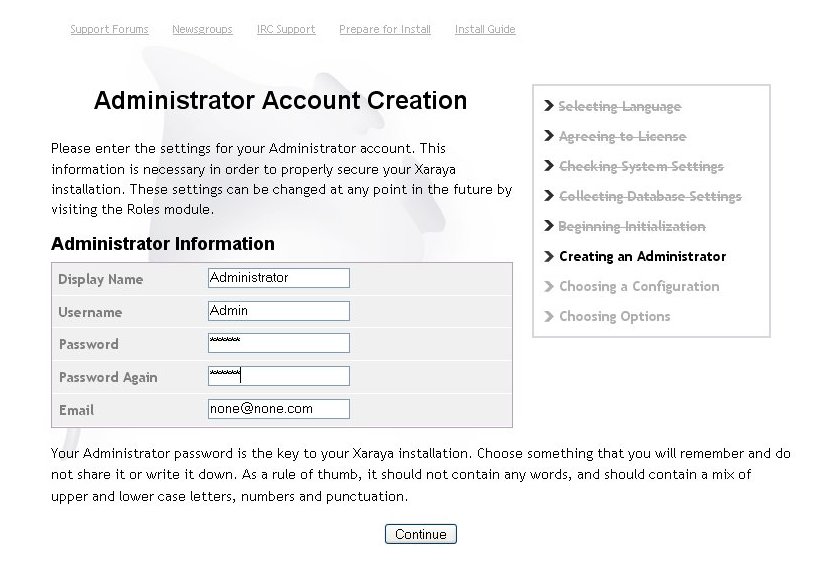
Enter Full Name -- the Administrator's full name.
Enter Username -- (required) used by the Administrator to log into the site. It is strongly advised to keep this to 'admin'.
Enter Password -- (required) used by the Administrator to log into the site.
Enter Password again to verify (required).
Enter Administrator Email address (required).
Click "".

'' prepares a site where Registered users have read access to all modules and Anonymous users can either read non-core modules or be limited essentially to the first panel (depending on the configuration option selected at installation).
'' configuration is very restrictive where users who aren't logged in (Anonymous users) are limited to the first panel. Registered users have read access to non-core modules. There is also another group of users called 'Oversight' that have Administrative rights to everything except the Roles and Privileges modules.
'' assumes a site where Anonymous users can do more than just read. They have the option to post comments to articles in non-core modules, while Registered users can be given moderate rights to all modules.
'' is the minimal install. This install will only install the necessary parts to get Xaraya running.
From the list of Available Configurations, select "Community Site". Click "Continue".
Once you've chosen your configuration from the Available Configurations, specify which modules you wish to initialise via the installer. The listed modules are a subset of all the modules available for Xaraya, but this provides a nice starting place. For this example, select the installation defaults unless you have specific reasons to select otherwise.

If you make a mistake or forget to install a module that you need, don't worry -- modules can be installed or removed at any time.

There are two steps that are recommended after installation to increase the security of the website.
To increase site security after installation, delete the '
install.php' and 'upgrade.php' files from the Xaraya installation directory ("<xarroot>"). These two files are not needed for normal site operation. For example, on Linux:"
cd <xarroot>""
rm install.php""
rm upgrade.php"
Change the file permissions for
<xarroot>/var/config.system.phpto "444" (read-only). This can be done by using the command "chmod 444 config.system.php" from within the Xaraya's/vardirectory. For example, on Linux:"
cd <xarroot>/var""
chmod
        444 config.system.php
"
After the first installation, Xaraya's interface is presented with the Xaraya Classic theme. This theme is shipped with every package and is meant as a start for your new website.
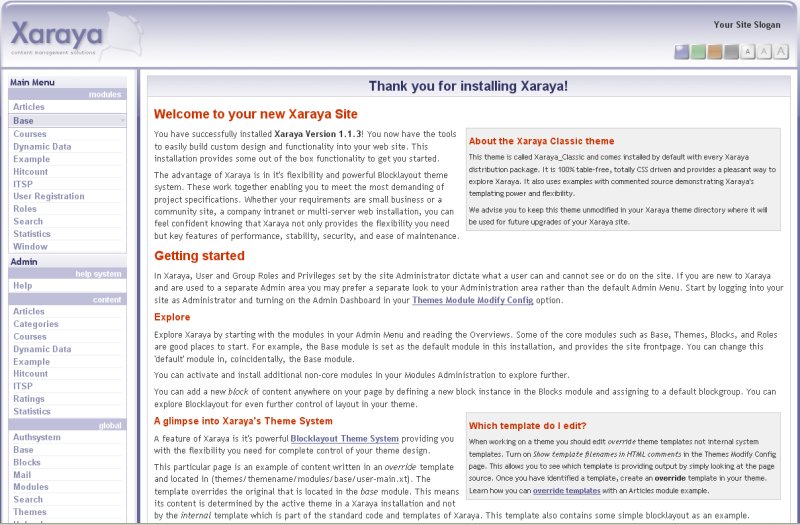
At the top is the title bar of the browser which says, "Your Site Name :: Base :: Welcome" by default (not in the figure). Below that, at the top left of the screen, is the Xaraya logo which is part of the 'header' region. Click the logo at any time to go to the front page of your site. To the right you see the sentence "Your Site Slogan". This is the configurable site slogan that you can set.
Down the left side, since you're logged in as an Administrator, appears the Administration menu which may be divided into groups (Global, Content, Users & Groups, etc.) depending on your configuration selection in Admin->Adminpanels->Modify config. The Administration menu appears only for members of the Administrator group; regular users (anonymous and registered users) do not see this menu.
The first item in the menu is called "Help". This title is available to admins at any page and will redirect you to the help page for the current function. At the bottom of the Administration menu there can be the "[admin logout]" link which should be used to log out of the site when you're done administrating Xaraya. This link is not shown by default. Above the Administration menu is the Main Menu. This Main Menu has items that can be shown to regular users. The number of items normal users can see depend on their privileges. You, as the current administrator, will be able to see all items.

At the bottom of the browser window is Xaraya's 'footer' region. After installation, you'll see the Copyright statement, CSS tableless design button (click it to check the theme for true tableless design), the xhtml button, the CSS validator button and the "powered by Xaraya" logo.
The large pane that uses most of the browser window is the content region. This is where the majority of site information is displayed to users. The first line of the first large text block shows you the version of Xaraya you use (1.1.3 in the image).
Everything you see in Xaraya is configurable. Xaraya's powerful theming engine, BlockLayout, makes it easy to customize your site to your exact specifications. The colors, the fonts, the placement of information is all configurable by changing themes or templates on your Xaraya site. Don't like the Administration menu on the left? It's quite simple to move it. Want to put your own logo in place of the Xaraya logo at the top? No problem! Read on to learn how!
For the remainder of this document, we indicate where to click by using "click-paths".
"Click-paths" are a series of clicks you make in your web browser. An example of a "click-path" is indicated as follows:
Admin->Blocks->View Instances
This example click-path instructs you that while logged in as the Administrator ('Admin'), click the link for Blocks and finally on the next page click 'View Instances'. Generally, the click-path is followed with a specific instruction, as you see in REMOVING THE REMINDER BLOCK, below.
There is a REMINDER block that is displayed on the left side menu of a newly-installed or updated Xaraya site which reminds the Administrator to delete the install.php and upgrade.php files from <xarroot>. Since we've already deleted those files, we can safely remove the REMINDER block. Follow the steps below to remove the REMINDER block.
Admin->Blocks->View Instances:
In the line with REMINDER in the title, click the "Delete" operation and "OK" to confirm deletion. The REMINDER block is deleted.
Table of Contents
Now that we've installed Xaraya, we should begin to configure it. The pages in this section should help guide you through some of the more basic configuration options and start you on the path to customizing your Xaraya site.
Every content system needs configuration. The configuration of Xaraya to your needs is done via options of the modules you have installed. The configuration of the Xaraya installation is a job for the Administrator of the site. Hence, all global configuration options are available via the administration area of Xaraya. In the Installation we have just done, you can access the administration options via the admin menu. We will use clickpaths to show you where to go. A clickpath contains all the seperate clicks you need to do. In this chapter, most clickpaths will start with Admin, meaning you will find the option in the Admin menu.
The Base module holds the base configuration of you Xaraya installation. Base is the name for the module that defines the standard behaviour of your installation, the Base options. Base is part of the Core of Xaraya and cannot be removed.

Admin->Base->Modifyconfig: This panel allows you to change some of the settings controlling the core behaviour of the site.
Website display configuration:
For this example, set the Default Module to "" so that the articles module is displayed when a visitor hits the site. Select "" from the drop-down list of available modules.
Default Module Type: From the drop-down list, "".
Default Module Function: ""
Default Theme Directory (relative to <xarroot>): ""
CHECK "Enable Short URL Support" -- this is the 'master switch' for Short URL support on your site.
CHECK "Fix HTML Entities" -- this will ensure that characters such as the copyright sign and international symbols like umlauts are displayed correctly.
Sessions and Security
Security level: From this drop-down list, configure the general security level for your site. If a user CHECKS the "Remember Me" box displayed in the login panel when logging in, the user's session is not purged for the duration set in the settings below. If a user does NOT check the "Remember Me" box when logging in, they must log into the site each time they visit. For our example, select "Medium" security.
High: Users must log on each time they return to the site.
Medium: Users stay logged on for the number of days specified in Session Duration, below.
Low: Users stay logged in 'forever' (well, it's not actually FOREVER, but a really long time!).
Session duration (in days): This setting determines how long (in days) a user's session will last before it expires, forcing the user to re-log in with their existing username and password. Set the session duration to "
7" days.Session inactivity time out: If Xaraya detects that a user's session has been idle for a certain period of time and that the Security level is High or Medium, it will expire the session. This setting determines how many minutes Xaraya will wait before expiring the session due to inactivity. Set the inactivity time to "
90" minutes.Click "" to save changes.
Languages and Locales
This tab shows the available locales on your site. You can download additional locales/language packs from the Xaraya website and enable them here. You can also choose the way your site deals with multiple languages. For now, choose the one language setting.
Check the locales you want to activate. For now, leave the US locale active.
Set the standard locale to use. This is the locale pack (languages+ specific settings) that the site will use unless a user chooses otherwise. Leave this option set to US.
Other
This tab holds all other options you can set in the Base module.
If you have installed a graphical text editor like TinyMCE on your site, then set it here as the default WYSIWYG editor.
A WhatYouSeeIsWhatYouGet editor is a friendly way to input text. Editors that you will allow to edit or create texts on your site will not have to worry about the formatting, as this is done in the editor much like an offline graphical text editor.
Load Historical functions should normally not be needed. Deprecated Xaraya functions are put in a set of historical functions, which can be activated via this checkbox. Only turn this on when needed.
Proxy. If needed, set your proxy server in here. Do not forget to set the port to your proxy.
The timezone setting is the timezone that the site will use to display times. If for instance your website is set for an audience in a country that is not on GMT, then you can choose to have a standard offset when displaying times.
Release number to display: This is the number of extension releases to show in the Extension Release page. You will notice that you can set the display number in many places. This is one of them. When the number of items is more than this setting, they will not be shown (eg in Release Extensions), or Xaraya will produce a pager (eg in Articles).
Admin->Base->System Information: This panel displays a variety of information about the PHP installation on the site. Should you ever need to determine what version of PHP the site is running, or what modules are compiled into PHP, this is where to find that information. This information may be helpful if you need to submit a Xaraya bug report or a feature request.
Admin->Base->Extension Releases: This panel syndicates a news feed from www.xaraya.com listing recent module and theme releases. This information is very relevant if you use modules or themes that have a new version released.
Once the Base module settings are complete, you can move on to the other modules you will use.
First we will set the way you will see your site in the themes module, then we will start adding the first content.
Xaraya uses so-called themes to display your content. Themes are packages with templates and css files that dictate how the data from the database is eventually displayed to your users. You can download themes from the Xaraya website via the release module. They are also called extensions, as they extend the Xaraya Core.
Note
Visit the Xaraya themes website for recent themes: http://themes.xaraya.com/
Themes are installed in the /themes/ directory of your installation.
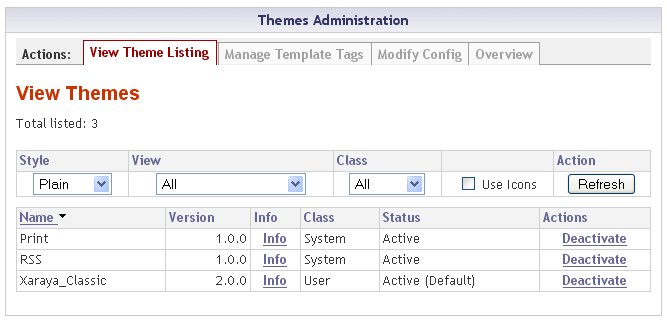
But first let's see which themes are available now. Go to the admin>Themes>View Themes. You will see that Xaraya_Classic is set Active and as the Default theme. You will also see the RSS theme and the print theme. These settings are ok for now. Xaraya_Classic is a nice theme to see how things work; we will use it throughout this manual. You don't have to worry yet on your own theming. Read more on themes in the next chapter.
The Modules module shows all the available modules. It also configures the way they communicate with eachother via hooks. The hook configuration (we willl explain hooks later on) is the second option in the admin menu for the Modules module.
Go to Admin->Modules. The admin list function will show you all the modules available in your installation, their state and give you short links to their configuration. For this moment, make sure the articles module is installed. If it is not installed, click on the Install command and follow the instructions.
Note
The module list is the same as you will see in your filesystem under /modules/ . If you have downloaded and placed a new module in there, but cannot see it in the module listing, then press the "reload" button. This will reload all present modules.
If you like a fancy view on your module listing, try the Style "Icons" method. It will show icons instead of simple texts for the commands.
That is it! You are now ready to follow the rest of the Guide.
Table of Contents
Xaraya displays information to site visitors by using TEMPLATES. Templates are available in the following varieties: "function templates", "block templates", "page templates", "block group templates", or module templates.
Introduction here
"Function Templates" are Content Layout templates that display a view of a particular function of Xaraya. Xaraya separates function templates for users and administrators. User function templates have "user-" at the beginning of the template filename, and administrator function templates have "admin-" at the beginning of the template filename. For example, one of Xaraya's default function templates is called '
user-display-news'. This template defines the layout of the news area in your page as it is displayed to users of the site. The administrator view is defined by the 'admin-display-news' template)."Page Templates" are Content Layout templates that display a view of a whole page, which can include function and block templates. These files reside in the
<xarroot>/<themes_dir>/<theme_name>/pagesdirectory."Block Templates" are Block Layout templates that display a view of a particular block within Xaraya. Block templates exist in
<xarroot>/modules/<module_name>/xartemplates/blocks, creating directories as necessary (give new directories appropriate permissions). So, for the articles module, the block templates exist in<xarroot>/modules/articles/xartemplates/blocks.Customize default block templates with the equivalent "
.xt" override template in the<xarroot>/<theme_name>/modules/<module_name>/blocksdirectory, creating directories as necessary (give new directories appropriate permissions). You also have specific override custom block templates that you name when you create a new block. The name of the template file (without the ".xt" extension) is entered into the custom template field when creating a block instance. These specific override template files are in the<xarroot>/<theme_name>/blocksdirectory."Block Group Templates" are Block Layout templates that contain a collection of individual block templates. The Block Group template files reside in the
<xarroot>/<themes_dir>/<theme_name>/blocksdirectory."<module_name>.xt Template" is a Content Layout template that overrides the default page template for <module_name>. These files reside in the
<xarroot>/<themes_dir>/<theme_name>/pagesdirectory.
Function templates, block templates, page templates, and block group templates can be defined as either site-wide or theme-specific. It is advisable to make template files theme-specific by default. By doing so, you minimize the amount of work necessary if you decide to add additional themes to the site later.
Site-Wide templates: A site-wide template is used to change the look & feel of the site, no matter what theme is being used. Site-wide templates are overridden by theme-specific templates, if one exists. These files exist in the
<xarroot>/modules/<module_name>/xartemplatesdirectory.Theme-specific templates: Theme-specific templates change the look & feel of the site only when displayed through a particular theme. These files exist in the
<xarroot>/<themes_dir>/<theme_name>/modules/<module_name>directory.
If template files exist in both site-wide, theme-specific locations, the theme-specific templates take precedence over site-wide templates.
Make your selected theme load as default by selecting it in the Admin->Themes->Modify config panel.
View Themes:
Style: Defines the display of the module list. Select the display style from the drop-down list.
Plain (fast): Default. Displays an unadorned listing of Themes. Options (activate, deactivate, etc.) are listed as clickable text.
Pro Icons: Displays a listing of Themes adorned with icons. Options (activate, deactivate, etc.) are listed as clickable icons, with a legend at the bottom.
Developer: Not currently implemented.
View: To limit the types of themese that are displayed, select from the drop-down list.
All Themes: Default. Shows all themes on the system.
Active: Shows only themes that have been activated.
Inactive: Shows only themes that have not been activated.
Uninitialized: Shows only themes that have not been initialized.
Sort by:
Name [a-z]: Sort the display in alphabetical order of theme name.
Name [z-a]: Sort the display in reverse alphabetical order of theme name.
Regenerate: When a theme is added to or deleted from the site's theme directory, the system needs to 'Regenerate' the file structure to recognize the change in the theme directory. To force the system to regenerate the themes list, CHECK "Regenerate" and click "". Regeneration is necessary only when themes have been added to or deleted from the site's theme directory.
Click "" to reload panel with new display settings.
Theme list:
Name: The name of the theme as it is displayed to users.
Version: The version number of the theme.
Reg.ID: Shows the Registered ID of the theme. Each theme is assigned a unique Registered ID.
Upgrade: If an upgrade to this theme is available, you are notified in this field. If no upgrade is available, "n/a" is displayed.
Info: Shows information about the theme, including creator, description, installation directory, version, and more.
Status: Shows the status of the theme.
Actions:
Initialize:
Deactivate:
Modify config: This panel allows modification of configuration options for this module.
Site Display Options:
Site Name - Module Name - Page Name: Displays as "
Your Site Name :: Themes :: Your Site
                    Slogan
" by default.Site Name - Page Name: Displays as "
Your Site Name :: Your Site
                    Slogan
" by default.Copyright: Defaults to "
©
                    Copyright 2003 <administrator
                    name>
". Change the text as necessary.Footer note: The 'footer' is displayed at the bottom (the 'foot') of each and every page on your site. This is an excellent place to give credit, state copyright, or put links that you wish to appear on every page of the site.
Page Title Options
Module Name - Page Name - Site Name: Displays as "
Themes :: Your Site Slogan :: Your Site Name"Page Name - Module Name - Site Name: Displays as "
Your Site Slogan :: Themes :: Your Site Name"Theme Driven: The page title order is determined by the theme's configuration.
Page Title Options
Page Title Separator:
Page Title Order: Determines how the page title is displayed. The results of the display options are:
Site Name - Module Name - Page Name: Displays as "
Your Site Name :: Themes :: Your Site Slogan"Site Name - Page Name: Displays as "
Your Site Name :: Your Site Slogan"Module Name - Page Name - Site Name: Displays as "
Themes :: Your Site Slogan :: Your Site Name"Page Name - Module Name - Site Name: Displays as "
Your Site Slogan :: Themes :: Your Site Name"Theme Driven: The page title order is determined by the theme's configuration.
Template Debugging Options
Show template filenames in HTML comments:
Click "" to save changes.
Certified Releases:
Within Xaraya, Blocks act as building blocks to construct your site. Blocks are provided by the core Xaraya engine, or virtually 'bolted on' by modules. Core Xaraya blocks provide basic system functionality such as menus, while modules provide enhanced functionality or additional features. Using Blocks, the Administrator can customize the look of the site by adding, removing, or changing the position of Blocks.
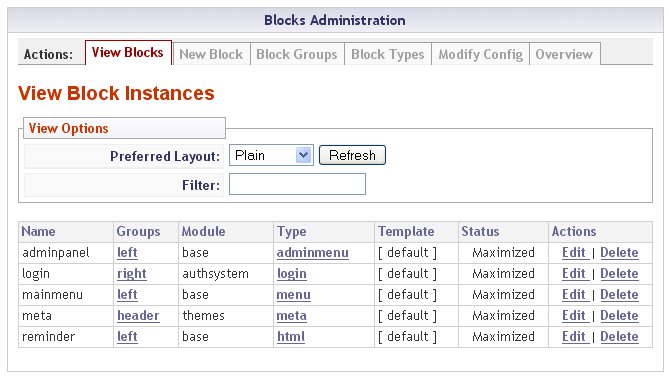
Go to Admin->Blocks and use the sub-functions to add, edit, view, or delete Blocks from your website. The Blocks display is sorted by Group.
View Types: This panel displays every block type that is available on your site. View Instances (below) displays block types that you're currently using on your site.
Module: Click the name of the module to go to its Administration panel.
Type: The types of blocks provided by a particular module. See Add Instance, below, for a listing & description of the block types included with a default Xaraya installation.
View Instances: This panel displays block types that are currently in use on your site. View Types (above) displays every block type that is available for use on your site.
Group: The Block Group to which the block instance is assigned. To edit Block Groups (including the ordering of block instances within a Group), click the Group name. For example, to edit the "center" group, click "".
Note
Block Groups are Theme dependent. The Block Groups listed below are based on the Xaraya_Classic theme. Block groups are defined in the main template of the theme.
Left: The new block instance is displayed on the left side of the site.
Right: The new block instance is displayed on the right side of the site.
Header: The header group gets put inside the <head></head> in the template. This is useful, for example, to place JavaScript or other miscellaneous features on the site.
Syndicate:
Admin: The new block instance is displayed in the admin panel of the site. Items in this panel are available only to site administrators.
Center: The new block instance is displayed in the center panel of the site.
Topnav: The new block instance is displayed in the menu navigation at the top of a site.
Title: The title for the block instance. Alphanumeric text, maximum of 256 characters. Beware to not use special characters in the block title. A ':' can cause problems with the privilege you will create later on.
Type: The type of the block instance. To view a listing of all available block types, click any block type or click Admin->Blocks->View Types.
Template: You can define custom display templates for each Block. To tell Xaraya to use a different template for a Block, enter the name of the template file in this field. Enter the filename without the "
.xt" extension. To use the default page template, leave this field blank. See TEMPLATES IN XARAYA for a thorough discussion of templates.State: Default state for the block instance.
Hidden: The block instance is not displayed. Setting a block instance's state to "Hidden" makes the block instance inactive.
Minimized: Not all block instances support the Minimized state. The block instance is presented minimized. If the site visitor wishes to display the block instance, it can be maximized.
Maximized: Default. The new block instance is fully displayed.
Operations: These functions permit editing or deleting of block instances.
Edit:
Title: Edit the title for the block instance in this field. Alphanumeric text, maximum of 256 characters.
Type: Displays the type of the block instance.
Group: Modify the placement of the block instance by selecting the group from this drop-down list. The block instance will be displayed in this group.
Click "" to save changes.
Template (optional): Type the filename of the template to be used when displaying this block instance. The file must exist in one of two places:
Module-dependant: Module-dependant file must exist in
<xarroot>/<module_name>/xartemplates/blocksTheme-dependant: Theme-dependant file must exist in:
<xarroot>/<themes_dir>/<theme_name>/modules/<module_name>.Theme dependant templates override module templates in
<xarroot>/<themes_dir>/<theme_name>/modules/<module_name>Theme dependant templates override module blocks in
<xarroot>/<themes_dir>/<theme_name>/modules/<module_name>/blocks
Default state: From this drop-down list, modify the default state for the block instance.
Delete: If you wish to delete a block instance, click the "" operation next to the block instance to be deleted. You are asked to confirm your intention to delete on the next page. Press the "" button to delete the block instance.
View Groups: Block Groups are Theme dependant.
Name: The name of the block group containing member block instances.
Members: The block instances that are contained in a group, in the order they are presented on the site.
Template: If a display template is used for the group, the name of the template is listed, otherwise this field is blank.
Operations: These functions permit editing or deleting of block groups.
Edit:
Name: Edit the group name in this field.
Members: Change the order of presentation of member block instances by left-clicking on the block instance to be moved and clicking on the UP or DOWN arrows to move the block instance up or down.
Template: You can define custom display templates for each Block Group. To tell Xaraya to use a different template for a Block Group, enter the name of the template file in this field. Enter the filename without the "
.xt" extension. To use the default page template, leave this field blank. See TEMPLATES IN XARAYA for a thorough discussion of templates.Click "" to save changes.
Delete: If you wish to delete a block group, click the "" operation next to the block group to be deleted. You are asked to confirm your intention to delete on the next page. Press the "" button to delete the block group. OTTO: What happens to Block Instances in a Group if the Group is deleted?
Add Instance: Click Add Instance to begin adding a new block instance to your site. Adding a block instance is a two-step process. First, complete the fields below in the following panel. Click "" to add the new block instance. Secondly, in the new panel that appears, configure block-specific options.
Title: Enter the title for the block instance in this field. Alphanumeric text, maximum of 256 characters. The Title is not always displayed to site visitors; sometimes a block instance overrides this Title field and displays its own block title. However, Title text is displayed in Admin->Blocks->View Instances.
Type: From this drop-down list, select the block type you wish to add. The contents of this drop-down list will vary based on the modules that are active in your Xaraya installation. View a listing of available block types by going to Admin->Blocks->View Types.
Note
The following sub-items are common across all block types. These items are not repeated in the listing & description of each block type, below.
Title: The title of the block instance.
Type: Selected when a new block instance is added, this indicates the block type.
Group: The group to which the new block instance will be added. See the description of Groups, above.
Template (optional): Type the filename of the template to be used when displaying this block instance. The file must exist in one of two places:
Module-dependant: Module-dependant file must exist in
<xarroot>/<module_name>/xartemplates/blocksTheme-dependant: Theme-dependant file must exist in:
<xarroot>/<themes_dir>/<theme_name>/modules/<module_name>.Theme dependant templates override module templates in
<xarroot>/<themes_dir>/<theme_name>/modules/<module_name>Theme dependant templates override module blocks in
<xarroot>/<themes_dir>/<theme_name>/modules/<module_name>/blocks
Default state: From this drop-down list, select the default state for the new block instance.
Group: From this drop-down list, select the grouping to which the new block instance will be added. See the description of Groups, above.
Click "" to save changes.
Add Group: Block Groups are Theme dependant.
Name: Enter the name for the new Block Group in this field.
Default template (optional): Type the filename of the template to be used when displaying block instances in this block group. The file must exist in one of two places:
Module-dependant: Module-dependant file must exist in
<xarroot>/<module_name>/xartemplates/blocksTheme-dependant: Theme-dependant file must exist in:
<xarroot>/<themes_dir>/<theme_name>/modules/<module_name>.Theme dependant templates override module templates in
<xarroot>/<themes_dir>/<theme_name>/modules/<module_name>Theme dependant templates override module blocks in
<xarroot>/<themes_dir>/<theme_name>/modules/<module_name>/blocks
Click "" to save changes.
Below is a listing of the available block types that are available for use in Admin->Blocks->Add Instance within the default Xaraya installation.
Block instance containing the Administration menu. The Administration menu is displayed only to users with Administrative privileges. It holds all the links to the administration parts of modules and to the settings of the Xaraya Core.
This module shows a short list of waiting content. Waiting content is the content that needs to be approved by an authorised editor (the administrator in many cases). The block shows newly added content from eg the articles module.
Block instance that displays featured articles on the site. The site administrator defines the articles to feature.
Articles Filter: The articles filter section of this panel allows the site administrator to filter the available articles on the site to simplify the task of finding the desired article.
Publication Type: From this drop-down list, select the Publication Type under which the featured article is published, or select "" to deactivate this filter.
Category: From this drop-down list, select the Category in which the featured article is published, or select "" to deactivate this filter.
Status: From this drop-down list, select the status of the featured article, or select "" to deactivate this filter.
Limit: Enter the number of articles you wish to see in the Featured Article drop-down list & Alternate Title box. For example, to return 25 articles, enter "
25" into this box.Click "" to filter articles.
Featured Article: From this drop-down list, select the specific article to be featured.
Alternate Title: If you would like to display an alternate title for the featured article, enter the alternate title in this field and the alternate title is displayed instead of the article title in the block instance. If this field is empty, the article's title will be displayed.
Show Summary: If you would like to display a summary of the article (usually the Introduction block of the article), CHECK this box. The article title (or Alternate Title) is displayed followed by a summary. UNCHECK this box and only the article title (or Alternate Title) is displayed.
Additional Headlines: To select additional featured headlines, select the headline(s) from this box.
Select a single headline by left-clicking on it.
Select a range of headlines by left-clicking on the first headline in the range, holding down the SHIFT key, and left-clicking on the last headline in the range.
Select individual headlines by holding the CTRL key while left-clicking on the individual headlines to add.
Sort by: This sort option defines the way items are displayed on this panel.
Hit Count: Sort by the number of times an article has been viewed. Articles with more hits are displayed before articles with fewer hits.
Rating: Sort by the rating of an article. Articles with higher ratings are displayed before articles with lower ratings.
Date: Sort by the date of an article. Newer articles are displayed before older articles.
Show sort value: Displays the value of the "" parameter (above). For example, if "" is set to "" and this field is CHECKED, the number of hits for an article is displayed after the article title in the block instance. If you do not want the sort value (hits, in this example) displayed, UNCHECK this field. Likewise, if "" is set to "" and this field is CHECKED, the publication date of an article is displayed after the article title in the block instance.
Show summary: If CHECKED, article titles are displayed with summaries. If UNCHECKED, article titles are displayed without summaries.
Click "" to save changes.
Block instance that displays articles that are related (same category, same author) to the current article being displayed. This block instance functions only when an article is being displayed; it is not useful on the front page of a site.
Number of items: Enter the number of related items to be displayed in this field. For example, to display 5 related items, enter "
5" here.Click "" to save changes.
Block instance containing the top items for a particular Publication Type (or for the currently-displayed Publication Type) based on administrator-defined criteria.
Number of items: Enter the number of items to be displayed in this field. For example, enter "
5" to display the top 5 items.Publication Type: From this drop-down list, select the Publication Type for which the top items are displayed.
Select "" from the drop-down list to display the top items for whatever Publication Type the user is currently viewing. For example, if this field is set to "" and the user is viewing the '' Publication Type, Xaraya will display the top items in ''. If the user then switches to the '' Publication Type, Xaraya will display the top items in ''.
Sort by: From this drop-down list, select the sort criteria that will be used to select articles for display in this block instance.
Hit Count: Sort by the number of times an article has been viewed. Articles with more hits are displayed before articles with fewer hits.
Rating: Sort by the rating of an article. Articles with higher ratings are displayed before articles with lower ratings.
Date: Sort by the date of an article. Newer articles are displayed before older articles.
Show sort value: Displays the value of the "" parameter (above). For example, if "" is set to "" and this field is CHECKED, the number of hits for an article is displayed after the article title in the block instance. If you do not want the sort value (hits, in this example) displayed, UNCHECK this field. Likewise, if "" is set to "" and this field is CHECKED, the publication date of an article is displayed after the article title in the block instance.
Show summary: If CHECKED, article titles are displayed with summaries. If UNCHECKED, article titles are displayed without summaries.
Click "" to save changes.
Block instance that includes a file from the website.
File: OTTO -- where is the file location?
Block instance that displays HTML-formatted code. Permitted HTML codes are defined in Admin->HTML.
Block Expiration: From this drop-down list, select the expiration date for this block instance.
Unlimited: This block instance does not expire, and will always be displayed.
1, 2, 5, 15, 30 Days: Select the number of days that this block instance will be displayed. When the block expires, it is not displayed anymore.
HTML: Enter the HTML-formatted content in this block. Permitted HTML codes are defined in Admin->HTML.
Click "" to save changes.
The templates for the menu are located in base/block and have the naming convention of menu-innertemplate.xt. Note the 'menu' part in there. Substitute innertemplate with the name you want to use and add that as the ;innertemplate in the block configuration.
This block instance creates a (user) menu for the site. Menu items can be modules that exist on the site, URLs to other on-site resources, or complete URLs to off-site resources. At install, you will have one instance of this block: the mainmenu block.
Display modules: CHECK this option to display all active modules that are installed in
<xarroot>/modulesthat have user menu items available.Marker: In this field, define the marker to be displayed next to the active menu item. Leave this field blank to disable display of a marker.
Menu Content:
Title: Enter the title of the menu item. The title is displayed to users.
URL: Enter the URL to the resource. If the resource is on your site, you may enter the path to & filename of the resource. If the file is external to your site, be sure to enter a complete URL, including "
http://". If the resource is a module, enter the case-sensitive module name in brackets ("[" and "]"). For example, to add the Polls module, type "[Polls]" in the URL field.Description (optional): Enter an optional description of the menu item in this field. The description is presented as a mouse-over (if supported by the user's browser).
Delete: CHECK this box to delete a menu item.
Note
No confirmation is requested before the menu item is deleted.
Child: CHECK this box to make the item a child of the item above it.
Insert blank after: To insert a blank menu line, CHECK this box on the line with the menu item after which you would like to insert a new line.
Click "" to save changes.
Block instance that executes a PHP script within the site. Meant to include small blocks of PHP code, like a Stock Ticker from http://www.hotscripts.com or similar.
Block instance that displays the text contents of the Content field.
Block Expiration: From this drop-down list, select the expiration date for this block instance.
Unlimited: This block instance does not expire, and will always be displayed.
1, 2, 5, 15, 30 Days: Select the number of days that this block instance will be displayed. When the block expires, it is no longer displayed.
Text: Enter the text content in this block. This text will be displayed to site visitors.
Click "" to save changes.
Block instance that displays a listing of site categories as defined in Admin->Categories.
Category Layout:
Tree (side block): Displays a vertical 'tree' structure of the site's categories; most useful along the side of a page.
Crumbtrail (top block): Displays a 'crumb trail'-type horizontal structure of the site's categories; most useful at the top of a page.
Prev/Next (bottom block): Displays previous- and next-type links; most useful at the bottom of a page.
Show count per category: If you would like to display the number of items per category, CHECK this box. If you do not want to display the number of items per category, UNCHECK this box.
Show children:
None: Show no children.
Direct children only:
All children: Show all children.
Click "" to save changes.
Block instance that displays an ephemerid for today, if the Ephemerids module is active and if an entry exists for today. No additional configuration options.
Block instance that displays an admin-selected RSS feed, if the Headlines module is active and has RSS feeds configured.
RSS File URL: From this drop-down list, select the RSS feed to display in this block instance. See Admin->Headlines->Add to add an RSS feed to your site for syndication.
Display article descriptions: If this box is CHECKED and supported by the feed, short article descriptions are be displayed below the syndicated article titles. If UNCHECKED, only article titles are displayed.
Click "" to save changes.
If the Messages module is active, this block instance displays notification of waiting private messages. If new private messages are waiting, a count of total and unread private messages is displayed with a link to read new private messages. If no new messages are waiting, "No Unread messages in mailbox" is displayed. No additional configuration options.
Block instance that displays a site Poll.
Poll to display: From this drop-down list, select the poll you wish to be displayed in this block instance, or select "" to select the most recently-added poll.
Click "" to save changes.
Block instance that displays a random quote from the site's quote database, if the Quotes module is active. No additional configuration options.
This block will allow a user to choose the language that the site will use for display.
Block instance that displays a count of users & guests who are currently visiting the site. No additional configuration options.
Block instance that displays a Search box on the site. No additional configuration options.
Block instance that displays a random smiley icon and the ASCII text needed to generate the smiley within site content. No additional configuration options.
Block instance that defines metadata for your site. Information in this block instance is not displayed to users. This block type is generally assigned to a "header" block group.
Meta description: Enter a description of your site in this field. The contents of this field are sent as a metadata "Description" for the site.
Meta keywords: One of the challenges when running a web site is letting external search engines know that your site exists. Meta keywords categorize your site. Many search engines send out robots (also called 'spiders') to search the Web for content. When you define Meta Keywords for your site though this configuration option, you make it easier for the search-engine robots to categorize your site, and your site will be categorized more appropriately since you are defining the options. Enter words & phrases, separated by commas, that describe the focus of your web site. Capitalization is not important in this field. Many search engines limit the number of keywords that you can use. Therefore, you should choose your words carefully and use no more than 10-15 keywords that best describe your site's content.
If your site is all about rock and roll music, for example, you might enter the following information in this field: "
music, rock, roll, beatles, aerosmith, guitar, drum, bass, sing, singer, singing"For additional information on Meta Keywords, please visit Web Developer-META Tag Resources (http://www.webdeveloper.com/html/html_metatag_res.html) or The META Tag Builder (http://vancouver-webpages.com/META).
Use GeoURL (http://www.geourl.org): GeoURL is a location-to-URL reverse directory. This will allow you to find URLs by their proximity to a given location. Find your neighbor's blog, perhaps, or the web page of the restaurants near you. GeoURL's page provides tools for determining your location's latitude and longitude.
Your Longitude: In this field, enter your longitude in the format "
W 84.520407".Your Latitude: In this field, enter your latitude in the format "
N 39.283899".
Use Dynamic Keywords: In addition to defining your own keywords for your site (in Meta keywords, above), you can choose to have meta keywords generated dynamically. When this option is CHECKED, meta keywords are generated dynamically whenever the full text of an article is displayed. All the words in the article are used as meta keywords. CHECKING this function has a small performance cost.
Copyright page: OTTO
Help page: OTTO
Glossary: OTTO
Click "" to save changes.
Within this example, we explore methods for adding, modifying, and deleting block instances.
Adding block instances
For these examples, we'll add a few block instances to work with. Following the instructions in Admin->Blocks->Add Instance (above), add the following three blocks:
Block 1:
Title:
Base HTML Block 1Type: Base \ HTML
Group: Center
Leave the other items set at their default.
Click "" to save changes.
In the HTML field that appears in the next panel, type:
"
<b>This is BASE HTML BLOCK #
                1.</b>
" (no quotes)Click "" to save changes.
Block 2:
Do the same steps as with Block #1, substituting "
Base HTML Block 2" for the title and "<b>This is BASE HTML BLOCK # 2.</b>" for the HTML field.
Block 3:
Do the same steps as with Block #1, substituting "
Base HTML Block 3" for the title and "<b>This is BASE HTML BLOCK # 3.</b>" for the HTML field.
If you go to the front page of the site (click the Xaraya logo in the top left corner of the default theme), you'll see these three blocks displayed in ascending numerical order.
Modifying block instances
If you wish to modify a block instance, go to Admin->Blocks->View Instances. Click "" on the line next to the block instance you wish to modify. On the next panel, make your changes and click the "" button to save changes.
For our example, edit Block #2's title to read "
The Second Base HTML Block" and the HTML to read "Here's the <i>second</i> HTML block". Be sure to "" to save your changes.
Deleting block instances
To delete a block instance, go to Admin->Blocks->View Instances. Click "" on the line next to the block instance you wish to delete. On the next panel, confirm your intention to delete.
Follow this example, using the three blocks we added in "Adding block instances", above, to learn how to change the order of block instances within Groups.
If you don't have the three sample block instances from "Adding block instances", above, create them now.
Go to Admin->Blocks->View Groups. Click "" on the line next to the block group you wish to modify. In this example, click "" on the line next to the "" block group. On the next panel, modify the order of block instances. Left-click on an instance to select it, then use the UP and DOWN arrow icons to change the placement of the selected block instance in the block group. Click the "" button to save changes.
For our example, move the block instances we created into the following orders, saving changes between each:
3, 2, 1
1, 3, 2
2, 1, 3
When you have finished this example, delete the three block instances. Follow instructions in 'Deleting block instances', above.
The Adminpanels module configures how the Administration menu block is displayed to the site administrators.
NOTE: The Adminpanels Module has been removed from Xaraya since version 1.1. This module is not supported anymore and replaced by functions in Base.
Modify config:
This panel allows modification of configuration options for this module.
Configure Adminmenu
Always on top: Sets position of administration menu in block group. If CHECKED, the Administration menu is always at the top of the block group in which it is placed. If UNCHECKED, the Administration menu's position is determined by its order in Admin->Blocks->View Instances.
Mark active item: CHECK if you would like a marker displayed next to the active menu item. UNCHECK if you do not wish to have a marker displayed next to the active menu item.
Specify marker: Specify the marker to be used if "Mark active item" (above) is CHECKED. Default is "[x]".
AN EASTER EGG: What version of Xaraya was first the PUBlic release? Type your answer in this field. If your answer is right, as site administrator, you may catch sight of the elusive 'red manta'. This Easter egg exists in versions .906 and later.
Sort admin menu items:
By Name: Displays the Administration menu sorted alphabetically.
By Category: The Administration menu is displayed by category (Content, Global, Users & Groups, Miscellaneous, etc.).
By Weight: Not currently implemented.
By Group: Not currently implemented.
Sort order "By Weight" configuration: Not currently implemented.
Sort order "By Group" configuration: Not currently implemented.
Groups configuration: Not currently implemented.
Add: Not currently implemented.
Delete: Not currently implemented.
Modify: Not currently implemented.
Position admin menu: The Administration menu can be displayed in the center or on the left or right side of the page. Select the placement of the Administration by selecting from the drop-down list.
Left: Display the Administration menu on the left side of the screen.
Center: Display the Administration menu in the center of the screen. Not currently implemented.
Right: Display the Administration menu on the right side of the screen.
Display "Help" link: Not currently implemented.
Click "" to save changes.
Configure Overviews
Disable Module Overviews: By default, Xaraya displays an overview panel when you click on any module in the Administration menu. This overview panel contains useful information about the module, but after you've read it several times, you may wish to turn it off. CHECK this box to skip the module overview. UNCHECK the box to display module overviews.
Click "" to save changes.
Table of Contents
Articles are placed into Publication Types which can contain Categories. Categories are an easy way to provide hierarchical categorization for all information on your site. You could use one or more common Categories across different Publication Types, or use specific Categories for each type of article, or any combination that you prefer for your site.
Before specifying which Publication Types will be using what Categories, create the categorization you want via the Categories Administration Menu. To get you started, a default set of categories was defined for articles when Xaraya was installed. You can adapt the existing categories to your specific needs, of course, or remove them altogether.
Once you have a set of categories you would like to use for your articles, go to Admin->Articles->Modify config, and specify the number of categories that can be used for each Publication Type, and select the 'base categories' to be used.
A 'base category' is any starting point somewhere in your tree of categories, below which you will have the actual list (or sub-tree) of categories people can choose from when they submit or view articles.
For example, you could have a 'base category' called Topics, with a list of different topics relevant to your site below it, and another 'base category' called Cities, with a list of cities or places for which you would provide regional news. One topic might be 'Good Restaurants', and one category might 'Brussels', so people would be able to browse through any articles about good restaurants in Brussels, for instance.
In this section, we explore how to edit pre-configured categories and create new categories. Categories are displayed to the site administrator in a "category tree", a listing that shows categories and sub-categories in an easy-to-understand format.
Admin->Categories->Modify config:
You can set some global options in the configuration screen.
Number of items: how many categories will the admin see on 1 page?
The number of links shown in the stats area is the number of linked items you will see for each category in the stats page.
Click "" to save changes.
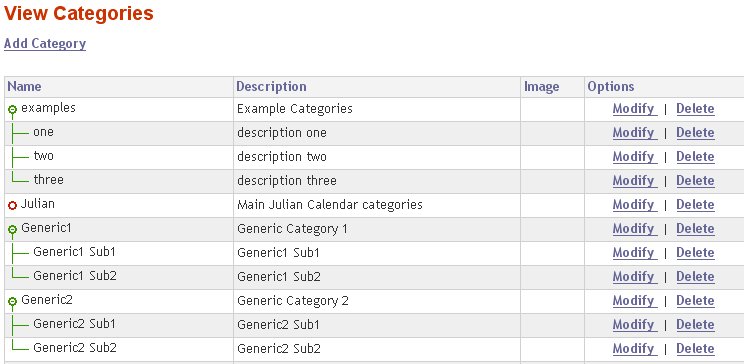
Admin->Categories->View Categories:
This panel displays all the Categories that are pre-configured by the Xaraya Base installation. Let's edit an existing category, and then add a few new categories from scratch.
To edit an existing category, click on the "" link on the same line as the Name of the category you wish to edit. For this example, click "" on the "Topics" line. This edits the top-level category called "Topics".
Name: The name of the category. For this example, change it to "Topics of Interest".
Description: A description of the category that is displayed to users. For this example, change it to "
Interesting
          topics on this website.
".
The next two options determine the position of the new/edited category in the category tree, and specifies if the category is a top-level category or a sub-category.
In relation to this category: Select an existing category from the drop-down list. This existing category serves as the reference point for the Position function, below. For this example, since we don't want to move this category, just leave this field as it is.
Position: Determines the placement of the new/edited category in conjunction with the "In relation to this category" field above. For this example, since we don't want to move this category, just leave this field as it is.
Right before, in the same level: If you want the new/edited category to be placed ABOVE the category specified in "In relation to this category" and be on the same level (for example, if the category selected in "In relation to this category" is a top-level category, this new/edited category will also be top-level), select this option.
Right after, in the same level: If you want the new/edited category to be placed BELOW the category specified in "In relation to this category" and be on the same level (for example, if the category selected in "In relation to this category" is a top-level category, this new/edited category will also be top-level), select this option.
The first child category: If you want the new/edited category to be placed ABOVE the category specified in "In relation to this category" and to be a child category of the category referenced in "In relation to this category", select this option.
The last child category: If you want the new/edited category to be placed BELOW the category specified in "In relation to this category" and to be a child category of the category referenced in "In relation to this category", select this option.
Optional image: From this drop-down list, select the image associated with this category. The image format can be any popular image file format (JPG, GIF, PNG, etc) and must exist in one of two directories:
"
<xarroot>/modules/categories/xarimages" or"
<xarroot>/themes/<theme_name>/modules/categories/images" for theme-dependent versions
Click "" to save changes.
To add a new Category, click Admin->Categories->Add Category. Complete the fields on the next panel, and click "" to create the new category. If you are adding a large number of categories at one time, you can do so in a batch. Enter the number of categories you'd like to create in the "" field and click "". This will refresh the panel with the specified number of category slots. Complete the fields and click "" to batch-create the categories.
For this example, using the methods detailed above (editing or
adding categories as necessary), create the following categories under
"Topics of Interest" (to create this category, see "Editing an
Existing Category", above): News,
Announcements, System
Information, Xaraya, and
Internet. Enter any text in the Description
field. Also, put these new categories in alphabetical order under
"Topics of Interest" either by manipulating the placement using the
available category positioning tools or by creating them in
alphabetical order.
Table of Contents
Xaraya allows items to be virtually 'bolted on' to its engine. These items, called "modules", add features or functionality to Xaraya. Because it is important to understand how modules function within Xaraya, in this section we explain how any Xaraya module can be installed, configured, deactivated, upgraded, and completely removed (deleted!). Any of these actions may be taken on any non-core Xaraya module. Xaraya's Core modules make up the distribution of Xaraya, and can not be deactivated, edited, or removed. The Xaraya Base distribution comes with a selection of popular modules available for use with your site. The Site Administrator may choose additional modules to add to the site. Additional official modules and third-party modules for Xaraya may be downloaded from the official site at http://www.xaraya.com.
In other Content Management Systems, if, for example, you had a Reviews module and a Gallery module, they exist on the site as two separate entities that do not communicate with each other. If, for example, you wanted a Gallery that allowed users to post Reviews, you had to write your own custom module to integrate the two pieces, or duplicate the functionality of each module in a new custom module.
Modules in Xaraya are different than modules in any other Content Management System because when they are 'bolted on' to the Xaraya engine, they can communicate with any other part of Xaraya, including other modules. These communication paths are easily built using "hooks" within Xaraya -- without coding -- by the site administrator.
In our example, within Xaraya, Review functionality could be combined with the Gallery without writing any code at all, allowing users to post Reviews of items in the Gallery. Further in this Guide, we will explore specific examples of how to combine the function of modules within Xaraya.
SPECIAL NOTE: Xaraya doesn't need an external "Gallery" module... Using Publication Types, Xaraya can be configured to display nearly any kind of data -- without requiring a special module to do so. We'll explore this more later in the Guide.
This section of the Guide shows how to initialize, activate, edit, deactivate, upgrade, and completely remove (delete!) modules from your Xaraya site.
Admin->Modules->View All: This configuration area of Xaraya focuses on the modules of your site.
Style: Defines the display of the module list.
Plain (fast): Default. Displays an unadorned listing of Modules. Options (activate, deactivate, hooks, etc.) are listed as clickable text.
Icons: Displays a listing of Modules adorned with icons. Options (activate, deactivate, hooks, etc.) are listed as clickable icons.
Compact-A: Displays a listing of modules in a compact, two-column "over then down" format. The action & status list is displayed at the top of the screen. The letter indicators are as follows:
[I]nstall
[U]pgrade
[D]eactivate
[A]ctivate
[R]emove
[M]issing
[V]iew Info
[H]ooks
[C]ore Module
Compact-B: Displays a listing of modules in a compact, two-column "down then over" format. The letter indicators are the same as for "Compact-A" display style, above.
View: Filters the display to modules of a certain type as selected from the drop-down list.
All modules: Default. Shows all modules on the system.
All Installed: Shows only modules that have been installed.
All Active: Shows only modules that have been activated.
All Inactive: Shows only modules that have not been activated.
Not Installed: Shows only modules that have not been installed.
Missing files: Shows any modules with missing files.
Sort by: The sort order for displayed modules.
Name [a-z]: Default. Alphabetical ordering of modules.
Name [z-a]: Reverse alphabetical ordering of modules.
Hide: Because we cannot change any Core modules within Xaraya, we may choose to hide them from the module list to reduce clutter. If the "" box is CHECKED, Core modules are filtered from the module list and not displayed. To hide the Core modules, CHECK "" and click "". Core modules can be displayed by UNCHECKING "" and clicking "".
Force:
Regenerate: When a module is added to or deleted from the site's module directory, the system needs to 'Regenerate' the file structure to recognize the change in the module directory. To force the system to regenerate the modules list, CHECK "" and click "". This is necessary only when modules have been added to or deleted from the site's module directory.
: Applies any changes you've made to Style, View, Sort by, Hide, or Force and reloads the module listing.
Below the display & navigation section is the listing of the modules on the site. Each module has a variety of information displayed next to the name of the module. We explore the definition of each piece of information, below.
Name: The name of the module. When the module has an "Active" status, click the name of the module to go to the module's administration screen. If you click the name of the module and nothing happens, the module does not have an administration screen. The administration screen of inactive modules is not available.
Version: The version number of the module.
Upgrade: If an upgraded version of the module that is newer than the installed version is available, this field displays notification.
Info: Click the "" link for information about the module, including contact information.
Status: Displays the status of the module. Status can be one of the following items:
Not Installed: The files for this module exist in Xaraya's installation, but the module has not been installed. Modules that have a status of Not Installed cannot be used on the site until they are installed.
Active: The module has been placed into Xaraya's modules directory and has been installed. The module is ready for use on the site.
Inactive: The module is not available for use on the site but the module's database and configuration settings have NOT been removed. Click "" to make the module available on the site.
Missing Files: This module has files missing and will likely not function. Remove and reinstall the module to correct the problem.
Actions:
[Core module]: Denotes a core module. Since core modules are not configurable, no actions are available for this module.
Install: Indicates that the module exists in Xaraya's module directory but is not yet ready for use. Click "" to initialize and activate the module, which creates any database tables that the module needs and prepares the module for use on the site.
Deactivate: If you wish to make a module unavailable, click "". This sets the module to an unavailable setting, but does not remove any data or database tables.
Remove: If you wish to remove the module from your site and remove all configuration information and database tables associated with the module, click "" (if necessary) and click "". Clicking "" removes all the module's data and database tables from the site's database and makes the module unavailable to site visitors. The module is NOT removed from Xaraya's modules directory. Modules must be manually deleted from Xaraya's modules directory to completely remove them from the site.
Activate: If a module has previously been deactivated and you wish to re-activate it for use on the site, click "".
In later sections of the Guide, we will explore the individual modules that are included with Xaraya. Most modules support Dynamic Data. If you have Dynamic Data fields defined for a module, you will have additional configuration options beyond what is covered in this Guide. There are other modules which can provide functionality to extend existing modules. This is normally done via hooks, which will be covered next. Not all site administrators will use all of these features, so feel free to skip around!
It is easy to add or remove modules at any time after Xaraya installation.
Adding a new module:
To add a new module to Xaraya, follow these steps:
Download the new module.
Un-archive the new module into a temporary directory (if necessary).
Configure the module (read the module's documentation to determine what pre-installation configuration, if any, is necessary).
Copy (or upload) the module directory & sub-directory from the temporary directory to
<xarroot>/modules.Assign appropriate ownership and permissions (if necessary).
As the site administrator, go to Admin->Modules->View All. CHECK the box at the top right of the panel and click the "" button. Xaraya will scan the
<xarroot>/modulesdirectory and display all modules that are available, including the new module.Click "" on the line next to the new module you wish to install. The module will be installed.
Perform any post-installation configuration of the module (if necessary). If a module has post-installation configuration options available, you can click on the module name in Admin->Modules->View All to go to the module's configuration panel. You may also click on the module name in the Admin menu on the left of the browser window.
Removing a module:
To remove a module from Xaraya, follow these steps:
Identify the module you wish to remove.
As the site administrator, go to Admin->Modules->View All.
If the module is active, click "" on the line with the module to be removed. When a module has been deactivated, it is no longer available to users but the module data is not removed. If you intend to make the module active again in the future but do not want the module to be available to users at the moment, it is advised to leave the module in a deactivated state.
To completely remove the module's data, click "". The module's data is removed from the database (including configuration settings and stored information). Once a module has been "Removed", it is necessary to re-install and re-configure the module if you intend to use it again.
If you wish to remove the module completely from your Xaraya site, delete the module's directory from
<xarroot>/modules. Consult your webserver's operating system documentation for how to accomplish this.
Table of Contents
Hooks extend the functionality of modules by allowing site resources to be re-used in a variety of ways across the site. Hooks increase the interoperability and efficiency of Xaraya. For example, a site resource is BBCODE (which allows bbcode-style formatting to be used in text entry). Rather than code BBCODE for articles and re-code it again for comments, we can simply "hook" BBCODE functionality into the articles and comments modules, as well as any other modules we wish! Xaraya provides unparalleled levels of interoperability by truly modularizing functions.
Xaraya provides two different methods to view or edit hooks.
Admin->Modules->View All: Click "" under the Hooks heading for the module to view or edit hooks that are enabled for the particular module. So, for example, if you wanted to view the active hooks for the Articles module, click "" under the Hooks heading for the Articles module. You see the modules that are 'hooked' into this module, and can add or remove hooks. Be sure to click "" to save changes.
Admin->Modules->Configure Hooks: The simplest way to determine the order in which to click items to activate hooks is to fill in the blanks of this sentence: "
I want
      to enable ____ in ____.
" So, for example, if you wanted to enable comments in articles, you would first click , then CHECK . Be sure to click "" to save changes.
These two methods serve the same purpose -- to display hooked modules and allow modification of hooks. Work with each of them to determine which of the methods suits you best.
Admin->Modules->Configure Hooks:
Using 'hooks' in Xaraya, you can extend the functionality of your modules.
Select the hook module providing the extra functionality and then check the box(es) of the module(s) in which you would like to enable that functionality (For example, select "Comments" and then check "Articles" to enable Comments within the Articles module.)
Table of Contents
The Articles module is one of the older modules in Xaraya. It is used to hold document type of content. The Articles module comes with several standard types of content. These include News articles, Documents, Reviews and Downloads. You will learn how to use these and add your own types of content, socalled publicationtypes.
Content from the Articles module can be shown via your website, or be feeded via RSS to newsreaders.
First some naming conventions.
Articles
An article is a set of content that can be shown on your site or feeded via the RSS theme. Articles are stored in the Articles module. The setup of an article is described in the Publication Type it belongs to.
Publication Type
A Publication Type is a certain set of rules for a type of Articles in the Articles module. The rules when needs to be added, how the content is shown and managed make up the Publication Type. Examples or Publication types are News articles, Documents and Downloads.
When we talk of an Article, it refers to the content in a publication type.
The Articles module is possibly the most often-accessed part of a community site, since nearly all of the site's content can be placed into Article sub-categories. Articles are added via the administration interface. First we will view the current article types (Publicationtypes) and add a new article.
View Articles
Click View Articles to view a listing of articles on the site by Publication Type. If there are multiple pages of articles, navigation links are displayed at the bottom of the panel. (The number of articles displayed per page is defined in Admin->Articles->Modify config. Click the Publication Type and set "" to the number of articles to be displayed. Click "" to save changes.)
Publication Type: From the listing of available Publication Types, click the Publication Type for which you would like to display articles. For example, to display articles in the Web Links Publication Type, click "".
Status: This is a filter that displays articles in the selected Publication Type that match one of the following options. Following our example above, to display Approved articles in the Web Links Publication Type, click "".
All: Display all articles in the currently-selected Publication Type.
Submitted: Display articles in the currently-selected Publication Type that have been submitted for publication.
Rejected: Display articles in the currently-selected Publication Type that have been rejected for publication.
Approved: Display articles in the currently-selected Publication Type that have been approved for publication.
Frontpage: Display articles in the currently-selected Publication Type that have been approved for publication and are displayed on the front page of the module. If this module is the current default starting module (set in Admin->Base->Modify config), then articles with this status will also be displayed on the front page of the site.
Browse in: This is a filter that displays articles in the selected Publication Type based on the Category to which the article is assigned. Click the Category next to "Browse in" to display a panel with available Categories. Click a Category to display its articles.
New Article: Click New Article to add a new article to the site as administrator. In the panel that appears, select the Publication Type for the new article. Enter the article in the text fields. The available text fields may be different between Publication Types, but Publication Types will have a Categories box at the bottom of the panel. From the Categories box, select the Categories to which the new article will be assigned. Click "" to display the article without saving, and click "" to save changes.
List of articles on the site. The bottom of this panel displays a listing of articles on the site for the currently-selected Publication Type.
Title: The title of the article.
Publication Date: The article's publication date and time.
Status: The status of the article. Status can be "Submitted", "Rejected", "Approved", or "Frontpage". See below for information about these statuses.
Checkbox: To change the status of currently-listed articles in a batch, place a CHECK in this box next to each article you wish to add to the batch. From the "Change checked article status to" drop-down list, below, select the status to which the checked articles will be changed. Click "Change Status" to change the status of all checked articles.
Options:
View: Click this link to view the article as it is displayed to a user of the site. An "[Edit]" link displayed at the top of the article is shown only to users with appropriate editing privileges.
Edit: Click this link to edit the article. Make changes to the article in the panel and click "Preview" to display the modified article without saving, and click "Update Article" to save changes.
Delete: To delete a specific article, click this link next to the article. Confirm your intention to delete the article on the following panel. If you choose to delete an article, all comments associated with the article are deleted at the same time.
Change checked article status to:
Submitted: The article has been submitted to the site, but has not yet been rejected or approved. This article is visible only to the site administrator; it is not visible to users.
Rejected: The article has been submitted to the site, but has not been approved for publication. This article is visible only to the site administrator; it is not visible to users.
Approved: The article has been submitted to the site and has been approved for publication. This article is visible to site visitors and the site administrator. To view this article, navigate to the Publication Type and Category of the article, then click the title of the article to display.
Frontpage: The article has been submitted to the site and has been approved for publication. This article is visible to site visitors and the site administrator. The article is displayed on the front page of the module, and if this module is the default starting module, then it will be on the front page of the site. Articles with this status may also be displayed by navigating to the Publication Type and Category of the article, then clicking the title of the article.
Click "Change Status" to save changes.
Add Article
Click Add Article to add a new article to the site as administrator. In the panel that appears, select the Publication Type for the new article. Enter the article in the text fields. The available text fields may be different between Publication Types, but Publication Types will have a Categories box at the bottom of the panel. From the Categories box, select the Categories to which the new article will be assigned. Click "" to display the article without saving, and click "" to save changes.
If you wish to insert a PAGE BREAK in an article, enter
<!--pagebreak-->in the article text (either the Introduction or Body Text) where you'd like the break to appear. Xaraya automatically manages the page break.Import Webpages
If you need to import any existing HTML pages into your Xaraya site (for example, if you are converting your site from a 'flat' HTML site to a content management system), the Import Webpages tool will facilitate the process. Use this tool to define existing HTML page(s) to import into the Xaraya database structure. The imported pages become available as articles in the Publication Type selected during import. The Import Webpages tool provides filtering and replacement options during import.
Base Directory: This is the local directory which is recursively searched for pages ending with "
HTML" or "HTM" (case insensitive). The resulting HTML pages are listed in this box. If you change the directory, click "" to reload the listing of available files.Available HTML Pages: Highlight the HTML page or pages you would like to import in this box. You can select multiple individual pages by holding the CTRL key down and left-clicking on the desired HTML pages. To select a range of pages, left-click the first page in the range, hold the SHIFT key down while left-clicking the last page in the range. Selected pages are highlighted.
Publication Type: From this drop-down list, select the Publication Type to which the imported HTML page will be assigned. Once the Publication Type is selected, the panel will refresh, showing additional options.
Insert Page Title into field: From this drop-down list of fields available in the selected Publication Type, select the field into which the HTML page's title will be inserted.
Insert Content into Field: From this drop-down list of fields available in the selected Publication Type, select the field into which the HTML page's content will be inserted.
Initial Categories: Select the categories to which the imported article will be assigned. If multiple HTML pages are imported, all will be assigned to the same category.
Filter Start of Page: This page indicates material to be filtered (removed) from the imported webpage. The default regular expression is "
#^.*<body[^>]*>#is" (no quotes), which removes everything before the HTML <body> tag. The original HTML page is not modified.Filter End of Page: The default regular expression is "
#</body.*$#is" (no quotes), which removes everything after the HTML </body> tag. The original HTML page is not modified.Find Page Title: The default regular expression is "
#<title>(.*?)</title>#is" (no quotes), which indicates that the page title is between the <title> and </title> HTML tags.Replacement Rules: Xaraya will search your source HTML page and replace matching search text with replacement text. This is useful, for example, if you've changed the path to graphic files.
Search for: Enter the text to be replaced.
Replace with: Enter the text to replace found text.
Test Import button: Click this button to perform a test import of the HTML page without adding the article to the site. Examine the resulting page to ensure that everything worked as expected.
Import Webpages button: When ready to perform the import of HTML pages into Xaraya, click this button. The HTML pages are imported and the article is added to the site. The original HTML pages are not modified.
Publication Types
This portion of the panel displays existing Publication Types with options to edit or delete.
New Publication Type: Click this link to add a new Publication Type.
New Publication Type
Type: The title of the new Publication Type. This is the "system" name of the Publication Type, and is also the name used when referring to this Publication Type in a Short URL.
Description: A description of the Publication Type. The description is used on the site to denote the Publication Type. The contents of this field are displayed to site visitors.
Configuration
Field: The field name for the new Publication Type. This field name is used by themes to denote where pieces of content are displayed within the theme. For example, the field named "title" is displayed through placement of the string "#$title#" within the theme definition.
Label: The label for the new Publication Type. The label serves as a description of the Publication Type, and is displayed to users. Leave the Label field blank if you do not want to use a particular field in your new Publication Type.
Format: From this drop-down list, select the format for the field.
Static Text:
Text Box:
Small Text Area:
Medium Text Area:
Large Text Area:
Username:
Calendar:
File Upload:
Status:
URL:
Image:
HTML Page:
Input: CHECK this box if you would like the field to accept input. If you do not with for the field to accept input, UNCHECK this box.
Type: A reference area displaying the database type for the field.
Click "" to save changes.
Existing Publication Types
Existing Publication Types are listed in the bottom portion of this panel, with the following information & options.
Name: The name of the Publication Type.
Description: A description of the Publication Type.
Options:
Edit:
Delete: To delete a Publication Type, click this link next to the Publication Type to be deleted. Confirm your intention to delete on the next panel. If you delete a Publication Type, all articles contained in the Publication Type are also deleted.
Article Config:
Global Configuration ('Default' Publication Type only)
Default Publication Type for the Articles "Front Page": From this drop-down list, select the Publication Type to which a "frontpage" alias will be assigned. Generally, "" is an appropriate Publication Type for this field.
Support Short URLs: This box is the 'master switch' for Short URL support in articles. CHECK this box to enable Short URL support for articles. UNCHECK this box to disable Short URL support for modules. Short URL support may be enabled or disabled for individual Publication Types, so it is possible to have some Publication Types support Short URLs while others do not. In order for Short URL support to function, the 'master switch' for Short URLs must be CHECKED in Admin->Base->Modify config.
Website Configuration
Use <alias> as alias in Short URLs: CHECK this box to use the Publication Type's type as the Short URL for this Publication Type. The Type is configured when adding a new Publication Type under Admin->Articles->Publication Types. To turn off Short URL support for this specific Publication Type, UNCHECK this box.
Use different page template: You can define custom display templates for each Publication Type. To tell Xaraya to use a different template for a Publication Type, enter the name of the template file in this field. Enter the filename without the "
.xt" extension. To use the default page template, leave this field blank. See TEMPLATES IN XARAYA for a thorough discussion of templates.
Overview Configuration
Note
The ($...) indicates the name of the variable used to display this feature in site templates. If you wish to enable a specific feature to a template, add the name of the variable to the template at the location where you want the feature to appear.
Default start view: From this drop-down list, select the default behavior of Xaraya when a user clicks on the name of a Publication Type from the user's (not the Administration) main menu.
Latest items:
Browse in...: (recommended)
Number of columns ($numcols): The number of columns that will display the data to site visitors. If you would like a traditional, single-column display, enter "
1" in this field. If you would like a two-column display, enter "2" in this field, and so on.Items per page ($number): Determines the maximum number of items to display per page in the overview panel. If you would like to display 25 items per page, enter "
25" here. Xaraya provides page navigation links if there are more than this number of items.Show category links in article summaries ($categories): If CHECKED, category links are displayed in article summaries in the overview panel. If UNCHECKED, category links are not displayed in article summaries.
Show previous/next category ($showprevnext): If CHECKED, previous/next category links are displayed on the overview, which allow a site visitor to move more easily between categories. If UNCHECKED, previous/next category links are not displayed.
Show number of comments ($comments): If CHECKED, the number of comments associated with the article are displayed in the overview panel. If UNCHECKED, the number of comments are not displayed.
Show hit counts ($counter): If CHECKED, the number of hits received by the article are displayed in the overview panel. If UNCHECKED, the article's hits are not displayed.
Show ratings ($rating): If CHECKED, article ratings are displayed on the article overview panel. If UNCHECKED, article ratings are not displayed.
Show links to Publication Types ($showpublinks + includes/publinks.xd): If CHECKED, a link-bar is displayed near the top of the center panel of the site that displays quick links to Publication Types and, in parenthesis, the number of articles within the Publication Type, for example:
News Articles (403) - Documents (28) - FAQs (16) - Web Links (310)
If UNCHECKED, the links are not displayed.
Show link to archives ($archivelink + $archivelabel): If CHECKED, a link to the site's archives is displayed in the overview. In the default Xaraya theme, this link is at the bottom of the page. The Archives show a listing of the stories published per month. If UNCHECKED, the link to the archives is not displayed.
Show link to article map ($maplink + $maplabel): If CHECKED, a link to the site's article map is displayed in the overview. In the default Xaraya theme, this link is at the bottom of the page. If UNCHECKED, the link to the article map is not displayed.
Call transform hooks in summaries: To display text with the output of any 'transforming' hooks, CHECK this box. For example, if you have hooked BBCODE into ARTICLES and would like the Article summary page (typically Frontpage or Article overview) to show the output of BBCODE, CHECK this box. If you wish to show the raw text, UNCHECK this box.
Article Display Configuration
Show link to previous/next article in display ($prevart + $nextart): OTTO
Configuration of Hooked Modules
OTTO
Categories
[New]:
Number of possible categories:
Base category for articles (#):
Click "" to save changes.
Modify config:
This panel allows modification of configuration options for this module.
In this advanced example, we will configure a new Publication Type for Recipes. We will add the new Publication Type, enable Dynamic Data, add Dynamic Data fields to our new Publication Type, add appropriate Categories, attach the new Publication Type to the new Categories, add Templates for the new Publication Type, and finally, add an article (a recipe!) to the new Publication Type. This example assumes you are starting from a fresh, brand-spanking-new, just-installed Xaraya Base installation.
LOG IN AS A XARAYA ADMINISTRATOR: This is done any time you wish to have Administrator access to your Xaraya site.
CREATE A NEW PUBLICATION TYPE: This is done for each custom Publication Type you create.
To create the new Publication Type, go to Admin->Articles->Publication Types. Click "New". Complete the fields as follows:
Type: recipes (NOTE: Lower case.)
Description: Recipe Collection
Field: title
Label: Recipe Title
Format: Text Box
Input: CHECKED
Field: summary
Label: Description
Format: Small Text Area
Input: CHECKED
Field: bodytext
Label: Ingredients
Format: Large Text Area
Input: CHECKED
Field: bodyfile
Label: (this field should be blank)
Format: (as long as Label, above, is blank and Input, below is UNCHECKED, it does not matter what this field contains)
Input: UNCHECKED
Field: notes
Label: Instructions
Format: Large Text Area
Input: CHECKED
Do not modify the last 3 fields (authorid, pubdate, and status); leave them as they are. Click "" to save changes.
ENABLE DYNAMIC DATA FOR ARTICLES/RECIPES: This is done for each custom Publication Type using Dynamic Data you create, unless Dynamic Data has previously been enabled for the module.
To enable Dynamic Data for a Publication Type, go to Admin->Modules->Configure Hooks. We want to enable Dynamic Data within Articles, so click "" and CHECK the box for Articles and the 'Recipe Collection' sub-category under Articles. Click "".
ADD DYNAMIC DATA FIELD(S) TO THE NEW PUBLICATION TYPE: This is done for each custom Publication Type using Dynamic Data you create.
To add dynamic data field(s) to the new publication type, go to Admin->Articles->Publication Types. Find the 'recipes' Publication Type that we created in CREATE A NEW PUBLICATION TYPE, above, and click Article Config next to it. Near the bottom of the next screen, you'll see "Dynamic Data Fields [modify]". Click "" and in the new window that opens, enter the Dynamic Data as follows:
Label: photo (NOTE: Lower case.)
Property Type: Image
Data Source: dynamic_data
Status: Active
Click "" to save changes. Close the window and return to the previous browser window for the rest of the steps.
ADD A NEW CATEGORY (AND OPTIONAL SUB-CATEGORIES) FOR THE NEW PUBLICATION TYPE: This is done for each custom Publication Type you create.
To add the new category (and optional sub-categories), go to Admin->Categories. Click "" to add a new Category. For this example:
Create a new Category called "Recipes Category" by following the steps below.
Name: Recipes Category
Description: This is the recipes category for this site.
In relation to this category: Generic1
Position: Right before, in the same level
Optional image: categoryrecipes_top.jpg
Click "" to add the new category.
Create three sub-categories: "Appetizers & Soups", "Breads & Baked Goods", and finally "Desserts". To create the "Appetizers & Soups" sub-category, click "Add Category" and follow these steps:
Name: Appetizers & Soups
Description: Soups and Appetizer recipes go here.
In relation to this category: Recipes Category
Position: The first child category
Optional image: categorysoups.jpg
Click "" to add the new category.
To create the next two sub-categories, click "Add Category" and follow these steps:
Name: Breads & Baked Goods
Description: Breads & baked goods recipes go here.
In relation to this category: Recipes Category / Appetizers & Soups
Position: Right after, in the same level
Optional image: categorybaked.jpg
Click "Add" to add the new category.
Create another sub-category, typing "Desserts" in the Name field, "Dessert recipes go here" for the Description, and "categorydesserts.jpg" as the image.
ADD THE NEW PUBLICATION TYPE TO A CATEGORY: This is done for each custom Publication Type you create.
To add Publication Types to Categories, go to Admin->Articles->Modify config and click on the description of the Publication Type we created (in this example, it's "Recipe Collection"). Scroll down, and you'll see:
Number of possible categories: 0
Change the "
0" to "1".Click "" to save changes.
After the screen refreshes, scroll to the bottom of the center section and select the Category for the new Publication Type. In this example, if it's not already selected, select "Recipes Category" that we created above. Click "" to save changes.
CONFIGURE THE NEW PUBLICATION TYPE: This is done for each custom Publication Type you create.
Still in Admin->Articles->Modify config, click on the description of the publication type we just created (in this example, it's "Recipe Collection"). Make the following changes:
Use 'recipes' as alias in short URLs: CHECKED
Default start view: Browse in Recipes Category
Number of columns ($numcols): 1
Items per page ($number): 10
Show category links in article summaries ($categories): CHECKED
Show previous/next category ($showprevnext): CHECKED
Show number of comments ($comments): CHECKED
Show hit counts ($counter): CHECKED
Show ratings ($rating): CHECKED
Show links to publication types ($showpublinks + includes/publinks.xd): CHECKED
Show link to archives ($archivelink + $archivelabel): CHECKED
Show link to article map ($maplink + $maplabel): CHECKED
Call transform hooks in summaries: UNCHECKED
Show link to previous/next article in display ($prevart + $nextart): CHECKED
NOTE: Items enclosed in parenthesis above are the names of the variables used in templates.
Click "" to save changes.
ADD TEMPLATES FOR THE NEW PUBLICATION TYPE: This can be done for each custom Publication Type you create.
We can create up to three custom display templates to tell Xaraya specifically how to display this new Publication Type. Example files are included in this tutorial distribution. If you do not create a template, Xaraya will attempt to display the Publication Type using a default template.
If you wish to create your own (theme-specific) versions of these files, rename the files from
*.xdto*.xtand place the theme-specific version in the<webdir>/<themes_dir>/<theme_name>/modules/articlesdirectory, creating directories as necessary. It is recommended that you begin by examining the example files included with this tutorial, or open one of the sample templates provided with Xaraya and make changes as necessary using your favorite HTML editor. Where ever you want to display the fields in the new Publication Type, enter "#$fieldname#" (no quotes) in the template. Xaraya will replace "#$fieldname#" with the contents of the field as stored in the database. In this tutorial, we created the following fields, which are available for display in the template using the #$fieldname# indicated in parenthesis:title (#$title#)
summary (#$summary#)
bodytext (#$bodytext#)
notes (#$notes#)
photo (#$photo#)
Template files can also be placed into the
<webdir>/modules/articles/xartemplatesdirectory, and should then be called 'user-display-<pubtype>.xd', 'user-summary-<pubtype>.xd', and (optionally) 'user-view-<pubtype>.xd', where<pubtype>is the name of the Publication Type (in this tutorial,<pubtype>is "recipes" as created in step #2 above):user-display-recipes.xd -- this is the main view of the data
user-summary-recipies.xd -- this is a summary view of the data
user-view-recipes.xd (optional)
The templates included with this tutorial distribution expect to find a file called "
NoPhoto.gif" in the<webdir>/images/recipes/directory of your website. This file is displayed if a Photograph URL is not provided in the article submission, and is included with this tutorial distribution. CopyNoPhoto.gifto the<webdir>/images/recipes/directory, creating directories as necessary.ADD AN ARTICLE TO THE NEW PUBLICATION TYPE: This is done for each custom Publication Type you create.
Now you can add articles to the new publication type. Click Admin->Articles->Add Article and click on the name of the new Publication Type (in this example, it's Recipe Collection). A sample recipe is included with this tutorial (
SampleRecipe.txt).Enter the Recipe Title, Description, Ingredients, Directions, and a URL for the photograph for the recipe. Select the appropriate Category for the recipe, and click "" to see what the recipe will look like, or click "" to save it.
On the following page, approve the article by putting a CHECK in the STATUS box, and selecting "" from the drop-down list at the bottom of the page. Click "" to save changes.
LOGOUT FROM THE ADMINISTRATOR ACCOUNT: It is a wise idea, though technically not required, to log out of your administrator account at the end of each session. To log out of your Xaraya administrator account, click , which appears at the bottom of the Administration menu. Confirm your intention to log out by clicking "", or click "" to abort the logout.
Table of Contents
Xaraya's Articles module can manage 'articles' of different types at the same time, for instance news articles, longer documents in different sections, frequently asked questions, and so on.
These types are called 'Publication Types', and each type of article can utilize a different set of data fields, with a different meaning for each data field. For example, the 'summary' field could be used for an Introduction in News articles, for providing some Details about a question in FAQs, or not be used at all for Section documents.
There is a specific menu for management of Publication Types which allows you to change the description that appears in navigation menus, enable & disable dynamic data fields, or change their meaning for a particular type, or create or delete publication types according to your needs.
Each publication type also has its own templates, so that the look & feel of each publication type can be customized. Until you define templates for the new publication type, Xaraya will display items using default templates (and a warning).
A default set of publication types and templates (corresponding to the old News, Sections and FAQs modules of PostNuke or PHP-Nuke) is included as part of the installation.
Want to display recipes on your site? Create a new Publication Type, and Xaraya can do that.
A good strategy for configuration of Categories is to create a
top-level Category called <sitename>, and below that group all the
sub-categories for the site. This
"<sitename>" top-level category could be
considered to be the ROOT
CATEGORY, with additional Categories placed below
the ROOT CATEGORY. For example, if the site is
"MySite.COM":
MySite.COM (root category)
|
|---World News (sub-category)
| |
| |---North American News (sub-sub-category)
| | |
| | |---United States News (sub-sub-sub-category)
| | |
| | |---Ohio News (sub-sub-sub-sub-category)
| | |
| | |---Nevada News (sub-sub-sub-sub-category)
| | |
| | |---etc...
| |
| |---Asian News (sub-sub-category)
| |
| |---China News (sub-sub-sub-category)
| |
| |---Japan News (sub-sub-sub-category)
| |
| |---etc...
|
|---Sports News (sub-category)
|
|---Music News (sub-category)
|
|---Entertainment News (sub-category)
|
|---etc...
PUBLICATION TYPES CAN BE USED ONLY BY ARTICLES. CATEGORIES CAN BE USED BY ALL MODULES. A module that cannot fit into a Publication Type can still use Categories if they want. Plus 'Site News' could be a Category; you can put news articles in there... But you might ALSO have a 'Software News' Category.
Admin->Articles->Publication Types:
New: Add a new Publication Type
NOTE: Articles of this Publication Type will use the templates "
user-display-[publicationtype].xd" and "user-summary-[publicationtype].xd" by default from the articles module. However, if you make your own modules you start making a theme. These templates then get the extension .xt instead of .xd and are placed in "/themes/yourtheme/modules/articles/" Provide those templates before adding new articles.New PublicationType:
Type:
Description:
Configuration:
If the Label is empty, the field will not be used.
Field:
Label:
Format:
Static text:
Text box:
Small text area:
Medium text area:
Large text area:
Username:
Calendar:
File upload:
Status:
URL:
Image:
HTML page:
Input:
Type:
Click "" to save changes.
Edit: Click "" next to a Publication Type you wish to modify. On the next panel, you may modify the settings (as defined in New, above) for the selected Publication Type.
Click "" to save changes.
Export definition to XML: Click this link to export the definition of the Publication Type. On the next panel, the Publication Type is displayed in XML format.
Delete: If you wish to delete an existing Publication Type, click "" next to the Publication Type you want to delete. Note that all articles associated with the selected Publication Type will be deleted if the Publication Type is deleted. The next panel asks you to confirm your intention to delete the Publication Type. Click "" to confirm and the Publication Type is deleted.
Article config: Click this link to go to the Article configuration panel for the selected Publication Type.
View articles: Click this link to display the articles associated with the selected Publication Type.
Add article: To add an article to a particular Publication Type, click this link next to the Publication Type to which you wish to add the article.
Import definition from XML: Importing XML definitions of Publication Types can be done in two ways:
XML-format Publication Type definition files are placed into the
<xarroot>/modules/articlesdirectory with appropriate ownership & permissions.The XML definition is pasted into a text field on the panel.
If you wish to import a Publication Type in XML format, follow these steps:
Obtain the XML definition(s) for the Publication Type(s) you wish to import.
Go to Admin->Articles->Publication Types and click "".
On the next panel, specify the XML to import.
From the drop-down list of
*.xmlfiles in the<xarroot>/modules/articlesdirectory, select the file to import.Paste the XML-format definition into the large text box.
Click "" to import the Publication Type. The new Publication Type is added to your site.
A simple Guestbook can be made with the Articles module. Follow this example to create your own Guestbook.
Go to Admin->Articles->Publication Types. Click "New Publication Type". On the next panel, enter the following:
FIELD: title LABEL: Entry FORMAT: Medium Text Area INPUT: checked TYPE: string FIELD: authorid LABEL: Author FORMAT: Username INPUT: checked TYPE: integer FIELD: pubdate LABEL: Publication Date FORMAT: Calendar INPUT: checked TYPE: integer
Here's the template that should be placed in
<xarroot>/themes/modules/articles/user-summary-guestbook.xt:
<div class="xar-alt" style="margin: 0px 3px 6px 3px;padding: 1px;text-align: left;"> <div class="xar-norm" style="padding: 3px;">
<xar:if condition="!empty($categories) and count($categories) gt 0">
[ <xar:loop name="$categories">
#$cjoin# <a href="#$clink#">#$cname#</a>
</xar:loop> ]
</xar:if>
<div class="xar-accent">
<xar:mlstring>Posted by</xar:mlstring>:
<b>#$author#</b>
<xar:mlstring>on</xar:mlstring>
<b>#$date#</b>
<xar:if condition="!empty($counter)">
(#$counter# <xar:mlstring>Reads</xar:mlstring>)
</xar:if>
</div>
<br />
#$title#
<br />
<div class="xar-sub" align="right">
<xar:if condition="!empty($comments)">
#$comments#
</xar:if>
</div>
</div>
</div>
This example will guide you through the process of adding a Blogger Publication Type to your Xaraya site.
WHAT IS A BLOG? WHAT IS BLOGGING?:
blog n.: [common] Short for "weblog", an on-line web-zine or diary (usually with facilities for reader comments and discussion threads) made accessible through the World Wide Web.
The term "blog" is widespread and readily forms derivatives, of which the best known may be "blogosphere" (the hyperlinked totality of all blogs and the culture surrounding blogs).
There are tens of thousands of weblogs ("Blogs") on the Internet, many of them updated daily -- some of them many times a day. Some Blogs are public diaries while others are the authoritative or idiosyncratic musings of experts and cranks.
"Blogging" is the process of turning one's own filter on news and the world into something others might want to read, link to, and write about themselves.
Blogging is facilitated by desktop BlogTools -- word-processor-like tools that are created to encourage frequent updates of a blog by providing an easy interface, specialized tools, and a moment's readiness -- without the need to open your browser.
FILES INCLUDED WITH THIS TUTORIAL:
The following files are included with this tutorial.
OTTO: Move to FILES INCLUDED WITH THIS GUIDE, above, when complete.
ACTIVATING NECESSARY MODULES FOR BLOGGING:
In order to configure our Xaraya site for blogging, it is necessary to ensure that certain modules are activated. We need to activate at least three (and, optionally, a fourth) modules:
articles -- storage of the blog entries
bloggerapi -- the central axis for blogging in Xaraya
categories -- categorization of blogs
comments (optional but recommended) -- provides site visitors the ability to comment on blog entries
To activate the modules, log in as Administrator and go to Admin->Modules->View All. Some of the modules listed above may already be active on your site. If the modules listed above are not shown with a Status of "Active", they each need to be installed by clicking "" on their line.
Once you have ensured that the modules listed above are Active on your site, we can move forward to the next step.
CREATING A PUBLICATION TYPE FOR THE BLOG:
While not required, it is recommended that you create a specific Publication Type for your blog in articles configuration. Doing so allows us to use the site first for blogging only and offers the flexibility of adding additional types of content later. If you do not wish to create a specific Publication Type for your blog, simply use one of the existing Publication Types -- for example, "
news".Go to Admin->Articles->Publication Types. Click "" to begin adding a new Publication Type with the following values:
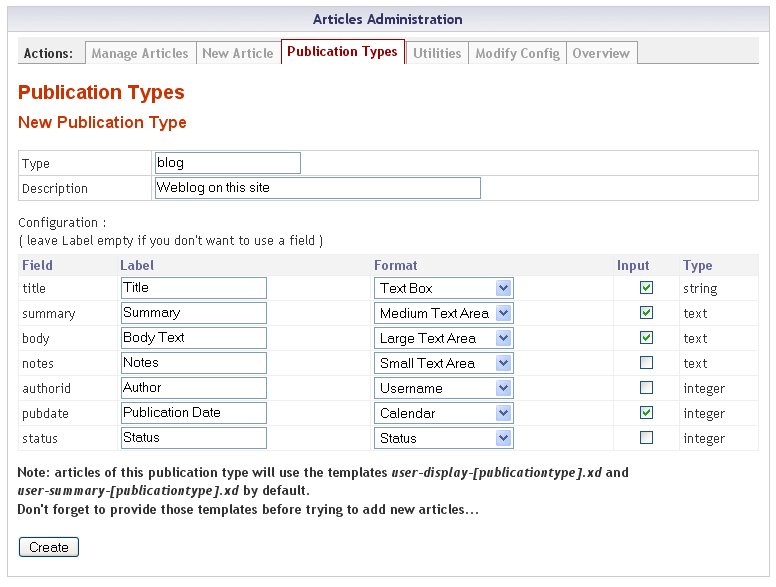
Click "" to save changes.
ADD CATEGORIES TO THE NEW PUBLICATION TYPE:
Go to Admin->Articles->Publication Types. Click "" on the 'blog' line. At the bottom of the panel, change Number of possible categories to "
1". Click "" to save changes.When the panel refreshes, select a category for blog entries from the 'Base category for articles' drop-down list. Click "" to save changes.
ACTIVATING HOOKS:
Go to Admin->Modules->Configure Hooks. Click on '', then CHECK 'blog'. You could CHECK 'all articles' instead of 'blog' if you want categories to be enabled for every article Publication Type. For the purpose of this tutorial, it doesn't matter which of the two options you choose as long as you choose one. Click "" to save changes.
LINK BLOGGERAPI TO THE BLOG PUBLICATION TYPE:
This step connects the incoming data from your BlogTool to the correct Publication Type in Xaraya.
Click Admin->Bloggerapi->Modify config. On the panel that appears, select the Publication Type to which you would like to point your Blog entries. Select 'blog : Weblog on this site', which is the Publication Type we created in CREATING A PUBLICATION TYPE FOR THE BLOG, above, and click "" to save changes.
We're now done with the Xaraya-side configuration of your blog. Let's move to the BlogTool configuration.
CONFIGURING YOUR BLOGTOOL:
For Windows we recommend w.bloggar. For other operating systems, MozBlog is the recommended tool.
Configuring w.bloggar -- http://www.wbloggar.com:
Download the latest version of w.bloggar from the site above. Install it on any computer(s) from which you'd like to be able to update your Xaraya site.
Start w.bloggar. A small account manager window will open for you to configure the site to which you wish to send the blog entries.
Account: <<New>>
User: Enter the user name of a user on your Xaraya site. Any blog entries made through this BlogTool will be posted as this user.
Password: Enter the corresponding password for the user above.
Click "". You will be asked if you want to create this new account. Click "" and you're taken to the Account Properties screen.
Blog Tool: >>Custom<<
Account Alias: The display name for this account, shown in the drop-down account selection list of this BlogTool. "
Xaraya weblog" is a good choice, but you can enter whatever you want here.Ping Weblogs.com: If you would like a notification sent to weblogs.com each time you use this BlogTool to update your site, check this box.
API SERVER:
Host:
your.xarayaserver.com(note: Do not put "http://"!)Page:
ws.php?type=xmlrpcPort:
80HTTPS: UNCHECKED
Timeout:
30
                          seconds
Click "" to save changes and connect to your Xaraya site.
Configuring MozBlog -- http://mozblog.mozdev.org:
This advanced example shows how to create a new Publication Type (called Recipes) in Xaraya using Dynamic Data. We cover Dynamic Data in depth later in this Guide.
LOG IN AS A XARAYA ADMINISTRATOR: This is done any time you wish to have Administrator access to your Xaraya site.
CREATE A NEW PUBLICATION TYPE: This is done for each custom Publication Type you create.
To create the new Publication Type, go to Admin->Articles->Publication Types. Click "". Complete the fields as follows:
Type:
recipes(NOTE: Lower case.)Description:
Recipe
              Collection
Field: title
Label:
Recipe TitleFormat: Text Box
Input: CHECKED
Field: summary
Label:
DescriptionFormat: Small Text Area
Input: CHECKED
Field: bodytext
Label:
IngredientsFormat: Large Text Area
Input: CHECKED
Field: bodyfile
Label:
(this field should be
                  blank)
Format: (as long as Label, above, is blank and Input, below is UNCHECKED, it does not matter what this field contains)
Input: UNCHECKED
Field: notes
Label:
InstructionsFormat: Large Text Area
Input: CHECKED
Do not modify the last 3 fields (authorid, pubdate, and status); leave them as they are.
Click "" to save changes.
ENABLE DYNAMIC DATA FOR ARTICLES/RECIPES: This is done for each custom Publication Type using Dynamic Data you create, unless Dynamic Data has previously been enabled for the module.
To enable Dynamic Data for a Publication Type, go to Admin->Modules->Configure Hooks. We want to enable Dynamic Data within Articles, so click "" and CHECK the box for Articles and the 'Recipe Collection' sub-category under Articles. Click "".
ADD DYNAMIC DATA FIELD(S) TO THE NEW PUBLICATION TYPE: This is done for each custom Publication Type using Dynamic Data you create.
To add dynamic data field(s) to the new publication type, go to Admin->Articles->Publication Types. Find the 'recipes' Publication Type that we created in CREATE A NEW PUBLICATION TYPE, above, and click Article Config next to it. Near the bottom of the next screen, you'll see "Dynamic Data Fields [modify]". Click "" and in the new window that opens, enter the Dynamic Data as follows:
Label:
photo(NOTE: Lower case.)Property Type: Image
Data Source:
dynamic_dataStatus: Active
Click "" to save changes. Close the window and return to the previous browser window for the rest of the steps.
ADD A NEW CATEGORY (AND OPTIONAL SUB-CATEGORIES) FOR THE NEW PUBLICATION TYPE.
To add the new category (and optional sub-categories), go to Admin->Categories. Click "" to add a new Category. For this example:
Create a new Category called "
Recipes
          Category
" by following the steps below:Name:
Recipes CategoryDescription:
This is the recipes category for
              this site.
In relation to this category: Generic1
Position: Right before, in the same level
Optional image:
categoryrecipes_top.jpgClick "" to add the new category.
Create three sub-categories: "
Appetizers &
          Soups
", "Breads & Baked Goods", and finally "Desserts". To create the "Appetizers & Soups" sub-category, click "" and follow these steps:Name:
Appetizers & SoupsDescription:
Soups and Appetizer recipes go
                  here.
In relation to this category: Recipes Category
Position: The first child category
Optional image:
categorysoups.jpgClick "" to add the new category.
To create the next two sub-categories, click "" and follow these steps:
Name: Breads & Baked Goods
Description:
Breads & baked goods
                  recipes go here.
In relation to this category: Recipes Category / Appetizers & Soups
Position: Right after, in the same level
Optional image:
categorybaked.jpgClick "" to add the new category.
Create another sub-category, typing "
Desserts" in the Name field, "Dessert recipes go here" for the Description, and "categorydesserts.jpg" as the image.
ADD THE NEW PUBLICATION TYPE TO A CATEGORY: This is done for each custom Publication Type you create.
To add Publication Types to Categories, go to Admin->Articles->Modify config and click on the description of the Publication Type we created (in this example, it's "
Recipe
          Collection
"). Scroll down, and you'll see:Number of possible categories: 0. Change the "0" to "
1".Click "" to save changes.
After the screen refreshes, scroll to the bottom of the center section and select the Category for the new Publication Type. In this example, if it's not already selected, select "
Recipes Category" that we created above. Click "" to save changes.CONFIGURE THE NEW PUBLICATION TYPE: This is done for each custom Publication Type you create.
Still in Admin->Articles->Modify config, click on the description of the publication type we just created (in this example, it's "
Recipe Collection"). Make the following changes (NOTE: Items enclosed in parenthesis below are the names of the variables used in templates.):Use 'recipes' as alias in short URLs: CHECKED
Default start view: Browse in Recipes Category
Number of columns ($numcols):
1Items per page ($number):
10Show category links in article summaries ($categories): CHECKED
Show previous/next category ($showprevnext): CHECKED
Show number of comments ($comments): CHECKED
Show hit counts ($counter): CHECKED
Show ratings ($rating): CHECKED
Show links to publication types ($showpublinks + includes/publinks.xd): CHECKED
Show link to archives ($archivelink + $archivelabel): CHECKED
Show link to article map ($maplink + $maplabel): CHECKED
Call transform hooks in summaries: UNCHECKED
Show link to previous/next article in display ($prevart + $nextart): CHECKED
Click "" to save changes.
ADD TEMPLATES FOR THE NEW PUBLICATION TYPE: This should be done for each custom Publication Type you create.
We can create up to three custom display templates to tell Xaraya specifically how to display this new Publication Type. Example files are included in this tutorial distribution. Download them from the website: http://www.xaraya.com/documentation/userguide/examples/Xar-PubType.zip If you do not create a template, Xaraya will attempt to display the Publication Type using a default template and show you a warning.
Template files shipped with a module are placed into the
<xarroot>/modules/articles/xartemplatesdirectory, and are called 'user-display-<pubtype>.xd', 'user-summary-<pubtype>.xd', and (optionally) 'user-view-<pubtype>.xd', where<pubtype>is the name of the Publication Type. When you create templates yourself your are strongly advised to use the Xaraya template overrides. This works simple. You will place your own templates in<xarroot>/themes/<yourtheme>/modules/articles/Note that we do not use the xartemplates directory in there. Templates placed in the themes directory get the extension xt instead of .xd. This is done for clarity. In this tutorial,<pubtype>is "recipes" as created in step #2 above and we will place these in the Xaraya_Classic theme:user-display-recipes.xt -- this is the main view of the data
user-summary-recipes.xt -- this is a summary view of the data
user-view-recipes.xt (optional) --
It is recommended that you begin by examining the example files included with this tutorial, or open one of the sample templates provided with Xaraya and make changes as necessary using your favorite HTML editor. Where ever you want to display the fields in the new Publication Type, enter "
#$fieldname#" (no quotes) in the template. Xaraya will replace "#$fieldname#" with the contents of the field as stored in the database. In this tutorial, we created the following fields, which are available for display in the template using the#$fieldname#indicated in parenthesis:title (#$title#)
summary (#$summary#)
bodytext (#$bodytext#)
notes (#$notes#)
photo (#$photo#)
The templates included with this tutorial distribution expect to find a file called "
NoPhoto.gif" in the<xarroot>/images/recipesdirectory of your website. This file is displayed if a Photograph URL is not provided in the article submission, and is included with this tutorial distribution. CopyNoPhoto.gifto the<xarroot>/images/recipesdirectory, creating directories as necessary.ADD AN ARTICLE TO THE NEW PUBLICATION TYPE: This is done for each custom Publication Type you create.
Now articles can be added to the new publication type. Click Admin->Articles->Add Article and click on the name of the new Publication Type (in this example, it's Recipe Collection). A sample recipe is included with this tutorial (
SampleRecipe.txt).Enter the Recipe Title, Description, Ingredients, Directions, and a URL for the photograph for the recipe. Select the appropriate Category for the recipe, and click "" to see what the recipe will look like, or click "" to save it.
On the following panel, approve the article by putting a CHECK in the STATUS box, and selecting "" from the drop-down list at the bottom of the panel. Click "" to save changes.
LOGOUT FROM THE ADMINISTRATOR ACCOUNT
It is a wise idea, though technically not required, to log out of your administrator account at the end of each session. To log out of your Xaraya administrator account, click , which appears at the bottom of the Administration menu. Confirm your intention to log out on the next panel by clicking "", or click "" to abort the logout.
Table of Contents
Xaraya provides the ability for site administrators to add data fields to the site to serve a number of different purposes, from extending the basic Xaraya configuration to adding completely new features. Using Dynamic Data, fields can be added and manipulated on the site. This ability is available through Dynamic Data, which can be considered 'building blocks' for data manipulation on the site.
With other Content Management Systems products, if you wanted to display Recipes on your site, for example, you had to wait for a Recipes module to be developed and then hope it met your needs. As a Content Management System, Xaraya is capable of showing almost any data in almost any way that you desire -- usually without the need to develop (or wait for) an external module. No more waiting for someone else to create a guestbook; no more waiting for someone else to develop that recipe module; no more waiting for someone to add categories to the reviews module; no more waiting for a module to display portraits or additional information in user information screens. Xaraya gives the site administrator the power to be self-sufficient and the flexibility to extend Xaraya -- without coding. Dynamic Data allows Xaraya's site administrators to customize Xaraya specifically for their needs.
Using Dynamic Data, site administrators can add fields to Xaraya that customize the site.
Here's a general overview illustrating how to add dynamic data to a Xaraya module:
Enable the Dynamic Data HOOK for the module you wish to extend
Create the Dynamic Data OBJECT via the hook
OTTO: * Define how the Dynamic Data object is DISPLAYED
For a specific example, we'll add a picture to user's information on the site. The user's picture file must be accessible via the web; this feature does not allow the uploading of picture. Let's walk through the steps to set this up...
Enable the Dynamic Data HOOK for the module you wish to extend
The first thing to do is to enable the dynamic data hook for the module you wish to extend. For this example, we wish to extend the roles module. To enable Dynamic Data for the roles module, follow these steps:
Go to Admin->Modules->Configure Hooks
Click ""
CHECK the box next to '' to enable Dynamic Data for the roles module
Click ""
Create the Dynamic Data OBJECT
Now we need to create the dynamic data object that will hold the picture information for the roles module. To do this:
Go to Admin->Roles->Modify Config
Under "", click on "" for the Dynamic Data Fields
You are now in the Dynamic Data module at the Modify Dynamic Properties tab. We will create now the image field, a socalled property.
Data Source: keep this to dynamic_data. This is the location the information will be stored
In Label, type "My Picture" (or whatever text you want displayed to your users)
In Property Type, select "" from the drop-down list.
Leave Default and Validation empty.
In status select "". This will stop it showing in the membership list but will still make it visible in the user info.
Click "" to save changes.
You are returned to a similar-looking screen with your new Dynamic Data object displayed. Your Dynamic Data object has been added.
Adding a picture to your user info
You'll need a picture that is accessible via the web to add a picture to your user info. To add the picture, follow these steps:
As Administrator, go to Main Menu->Modules->Roles (NOTE: Do NOT click Admin->Roles for this option, as you will return then to the admin area of roles).
Click "".
Add the URL of your picture to the "" field. Be sure it begins with "
http://" unless the picture is on your local webserver.Click "".
Viewing the picture
There are two ways to do this. Once you've added your picture's URL click the "" link next to it in "", or click on the user's name in the membership list.
Table of Contents
Roles allow you to manage Users and Groups on your site. Roles are representations of Users and the different Groups to which they can belong.
Roles can be members of other Roles, to any degree. You can, for instance, use Roles to represent a company's organization chart, or the set of classes at a university. A Role can be a member of as many other Roles as you like (as long as the parents are Groups).
Roles can be assigned Privileges. By doing so, you define what a given Role may or may not do on the site. You can use the test function of the Roles module to see what parts of the site a Role with a given set of Privileges has access to.
Roles have inheritance. A Role inherits all the Privileges of all of its parents, but can override these inherited privileges. If you give a group editing privileges, for instance, any other Role that is a member of that Group inherits the editing privileges. If you want to restrict the privileges of some of the members, simply assign them a different set of privileges, and the privileges of the parent will be overridden.
The Roles on your site are displayed in a tree under Admin->Roles->View All Groups. At the top of the tree is a Role called Everybody, which represents the "group of all groups" on your site. Every User and every Group is a member or descendent of the Everybody Role.
Xaraya comes preconfigured with a minimal set of Roles that are loaded when you run the installer. This configuration is shown below:
Everybody
|
|---Anonymous
|
|---Administrators
| |
| |---Admin
|
|---Users
Everybody: The Role containing all other roles. This Role has no access privileges.
Anonymous: A user that represents ALL unregistered users on your site. This Role is initially configured with Privileges only to access the front page of the site and the login block.
Administrators: A group that has administration privileges.
Admin: A member of Administrators group. This is the Admin role you create with the Xaraya installer.
Users: A group that normally holds registered users of the site. This role is not preconfigured with any privileges. Members of this Group will not have access to the site until you assign privileges.
The preconfigured Roles cannot be changed or removed. However, you can add members to them. You can also define as many more Roles in the tree as you wish in whatever configuration you choose.
Always keep in mind: When you create a role, until you've assigned privileges to it, the role will only have the privileges it inherited from its parents.
Admin->Roles->Groups & Users:
This panel displays all user and group roles you have in your install. After a fresh install there will be 6 roles. The standard tab is "Users". If you choose the Style in the scroll bar for style as Tree, you will see a graphical representation of the roles on your site that are groups, the Role Hierarchy.
The following options are available for each Role group:
Admin->Roles->Groups & Users->"X" icon: Delete this Role. It is not possible to delete a Role that contains any users. If you wish to delete a Role that is a group, first remove all the users from the Role. When there are no users assigned to a Role, the Delete icon becomes available.
Admin->Roles->Groups & Users->"Two people" icon: Display users assigned to this Role.
View All: View all users in this Role.
View Inactive: View inactive users in this Role.
View Not Validated: View users in this Role who have not yet validated their account.
View Active: View only active users in this Role.
Click the name of a specific user to go to a Modify User Role panel where the selected user can be edited, or added to (or removed from) a particular Role.
The Show Users screen allows you to delete a specific user, view the privileges assigned to a specific user, or to test the privileges of a specific user. Click the icon for the function you wish to utilize. See below for an explanation of these functions.
Admin->Roles->Groups & Users->"Envelope" icon: Send a plain-text email to all members of this Role.
The following variables are available to be used in the Subject or Body of the email (see Site Emails, below, for more information on using variables):
%%name%% -- Display name for the user on the site
%%sitename%% -- Site Name
%%siteadmin%% -- Name of the site administrator
Subject: Enter the subject of your email message in this field.
Message: Enter the body of your email message in this field.
Click "" to send email.
Admin->Roles->Groups & Users->"Arrow pointing down at person" icon: Show the Privileges assigned to this Role.
Privileges are displayed in two categories:
Inherited Privileges
Name: The name of the privilege
Realm: The realm in which the privilege exists
Module: The specific module affected by the privilege
Component: The module component affected by the privilege
Instance: The instance affected by the privilege
Level: The access level of the privilege
From Group: The group from which the privileges were inherited. Click the privilege name to view it.
Assigned Privileges
Name: The name of the privilege
Realm: The realm in which the privilege exists
Module: The specific module affected by the privilege
Component: The module component affected by the privilege
Instance: The instance affected by the privilege
Level: The access level of the privilege
If a privilege can be removed, a "" link is displayed in the far right column. Click "" to delete the privilege. Only directly-assigned privileges can be removed from this panel.
Assign a Privilege to Role <rolename>:
Privilege Drop-down list
Click "Add" to assign privilege.
Admin->Roles->Groups & Users->"Arrows swirling around person" icon: Test this Role's Privileges
You can test the privileges that are assigned to a role. This can be very usefull when you want to know what a role can or cannot do, without the need to login as a user in that role.
Registered Masks for this Module: Select a module from the drop-down list. The screen will update with a list of Masks for the module. Click the mask against which you want to test privileges. The selected user/group is tested against that mask, and if the user/group is permitted to perform the action, a PERMITTED message is displayed. If the user/group is not permitted to perform the action, a NOT PERMITTED message is displayed.
Click "" to perform test.
Admin->Roles->Add Group/User:
In this tab you can register a new role.
Display name: The display name for the User/Group.
Type: From the drop-down list, choose if you wish to add a new User or Group.
Member of: From this drop-down list, select the default Role for this new User or Group.
The following fields are required if "Type" (above) is "User". If you are adding a Group, these fields are not available.
User Name: The username of the user to be added.
Email: Email address of the user to be added.
State: From this drop-down list, select the state for the new user's account.
Inactive:
Not Validated:
Active: The user's account is validated and fully activated.
Pending:
Password: The password for the user to be added.
Confirm Password: Confirm the user's password by entering it here.
Click "" to save changes.
Admin->Roles->Messaging:
In this tab you can send emails to users in roles.
Groups: Choose the group you want to send an email to
State: From the drop-down list, choose if you wish to select only a role with a certain state.
Templates: Xaraya comes with predefined messages in templates. These message templates can be found in <xarroot>/var/messaging/roles/. From this drop-down list, select the template you want to use.
Press reload.
The number of selected users will be displayed. Also, the text of the email message is shown in the message field.
Subject: Check the subject of the email message.
Message. Check or enter the message you want to send.
Send the message by clicking the Send button.
Admin->Roles->Purge Users:
Select Status Type:
From the drop-down list, select the type of users you would like to purge.
Inactive: This classification is for users that have been inactive on the site for a specific period of time. If you wish to purge users of this status type, select this value from the drop-down list. OTTO: Where is inactive timeout set?
Not Validated: This classification is for users that have registered an account but have not validated their account. If you wish to purge users of this status type, select this value from the drop-down list.
Pending:
Click "" to perform purge.
Admin->Roles->Modify config:
Page Layout:
Number of Users to View Per Page to "
25"Enabled Short URLs: CHECKED
Show Terms of Service: CHECKED
Show Privacy Policy: CHECKED
User Registration Options:
Allow Registration: CHECKED
Minimum age to be a user: "
13"Allow users to choose their own password when registering: CHECKED
Minimum length for password: "
5"Send notice to admin when new user registers: CHECKED
Require explicit administrator approval before activating new user: CHECKED
Require validation of new user: CHECKED
Show dynamic properties on registration (if enabled): CHECKED
Send welcome email on successful registration of user: CHECKED
Default group for new users: From the drop-down list, select the default group to which new users will be assigned after successfully registering (and, if enabled, validating) their account.
Filtering Options:
Disallowed user names: Enter usernames that are forbidden for use on the site.
Disallowed email addresses: Enter email addresses that are forbidden for use on the site.
Disallowed IP addresses: Enter IP addresses that are forbidden for use on the site.
Click "" to save changes.
The site can automatically send email messages to users at various stages of user registration. Emails can be sent to confirm a new user, welcome a confirmed user to the site, remind a registered user of their password, or to re-validate a user who has changed email addresses.
The next few options allow customization of the site emails.
The following variables can be included in the email (either subject or body) and are replaced in the text with specific information:
%%username%% -- User's username on the site
%%name%% -- Display name for the user on the site
%%sitename%% -- Site Name
%%siteadmin%% -- Name of the site administrator
%%password%% -- User's password
Additionally, if you have configured Dynamic Data for the Roles module, available Dynamic Date objects are listed as variables.
Admin->Roles->Confirmation Email:
This email is sent to users to complete their registration by clicking a link in the email.
The confirmation email is plain text. Edit the subject and body as necessary, and click "" to save changes.
The following variables are available in this message body or subject:
%%link%%: The link on which the user must click to complete registration
%%ipaddr%%: The IP address of the person registering
%%name%%: Name given by user during registration
%%valcode%%: Validation code to activate the user's account
Admin->Roles->Welcome Email:
This email is sent to users to welcome them to the site.
The welcome email is plain text. Edit the subject and body as necessary, and click "" to save changes.
Admin->Roles->Reminder Email:
This email is sent to users who indicate that they have lost their password.
The reminder email is plain text or HTML depending on your settings in Admin->Mail->Modify config. Edit the subject and body as necessary, and click "" to save changes.
Admin->Roles->Validation Email:
This email is sent to users when they re-validate their account (for example, change email address).
The validation email is sent as plain text or HTML depending on your settings in Admin->Mail->Modify config. Edit the subject and body as necessary, and click "" to save changes.
Table of Contents
Through the use of privileges and roles, Xaraya provides very fine-grained access control for site users on either a Group or individual User level. Many of the concepts behind user roles and privileges are based in Object Oriented Programming.
Privileges are individual access levels (example: Allow Comments on Articles; example: Do not allow access to administration options) that can be used as building blocks and collected together into Compound Privileges.
Any combination of Individual Privileges and Compound Privileges can be placed into Site Roles. Site Roles are built from existing Individual Privileges or Compound Privileges. Privileges are made from Access Levels. Access Levels are the basis for the access control system in Xaraya. Users are placed into Roles and have permission to do whatever the Privileges associated with that Role permit them to do on the site.
Because Xaraya's Roles & Privileges are considerably different from user rights features in other Content Management Systems, let's first define some terminology that will be used in this section of the Guide.
Role: A uniquely-named set of one or more users. A Role can correspond to a User or Group of users.
Privilege: An object that can grant or deny a particular kind of access to a module component. For example, the ability to view the Login Block is a privilege, the ability to edit an Article is a privilege, and the ability to post a comment is a privilege.
Module: A functional unit of a Xaraya site -- a module of the Xaraya system (articles, polls, messages, ratings, comments, headlines, etc).
Component: A group of resources that can be protected with the security system. Components are defined by the modules in which they reside. Components can be VISUALLY DISCRETE resources, such as blocks or web pages, or they can be FUNCTIONALITY resources, such as the ability to add or edit items. Components can be defined in any way the module developer wishes, for example, "adding an article", "viewing a link", "displaying a menu", etc, could all be designed as components by the module author. Some components coincide with concepts known outside the security system, such as blocks, but this is not necessarily the case.
Instance: A specific instance of a component. For example, the login block on the front page of a Xaraya site is an instance of the Block component in the Roles module. Another example of a 'Component' and an 'Instance': the Component might be menus in a module while the Instance would be "menu number 7". Think of Components as classes of Privilege objects and Instances as specific examples of those objects.
Mask: A special kind of privilege used to check other privileges. Each mask protects one or more components. When a mask is encountered, it is checked against the user's privileges to see whether access to the component in question is permitted.
Access level: The type of access granted by a privilege or required by a mask. An access level is the right to access a resource. Security levels in Xaraya go from 0 (no access) to 800 (admin or full access).
Realms: Realms are a way of creating different security views of the same Xaraya site. They are an "extra dimension" used to make finely-grained security schemes.
For extended explanation of the terminology, read RFC 030 on the security system in Xaraya (http://www.xaraya.com/documentation/rfcs/rfc0030.html)
EXAMPLE: If you would like anonymous users to be able to view items on your website (but be unable to post comments), add the following privilege:
Admin->Privileges->Add Privilege:
Click "" radio button -- the panel will reload with additional options
Name: ViewTopics
Member of: CasualAccess (If you DO NOT select an existing privilege of which the new privilege is a member, the new privilege will appear in the top level. If you select a Member from the drop-down list, the privilege appears in TWO places:
Top level
Under the privilege selected from the drop-down list
This configuration is in place so the privilege may be re-used. It also prevents the privilege from being "lost".)
Realm:
AllModule:
ArticlesComponent:
AllLevel: Set to "
Read"Click ""
When you install the community site setup of Xaraya, then you will already have a set of several privileges in place. It is advised to keep this set of privileges, and only add new ones to it.
The levels of Privileges add up. So giving the highest admin level to a role, will automatically cause this role to be able to have read access as well.
None: User has no access to this item.
Overview: User can see the SUMMARY of an article, or be shown a link but not the article/link itself.
Read: User has READ ONLY access to this item.
Comment: User can POST COMMENTS about this item.
Moderate: Used for functions that require moderation, such as Comments, or in Forums. An example is granting a user moderation abilities within a message board but nowhere else on the site.
Edit: "Edit" is a permission for users that may not be permitted to Add, but are allowed to Edit. Example: An Article Administrator that is permitted to edit stories, but is not permitted to post Articles.
Add: "Add" grants permission to either add or approve content.
Delete: "Delete" is the opposite of "Add". You are granting someone the ability to remove content.
Admin: User has ADMINISTRATOR ACCESS to this item.
Empty: It's possible to create a Privilege which has no access rights itself, but is just a container for others. Selecting EMPTY can to create a 'master container' for other Privileges. ADVANCED: It is possible for a 'master container' to contain access rights. We'll explore that more later. OTTO
With Rights: This Privilege, unlike an Empty Privilege, has access rights.
To grant Anonymous users read access to the site, add the following privilege:
Go to Admin->Privileges.
Click "".
Under the Privilege drop-down list below Add Privilege To '', select ""
Click "" to save changes.
Unregistered and Anonymous users now have read access to the site.
To allow Registered users to change their theme, post comments, and submit articles, add the following privilege:
Go to Admin->Privileges->Add Privilege
Admin->Privileges->View Privileges->View Topics:
If you would like anonymous users to be able to post comments, change the "" field to "" and click "" to save changes.
Table of Contents
Authentication is the process of authenticating a user. Usually, a user identifies himself by logging in. His credentials are then checked by Xaraya and this specific user is granted access, or not. The administrator sets the way a user should authenticate in the Roles module (Admin->Roles->Modify Config).
Xaraya offers a variety of Authentication methods. We will describe the ones that are available from the Xaraya repositories and that are shipped with the Xaraya distribution.
Hint: you can view all modules that Xaraya holds in the repositories and its status in the Nighty Builds document at http://www.xaraya.com/index.php/team/580
This module is part of the Core of Xaraya. It is the standard authentication module.
Modify configuration
This panel shows some general options.
Enable Short URLs
Use lockout time on incorrect login attempts. You can increase security by locking out a session after several wrong attempts to login. This will help against blunt tries. This option is off in the standard installation.
Overview. This gives indepth information on the module.
This module provides LDAP authentication services for Xaraya.
Modify config:
This panel allows modification of configuration options for this module.
LDAP Server Name or IP: Enter the complete server name or IP address for the LDAP server.
LDAP Server Port Number: Enter the port number for the LDAP server.
Anonymously Bind to Server:
LDAP bind DN:
LDAP UserID Field Name:
Search User DN:
LDAP Admin ID:
LDAP Admin Password:
Add LDAP User to Xaraya Database on Login: If a user exists in LDAP but does not have a login account for Xaraya the user will be unable to login. By CHECKING this option and entering the attribute values, a user that has account information in LDAP will be automatically added to the Xaraya database and permitted to login. If you do not wish to add LDAP users automatically to Xaraya's database, UNCHECK this option.
LDAP Username Attribute Name:
LDAP Email Attribute Name:
Default Group: DDL
Click "" to save changes.
When this module is activated and configured and a user logs into your site, Xaraya looks at the Invision Power Board (IPB) database for the user's registration information. If the user's information is in IPB's database, the user is authenticated and their registration information is copied into Xaraya's database if it doesn't already exist.
Before starting, make sure that you've got your IPB forums set up and configured. The set up and configuration of IPB forums is beyond the scope of this document. Before the AuthInvision module can be activated, you have to manipulate a file and a database entry so that everything is properly configured.
Copy the
<xarroot>/modules/roles/xartemplates/login.xdfile to<xarroot>/themes/<theme_name>/modules/roles/xartemplates/login.xt(creating directories as needed) and edit the links in<xarroot>/themes/<theme_name>/modules/roles/xartemplates/login.xtto point to your IPB registration page (usuallyhttp://www.yoursite.com/forum/index.php?act=Reg&Code=00, depending on where your forum is installed).Using phpMyAdmin, go into your Xaraya database and edit the
xar_config_varstable and change theSite.User.AuthenticationModulesvalue toa:1:{r0;s:12:"authinvision";}. That is all that should be in that value; no more, no less. Be careful with this command; if you get it wrong, you will break your site.
Now install & activate the module and you're all set!
The AuthURL module allows you to authenticate a user based on their access to another URL/site. The AuthURL module sends a HTTP basic authentication request to the specified URL with the credentials supplied from the login form.
This module can be used if you have an authentication at another site, that uses an URL for logging in.
Table of Contents
Xaraya offers a wide variety of content modules. You can hold all kinds of content, and these modules can cater already for most needed types of content. We have discussed the articles module in the previous chapter, so here we will show some other ways to hold content.
Some of the modules in here are released via the release module at Xaraya.com. You are advised to check the list there to see if you can obtain a newer version. You can also see the latest extension releases via the release page in base: Admin->Base->Latest Xaraya Releases.
Polls allow you to gather information from your site visitors using a 'voting booth' method. Xaraya supports an unlimited number of different polls, and polls optionally support selection of multiple options (for example, for surveys like 'Which of these items do you own?').
: To create a new Poll for the site, click "". The next panel offers the following options.
Poll title: Enter the name of the poll in this field, which is displayed to site visitors.
Poll type: If you want your users to be able to select only one option, choose "" (for example, "Ringo"). If you want your users to be able to select multiple options (for example, "John" and "Paul"), choose "".
Private: CHECK this box to make this poll private. UNCHECK this box to make the poll public, which means any site visitor with privileges can view and vote in this poll.
Poll options: Enter each available poll option, one option per line. Move from field to field using the TAB key.
Click "" to save changes.
:
Title: The title of the poll.
Actions:
Edit Options: To add, modify, or delete options for the selected Poll, click the "" link.
Option: The poll option.
Order: To move a poll option up or down, click the corresponding arrow next to it.
Actions:
Modify: To modify a poll option, click the "" link next to the option to be modified. Make any modifications and click "" to save changes.
Delete: To delete a poll option, click the "" link next to the option to be deleted. Confirm your intention to delete the poll option by clicking "" on the next panel. The poll option is removed.
New option: Click "" to add a new poll option to an existing poll. Enter the option text to be displayed to site visitors, and click "" to save changes.
Close: Closes the poll so no more votes can be submitted.
Modify: The modify option allows the title, type, privacy setting, and options to be changed on an existing poll. Click "" to save changes.
Reset: Click this option to reset the polling data for an exsiting poll. Confirm your intention on the next panel. If you click "", any existing votes are removed for the selected Poll.
Delete: Deletes the poll and all responses from the site. Click "Delete Poll" to confirm your intention to delete the poll.
: This panel allows modification of configuration options for this module.
Scale of result bar: OTTO
Number of options for new polls: Sets the default number of options available when a new poll is created. If you only ask "
Yes" or "No" polls, it is safe to set this to "2" options. Only the poll options that you use are displayed to site visitors. No matter the value in this setting, new options can be added to polls easily. A suggested setting for this field is "10".Number of polls per list page: This setting defines the number of polls to display per page. To display 20 polls per page, enter "
20" in this field.Activate comments in polls?: CHECK this box to permit comments on polls. The Comments module must be installed for this option to function.
Use images for graph display: From this drop-down list, select if you would like to use images for poll results graphs.
Never: Select this option to NEVER display images in the poll results graph.
Blocks only: Select this option to display images in the poll results graph only when the poll is displayed within a block.
Module space only: Select this option to display images in the poll results graph only within the Polls module, but not in blocks. For example, selecting this option displays images in the poll results graph only when a site visitor clicks the Polls module.
Always: Always display images for the poll results graph.
Allow users to vote (per poll): From this drop-down list, select the frequency with which a site visitor is permitted to vote in a poll.
Once: The site visitor is permitted to vote in a poll only once.
Once per day: The site visitor is permitted to vote in a poll once per day.
Once per week: The site visitor is permitted to vote in a poll once per week.
Once per month: The site visitor is permitted to vote in a poll once per month.
Allow users to see results before voting: CHECK this box to allow site visitors to view poll results, even if they have not yet voted in a poll. UNCHECK this box to hide poll results until a user has voted in a specific poll.
Click "" to save changes.
To create a Poll, follow these steps:
Go to Admin->Polls->New Poll.
In Poll Title, type "
Who is your favorite Beatle?"Select SINGLE in Poll Type, since we want our site visitors to select only ONE Beatle. If you wanted to allow them to select multiple options, set this field to Multiple vote. For this example, set it to Single vote.
Leave Private UNCHECKED.
Options: Add the following options, moving from field to field by pressing the TAB key.
John
Paul
George
Ringo
Click "" to create the poll.
RSS is a Web content syndication format. Using RSS, your site can 'pull' content in the form of headlines from selected websites and display that content on your site. If a user of your site is interested in reading the article, they can click a link to be taken to the other site. The Headlines modules facilitates this process.
Your site can be syndicated assuming that you have configured Admin->Bloggerapi. The link for syndication of your site is "www.yoursite.com/index.php?module=articles&func=view&theme=rss".
: In this section of the Headlines module, we specify the news feeds that we want to syndicate.
List of available feeds: Click this link to open a new browser window with http://www.syndic8.com. Click "" at the top of the Syndic8 site to display a list of available feeds, or enter search criteria and search for feeds. Once you have found a feed you wish to syndicate, copy the Feed URL from Syndic8 into Xaraya's URL field, below.
URL: Once you know the URL for the news feed you wish to syndicate, enter the complete URL (including "
http://") in this space.Click "" to save changes. The news feed is added to the site's Headlines list.
: This link allows you to view news feeds which you are syndicating, and to edit or delete them.
URL: The complete URL for the news feed, including "
http://".Order: Defines the order in which syndicated news feeds are displayed in the module. News feeds are displayed in ascending numeric order by order number. From 0 to 999, you may assign an order number to your news feeds to arrange them in your preferred order. These numbers do not need to be consecutive; it is perfectly acceptable to number your news feeds by 5's or 10's as you see fit. If you do not assign order numbers, sites are displayed in the order in which they were added.
Options:
Edit: Permits modification of a news feed.
URL: Enter the complete URL (including "
http://") for the news feed.Alternate Title: To override the title of the feed that is provided by the feed, enter the title of the feed in this field. Leave this field blank to use the feed-supplied title information.
Alternate Description: To override the description of the feed that is provided by the feed, enter the description of the feed in this field. Leave this field blank to use the feed-supplied description information.
Order: Modify the order number of the news feed in this field. Enter a number, from 0-999, in this field.
Click "" to save changes.
Delete: To delete a news feed from your site, click this link next to the feed to be deleted. You will be asked to confirm your intention to delete, and the feed will be deleted from your site.
: This panel allows modification of configuration options for this module.
Items per page: In this field, enter the number of headlines to display per page. For example, to display 20 headlines per page, enter "
20" in this field.Click "" to save changes.
The Addressbook module provides a configurable address book for your site. Entries in the address book can be made private (viewable only by the person who entered the item) or public (viewable by all users with access to this module).
Modify config:
This panel allows modification of configuration options for this module.
Access level:
Grant Rights for an unregistered user:
Grant Rights for a registered user:
View: To give unregistered/registered users VIEW access to the address book, CHECK this box. To prohibit unregistered/registered users from VIEWING the address book, UNCHECK this box.
Create: To allow unregistered/registered users to CREATE entries in the address book, CHECK this box. To prohibit unregistered/registered users from CREATING entries in the address book, UNCHECK this box.
Edit/Delete: To allow unregistered/registered users EDIT/DELETE access to the address book, CHECK this box. To prohibit unregistered/registered users from EDITING/DELETING items from the address book, UNCHECK this box.
Other settings:
Title of this Address book: In this field, enter the name of the address book as it will be displayed to users.
Default sort order / List View: Select two columns of your choice. This setting affects not only the sort order but also the display of columns in the list view. Users may select between the Default and Alternate sort orders.
Alternate sort order / List View: Select two columns of your choice. This setting affects not only the sort order but also the display of columns in the list view. Users may select between the Default and Alternate sort orders.
Name display in list view and sort order for name information: This setting determines the sort order and display of names in the list view. You can change the default «Last Name, First Name» to «First Name Last Name».
Special character (Umlauts) replacement for sort columns: Names and companies are stored in special sort columns for correct sorting when special characters (such as Umlauts) are used. This Admin setting allows you to set up the character replacement to correct the sort for each language.
Personal address book mode: The Address Book module may be used as a Global address book (UNCHECKED (default)) or a Personal address book (CHECKED). As a Global address book (UNCHECKED) all users with appropriate access may view records that are NOT marked Private. As a Personal address book (CHECKED) users may only view entries they have created and unregistered users may not view or create any entries.
Do you want to use a prefix field?: Prefix/Title (Mr., Mrs., etc.) values can be set in Admin->Addressbook->Name Prefixes panel and are optionally selected via a drop-down list when creating/editing an entry. This field is hidden (UNCHECKED) by default. If you wish to use a prefix field, CHECK this box.
Do you want to use images/logos?: Administrators will see a selection box of all files in the
<xarroot>/modules/Addressbook/xarimagesand can assign an image to a record. The image is shown in the upper right corner of the detail page. Currently, all pictures must be manually uploaded into the<xarroot>/modules/Addressbook/xarimagesdirectory. This field is hidden (UNCHECKED) by default. If you wish to use images/logos, CHECK this box.Disable the menu: If you wish to use the Addressbook module as a simple contact list, you can disable the menu completely. You can also disable it for guests only. Note, Administrators always see the full menu, regardless of this setting. Select from the drop-down list.
Enabled for all: Everyone can see the menu.
Disabled for all: No one can see the menu. Administrators always see the full menu.
Disabled only for guests: The menu is disabled for unregistered users, but displayed to registered users.
Disable the second line of the main menu: Disables the display of the second menu line only. Users have access to the categories, sort order, and the search field, but not to Private records, A-Z / Complete list view switch, and the Add New Record link.
Show zip before city: If you would like to display the postal/zip code before the city, CHECK this box. Otherwise, UNCHECK this box.
Records viewed per page: How many Addresses would you like to display per page? Enter that value into this field, for example, "
25".Hide the Copyright and Version Note: If you wish to hide the version number and copyright notice of this module, CHECK this box. To display the version number and copyright notice of this module, UNCHECK this box.
Custom labels:
Custom tab (if empty, no custom fields are displayed): Name of the Custom Fields tab and the headline for custom fields in the detail panel. Leave blank if you do not use custom fields.
Width of TEXTAREA fields: The width of the TEXTAREA field can change depending on the settings of your theme. Sometimes this results in a very bad layout for your form. You can set the HTML COLS of a TEXTAREA field in this box. Valid size ranges from 4 to 100.
Format for date entries: Select the format for date entry and display.
MM.DD.YYYY: Displays September 14, 1971 as "09.14.1971".
DD.MM.YYYY: Displays September 14, 1971 as "14.09.1971".
Format for numeric values: Select the format for numeric entry and display, either "9,999.99" or "9.999,99".
Administrative Messages
Administrative messages are sent whenever Addressbook catches an error that forces the user to start over.
Send messages to Site Admin if error encountered?: This option enables error messages to be emailed directly to the site administrator email account. UNCHECK to disable this feature.
Different email address if not the default Site Admin: Choose an alternate email address if the Site Administrator does not wish to receive error notifications from Addressbook.
Send error reports to Addressbook developer?: Recommended for quality assurance purposes. Only the contents of the error message are sent. This option sends an email to the Addressbook developers with the error message, date & time of occurrence, and the fully qualified host name of the server running the Addressbook module. NO OTHER INFORMATION IS SENT. This information is used solely for the purpose of fixing issues encountered in the Addressbook module. UNCHECK to disable this feature.
Click "" to save changes.
Categories:
Your Addressbook entries can be assigned to a single category for organizational purposes. Example categories: "Business", "Personal", etc. You may add as many categories as necessary. The category is assigned to an entry by selecting it from the drop-down listing during entry creation or editing.
Category: Enter the name of the category you wish to add.
Delete: To delete an existing category, CHECK the box on the line with the category to be deleted.
Note
When you click "" to delete an existing category, you are NOT asked for confirmation before deletion.
Click "" to save changes.
Contact labels:
Contact labels allow specification of different contact methods for an entry in the address book. Example contact labels: Phone, Mobile, Pager, Fax, E-Mail, Web, Other. You may add as many contact labels as necessary. The contact labels are available as drop-down lists when adding/editing a contact.
Label: Enter the name for the contact label you wish to add.
Delete: To delete an existing contact label, CHECK the box on the line with the contact label to be deleted.
Note
When you click "" to delete an existing contact label, you are NOT asked for confirmation before deletion.
Click "" to save changes.
Name Prefixes:
Honorary titles, or name prefixes, such as "Mr.", "Sir", "Mrs.", "Professor", or "Dr." can be specified in these fields. You may add as many name prefixes as necessary. You must have CHECKED "Do you wish to use a prefix field?" in Admin->Addressbook->Modify config for this field to be displayed during creation/editing of a contact.
Prefix: Enter the prefix in this field.
Delete: To delete an existing prefix, CHECK the box on the line with the prefix to be deleted.
Note
When you click "" to delete an existing prefix, you are NOT asked for confirmation before deletion.
Click "" to save changes.
Custom Fields:
If you wish to add custom fields for your contacts, do so using this panel.
Custom label: Enter the display text for the custom label in this field.
Data type: From the drop-down list, select the data type for the new custom field. A special data type, "", simply draws a horizontal line and does not accept data entry.
Delete: To delete an existing custom data type, CHECK the box on the line with the custom field to be deleted.
Note
When you click "" to delete an existing custom field, you are NOT asked for confirmation before deletion.
Order: Set the order in which the custom fields are displayed by clicking the UP arrow to move a field up in the order. Click the DOWN arrow to move a field down in the order.
Click "" to save changes.
Admin Docs: Click this link to view administration documentation for this module.
The NewsGroups module provides the basic functionality to read and post to NNTP.
:
News server: Enter the name of the news server from which you wish to pull news. For example, "
news.xaraya.com".Port: Enter the port on the news server through which news will flow. Generally "
119".Topics per page: Enter the number of topics to display per page. If, for example, you wish to display 50 topics per page, enter "
50" in this field.Click "" to save changes.
Using the Uploads module, the Site Administrator may permit uploads in a protected fashion. For example, if the Site Administrator configures Uploads in a certain way (see examples, below), users can submit images along with article submissions. These user-sent images can be displayed within articles.
View uploads:
View All:
Waiting for approval:
Upload file:
Browse:
Click "" to save changes.
Import files:
Modify config:
Primary configuration:
Uploads directory: This must be the full path to a folder on your server, including ending slash.
Maximum Upload Size (in bytes): This number may be ignored if it is greater than your PHP maximum upload size.
Allowed File Extensions: This list should be semicolon (;) delimited. Do not use dots (.) unless it is a multi-part extension like
tar.gz. Do not put a semicolon on the end unless you wish to accept uploads without extensions.Confirm Deletes/Rejects: Specifies if confirmation must be provided before files are deleted. Check YES to turn on confirmation. Check NO to turn off confirmation.
Click "" to save changes.
Images configuration:
Maximum Image Width (in pixels):
Maximum Image Height (in pixels):
Thumbnails:
Kept with original file:
Kept in thumbnail folder:
None:
Thumbnail path: In this field, enter the local path where (optionally, depending on the setting of "Thumbnails", above) thumbnails are stored, including the trailing slash. The directory must be writable by PHP.
NetPBM path: Enter the path to the NetPBM installation, including the trailing slash (for example,
/usr/local/bin/). If this field is populated, the Uploads module will use NetPBM to generate thumbnails. If this field is not populated (or the NetPBM files cannot be found), the Uploads module will use PHP's GD interface which requires PHP to be compiled with support for GD 1.8+. See Admin->Base->System for information.
Import configuration:
Import directory: Enter the local path where you've placed files that you wish to import via Admin->Uploads->Import. This must be the full path to the folder on the server, including trailing slash.
Obfuscate/Secure imported files: Check YES to obfuscate the imported files. Check NO and the files will not be obfuscated.
Click "" to save changes.
To allow users to upload images to the site and include the uploaded images in articles, we must complete several steps. These steps are listed below.
Create a directory where uploaded images will be stored. Default is "
<xarroot>/var/uploads", but the directory can be anywhere you'd like.Change the permissions on the UPLOAD directory to world-readable & world-writable. On Linux systems, this is done by "
chmod 777 <path_to_upload_dir>".Install the Uploads module. Go to Admin->Modules->View All. CHECK "" and click the "" button to refresh the page. Click "" next to the Uploads module if necessary.
Go to Admin->Uploads->Modify Config.
In the "Uploads Directory" field, enter the full path to the uploaded images folder on your server, including ending slash.
Ensure that you're satisfied with the permitted extensions in the Allowed File Extensions field. For example, "
gif;jpg;png;zip;tar.gz;tgz".Edit the other settings in this panel to your preferences.
Click "" to save changes.
We want to enable Uploads in Articles Publication Type, so we must hook the Uploads module to the Publication Type(s) of the Articles module. Go to Admin->Articles->Publication Types. Select the Publication Type to which you would like to hook Uploads and click "" next to it.
If you do not see "
Dynamic Data Fields
            [modify]
" at the bottom of the panel, you need to enable Dynamic Data for the Articles module before you can continue. To enable Dynamic Data for the Articles module, do the following:Go to Admin->Modules->View All. Locate the Articles module in the panel. Click "" under Hooks next to the Articles module.
On the panel that appears, place a CHECK in the box next to Uploads to enable Uploads in Articles. You can select either ALL Publication Types in Articles (by CHECKing the "
All" column) or select specific Publication Type(s) by CHECKing their individual boxes.Click "" to save changes.
Go back to Admin->Articles->Publication Types. Select the Publication Type to which you would like to hook Uploads and click "" next to it.
If you see "
Dynamic Data Fields [modify]" at the bottom of the panel, click "". A new browser window will open. In this new window we define the Dynamic Data field that will hold the uploaded image filename.Enter text to be displayed to the user in the "Label" field. For example, "
Image".From the Property Type drop-down list, select "
File Upload".The remaining fields should be set as follows:
Default is blank.
Data source is set to "dynamic_data".
Validation is blank.
Status is Active.
Click "" to save changes. The new Dynamic Data field is added to the Publication Type.
Go to Admin->Articles->Add Article. Select a Publication Type for which you have enabled Upload hooks. You should see at the bottom of the page the new Image field.
: This panel allows modification of configuration options for this module.
Configure Module
Short URL Support: If you wish to enable Short URL support for this module, CHECK this box. If you do not wish to enable Short URL support for this module, UNCHECK this box.
Click "" to save changes.
Table of Contents
OTTO: explain content management and transforms usage with Xaraya
Make your selected theme load as default by selecting it in the Admin->Themes->Modify config panel.
View Themes:
Style: Defines the display of the module list. Select the display style from the drop-down list.
Plain (fast): Default. Displays an unadorned listing of Themes. Options (activate, deactivate, etc.) are listed as clickable text.
Pro Icons: Displays a listing of Themes adorned with icons. Options (activate, deactivate, etc.) are listed as clickable icons, with a legend at the bottom.
Developer: Not currently implemented.
View: To limit the types of themese that are displayed, select from the drop-down list.
All Themes: Default. Shows all themes on the system.
Active: Shows only themes that have been activated.
Inactive: Shows only themes that have not been activated.
Uninitialized: Shows only themes that have not been initialized.
Sort by:
Name [a-z]: Sort the display in alphabetical order of theme name.
Name [z-a]: Sort the display in reverse alphabetical order of theme name.
Regenerate: When a theme is added to or deleted from the site's theme directory, the system needs to 'Regenerate' the file structure to recognize the change in the theme directory. To force the system to regenerate the themes list, CHECK "Regenerate" and click "". Regeneration is necessary only when themes have been added to or deleted from the site's theme directory.
Click "" to reload panel with new display settings.
Theme list:
Name: The name of the theme as it is displayed to users.
Version: The version number of the theme.
Reg.ID: Shows the Registered ID of the theme. Each theme is assigned a unique Registered ID.
Upgrade: If an upgrade to this theme is available, you are notified in this field. If no upgrade is available, "n/a" is displayed.
Info: Shows information about the theme, including creator, description, installation directory, version, and more.
Status: Shows the status of the theme.
Actions:
Initialize:
Deactivate:
Modify config: This panel allows modification of configuration options for this module.
Site Display Options:
Site Name - Module Name - Page Name: Displays as "
Your Site Name :: Themes :: Your Site
                    Slogan
" by default.Site Name - Page Name: Displays as "
Your Site Name :: Your Site
                    Slogan
" by default.Copyright: Defaults to "
©
                    Copyright 2003 <administrator
                    name>
". Change the text as necessary.Footer note: The 'footer' is displayed at the bottom (the 'foot') of each and every page on your site. This is an excellent place to give credit, state copyright, or put links that you wish to appear on every page of the site.
Page Title Options
Module Name - Page Name - Site Name: Displays as "
Themes :: Your Site Slogan :: Your Site Name"Page Name - Module Name - Site Name: Displays as "
Your Site Slogan :: Themes :: Your Site Name"Theme Driven: The page title order is determined by the theme's configuration.
Page Title Options
Page Title Separator:
Page Title Order: Determines how the page title is displayed. The results of the display options are:
Site Name - Module Name - Page Name: Displays as "
Your Site Name :: Themes :: Your Site Slogan"Site Name - Page Name: Displays as "
Your Site Name :: Your Site Slogan"Module Name - Page Name - Site Name: Displays as "
Themes :: Your Site Slogan :: Your Site Name"Page Name - Module Name - Site Name: Displays as "
Your Site Slogan :: Themes :: Your Site Name"Theme Driven: The page title order is determined by the theme's configuration.
Template Debugging Options
Show template filenames in HTML comments:
Click "" to save changes.
Certified Releases:
Autolinks is a feature that, when installed, generates web links related to text content on-the-fly. If you have Autolinks turned on & configured properly, "Beatles" defined as a Keyword, and "http://www.beatles.com" as the auto-link URL, Autolinks in Xaraya can automatically replace occurrences of "Beatles" within your articles with "<a href="http://www.beatles.com">Beatles</a>".
When the Autolinks module is installed, the option to hook Autolinks into particular modules appears in Admin->Modules->Configure Hooks. Hook Autolinks into the modules you wish (such as Articles, Comments, Ephemerids, Messages, and XarBB). See the section on Hooks for information about hooking modules together.
There are five 'levels' of use for the Autolinks module on your site.
Beginner: Create Autolinks based on previously-defined Autolink Types without using Dynamic Data. If you just want to create Autolinks, this is the simplest level. The default Autolink Types & templates are reasonably comprehensive.
Intermediate #1: Using Dynamic Data to allow over-ride of global settings for individual links (for example, named targets for links, etc).
Intermediate #2: Using dynamic data to access optional features of the standard templates (features such as an alternative icon in the 'external' link type).
Advanced #1: Adding new Autolink Types and creating templates for the new types.
Advanced #2: Using regular expression (regex) matching.
Let's examine the options available within Autolinks.
View Links
To view, edit, or delete Autolinks, click Admin->Autolinks->View Links. On the next panel, the following options are displayed. Autolinks in your database are displayed sorted by Name.
Type: Displays the Autolink Type. Click the Autolink Type text to go to the Modify Autolink Type panel.
Name: Displays the name of the Autolink. Names are unique across all Autolinks on a site. Click the Name text to go to the Modify Autolink panel.
Matching key: Xaraya searches content items for this text. If matching text is located, it is replaced with an autolink. If the Autolink has the "Match as regular expression" field CHECKED, the matching key is considered to be a regular expression (regex) and, so that you can tell it's a regex, is displayed on the listing as emphasised (which may be italics or other text formatting based on the theme).
URL: The URL to which this autolink points.
Options:
Disable: If you wish to disable an Autolink but not delete it from the Autolinks database, click "Disable". The Autolink will not appear as a link when matching text is found. To enable an Autolink, click "Enable".
Edit: If you wish to edit an Autolink, click on the "Edit" link for that Autolink. A panel is displayed allowing you to edit all the information about the selected Autolink.
Type: Displays the Autolink Type. If you wish to move an existing Autolink to a different Autolink Type, select the "Move" command under Admin->Autolinks->View Links->Options.
Edit: If you wish to edit the Autolink Type, click this link to go to the Modify Autolink Type panel.
Security
Name: Type the name of the Autolink as it will be displayed in the Autolink administration panels of the site. Names are unique across all Autolinks on a site. The name field exists because the Keyword may be a regular expression (see below) instead of a simple name.
Enabled: If this box is CHECKED, the Autolink.is enabled and will be displayed if a matching key is found in content. If this field is UNCHECKED, the Autolink is not displayed if a matching key is found in content. The "Example" field is displayed regardless of the setting of this field. Toggling this field will recompile the autolink from the template.
Matching
Matching key: Xaraya searches content items for this text, which must be enclosed by white space, tags, or punctuation. The punctuation characters are defined in Admin->Autolinks->Modify config. If matching text is located, it is replaced with the autolink.
Match as regular expression: This is an advanced option within Xaraya. CHECK this box to cause the Autolink to be evaluated as a regular expression instead of a string. UNCHECK this box (default) to evaluate the Autolink as a string. A regular expression (frequently abbreviated to "regex") is a way for a site administrator to express how Xaraya should look for a specified pattern in Autolink text and then what to do when each pattern match is found. For example, a regular expression could tell a program to search for all text lines that contain the word "Windows 95" and then to print out each line in which a match is found or substitute another text sequence (for example, just "Windows") where any match occurs.
Regular expression matching is very powerful in that a single regular expression will match more than just one word. For example, you may want to match "Windows 98", "Windows 95", and "Windows 9X" as a single autolink with the same URL. Another reason for using a regex is to split the matched string into sub-strings. For example, you may wish to match the text <article:aid> (e.g., "<article:123>") and replace it with a link. The template would need to know just the "123" portion. The regex can split the matched string into the required parts, allowing the seperate components to be passed to the template.
Replacing
Everything in this section depends on the template. This section describes the 'standard' template; other templates may do something completely different with these fields. The sample templates included with Autolinks will adhere to the standards described below.
Title: Enter the title of the Autolink in this field. The title is displayed to site visitors as a tool-tip.
URL: Enter the complete URL for the Autolink in this field. For external sites, always include "http://" at the beginning of the link. For local links, just the path to the page is sufficient (remember that you can use Short URLs if they are enabled).
Comment: An optional comment on the Autolink. The Comment field is not currently used in any of the default Autolink templates, however, it is passed to the template in case someone wants to use it.
Other
Sample text to test link: In this field, enter sample text to test the link. The sample text (and resulting links) are displayed on the Admin->Autolinks->View Links panel. In Admin->Autolinks->Modify config, you can specify how the sample text will be displayed (sample, result, both, or none).
Sample: (displayed in Admin->Autolinks->View Links)
Result: (displayed in Admin->Autolinks->View Links)
Click "" to save changes.
Move:
Move to Autolink Type:
Click "" to save changes.
Delete: To delete an Autolink, click on the "" link for that Autolink. A panel will be displayed asking you to confirm your request to delete the Autolink. If you wish to delete the Autolink, click ""; otherwise click "" and the link will not be removed.
Add Link
To add a new Autolink, click this link. On the next panel, the following options are displayed.
Autolink Type: From this drop-down list, select the Autolink Type from the previously-defined Autolink Types.
Name: Enter the title of the site in the Name field (for example, "The Beatles Site"). If the name is left blank on the first panel, the value is taken from the matching key field. This is the name that will be displayed as a tool-tip and in the listing of all Autolinks.
Matching key: Enter the keyword or regex in the Matching key field. This is the text that will be matched in an article (for example, "beatles").
Note
Capitalization is not important in the Key (link) Word field.
URL: Enter the complete URL for the site in the URL field (for example, "http://www.beatles.com"). For external sites, always include "
http://" at the beginning of the link. For local links, just the path to the page is sufficient (remember that you can use Short URLs if they are enabled).If the URL is located on your web site, enter the path to the file or the complete URL. For example, if the file is on your site, enter "
music.html" and Autolinks will automatically prepend the "http://www.yoursite.com", resulting in an Autolink of "http://www.yoursite.com/music.html". To be more specific, you could also enter "http://www.yoursite.com/music.html" instead of just "music.html".Comments: Use the Comments field to enter optional free-form alphanumeric comments about the link. The Comment field is not currently used in any of the default Autolink templates, however, it is passed to the template in case someone wants to use it.
Click "" to save changes. You are displayed a second panel where there may be additional fields to be populated, including any dynamic data fields defined for the Autolink Type. Creation of a new Autolink must be two-stage because dynamic data fields presented will depend on the chosen Autolink Type.
View Types
To view, modify, or delete existing Autolink Types, click this link. On the next panel, the following options are displayed.
Name: The name of the Autolink Type as it is displayed in the Admin->Autolinks panel. Must be unique.
Template: Enter the name of the template file for this Autolink Type (link-{name}.xd). If you enter "
underlined" in this field, Xaraya looks for a file called "link-underlined.xd". The file must exist with appropriate permissions and ownership in one of two locations on the site:<xarroot>/modules/autolinks/xartemplates/for a site-wide templateor
<xarroot>/<themes_dir>/<theme_name>/modules/autolinks/for a theme-specific template
Method: Either "Static" or "Dynamic", based upon the Execute Template Dynamically setting. It is useful to understand the difference between these two methods.
Static: A Method of Static will execute the template the moment that "Modify" or "Save" is clicked. The results are then stored away and used to replace linked text.
Dynamic: A Method of Dynamic does not execute the template when "Modify" or "Save" is clicked. Instead, Dynamic will execute the template when matching text is found. If the same matching text appears ten times in a page, a Dynamic type is executed ten times. There are two main reasons why you might use the Dynamic Method:
The template performs some kind of lookup to get additional details related to what has just been matched, so that details can be displayed that are not known at the time the autolink is created (an article title, for example).
You may have different autolink templates in different themes and want to use the appropriate template for the theme. This will execute the theme template based on the theme being viewed by the site visitor. By contrast, a Static Method will 'freeze' the template based on the theme the site administrator is using at that time.
Description: Description of the Autolink Type. This is displayed within Admin->Autolinks as a bit of information for the site administrator.
Options: To edit or delete an existing Autolink Type, click the appropriate link next to the Autolink Type to edit or delete. If you choose to delete an Autolink Type, you are asked to confirm your choice on the next panel. If the Autolink Type contains autolinks, you are asked to confirm the intention to delete these Autolinks as well. Autolinks that are not assigned to an Autolink Type are not permitted.
Add Type
Autolink Types are a group of similar-style or similar-functionality links based on a shared template for formatting, and sharing the same dynamic data properties if dynamic data is enabled. To add a new Autolink Type, click this link. This panel is also displayed when Modifying an Autolink Type. On the next panel, the following options are displayed.
Name: Type the name of the Autolink Type in this field.
Template name: Enter the name of the template file for this Autolink Type (link-{name}.xd). If you enter "underlined" in this field, Xaraya looks for a file called "link-underlined.xd". The file must exist with appropriate permissions and ownership in one of two locations on the site:
<xarroot>/modules/autolinks/xartemplates/for a site-wide templateor
<xarroot>/<themes_dir>/<theme_name>/modules/autolinks/for a theme-specific template
Execute Template Dynamically: For default Autolinks operation (non-regular expression), leave this box UNCHECKED. To execute the template dynamically, CHECK this box.
Description: Description of the Autolink Type. This is displayed within Admin->Autolinks.
Click "" to save changes.
Modify config
This section allows configuration of how Autolinks appear on your site.
Matching Rule Options
Punctuation characters: This list defines characters that are allowed to border a linked word. For example, if you want to match the word "
site" but not in the word "my-site", do not define "-" as an allowed punctuation character.Match non-breaking space entity as white space: "
" is an entity that represents ' ', while ' ' is just a space. To match "$nbsp;" to a space, CHECK this box. It is generally recommended that this option be CHECKED unless you have a specific reason to uncheck it. For example, if this box is CHECKED, a link that matches "my site" will also match "my site" as well as "my site" and "my site". All of these links will display the same if the field is CHECKED, but you may not wish to match non-breaking spaces. White space in non-matching regular expressions is treated as white space, regardless of what type or how long it is.
Action Options
Limit on number of times each link is used in a piece of text: Enter the number of times in a particular article that matching text will be converted to an Autolink. For example, if you would like a matching piece of text to be converted to an Autolink twice in a single article and subsequent matches would not be converted, enter "
2" in this field. To convert ALL matching text within a particular article to Autolinks, leave this field blank.Autolink decoration (style will override class): From the drop-down list, select the type of decoration displayed for autolinks. This field may be depreciated at some point, but it is currently implemented for legacy reasons. The definitions below are used on the default templates. It is possible to over-ride these settings in a link by using a dynamic data property field called "style".
Default: The default decoration style as defined in the site's theme will be used.
None: The autolink is displayed without any decoration.
Underline: The autolink text is underlined.
Overline: The autolink text is overlined (the opposite of underlining).
Both: Both Underline & Overline decorations are used to display the autolink.
Open links in new window: CHECK this box if you would like Autolinks to open in a new window. UNCHECK it to open Autolinks in the current browser window. It is possible to over-ride this setting in a link by using a dynamic data property field called "target", where your own targets may be defined.
Show template errors inline (errors shown in content): Use this while debugging. If a link does not execute the template properly, then it will generate an error message. CHECKING this field will show the error message as a tool-tip over the matched text (the text showing as an error class). UNCHECKING this field will leave words that link to an erroneous template intact - unmatched. The error message does not look good on a site, so it should be UNCHECKED once debugging is complete.
Template base name (affects all templates used): Don't touch this unless you want to see what template errors look like. Seemed like a good option so an admin can switch between different sets of links without changing theme.
Admin Options
Items per page: How many Autolinks would you like to display per page? Enter that value into this field, for example, "
25".Show sample links in list:
None:
Results only:
Sample only:
Sample and Results:
Click "" to add the Autolink to the database.
Adding AutoLinks to a Publication Type is very easy. There are two different methods for accomplishing this task, and we will cover them both in this example. Be sure you have some Autolinks defined (go to Admin->Autolinks->Add and add a few) and an article that contains Autolink text so you can see the results of your work.
Method 1. Go to Admin->Modules->View All. Next to the Articles line in the panel, click "" under the Hooks heading. On the next panel that appears, CHECK to enable Autolinks in specific Publication Type(s), or CHECK the ALL box to enable Autolinks in all Publication Types. Click "" to save changes. You have just enabled Autolinks to Publication Type(s)!
Method 2. Go to Admin->Modules->Configure Hooks. In the next panel, click Autolinks. CHECK the specific Publication Types in which you wish to enable Autolinks, or CHECK the ALL ARTICLES box to enable Autolinks in all Publication Types. Click "" to save changes. You have just enabled Autolinks to Publication Type(s)!
This module does not have an administration panel.
Enables BBCode formatting markup tags in text fields on the site. When BBCode is activated for a module, that module will allow entry & display of BBCode tags. BBCode is a markup language that allows, among other options, making text bold by enclosing it in "[b]" and "[/b]" markups (for example, "[b]Bold Text[/b]").
When this module has been hooked to another module (for example, if you enable BBCode in Articles), an editor page will display BBCode formatting quick-buttons. If text in a text field is highlighted, it can be transformed by clicking one of the BBCode quick-buttons. For example, if text was highlighted in a text area and the "I" (italics) BBCode quick-button was clicked, the italics tags would be added before and after the highlighted text.
To add BBCode formatting capability or BBClick transformation to a Publication Type, follow these steps:
Go to Admin->Modules->Configure Hooks.
Click BBCode to select it as the module providing extra functionality. The panel will refresh, and you will see a list of modules to which the BBCode module can be hooked.
CHECK the module(s) in which you would like to enable BBCode formatting. For our example, CHECK "" and "". Click "" to save changes.
Go to Admin->Articles->Add Article. Click the "" Publication Type. On the resulting panel, the BBCode Form Controls are displayed above the Category selector box. Using these controls, or by manually entering BBCode formatting markup, BBCode can be used in articles.
To add BBClick capability, just go through the steps again substituting BBClick for BBCode.
This module allows a site administrator to automatically filter -- or 'censor' -- objectionable words or phrases from the site.
Add Censored Word
Add items to the list of objectionable words to be filtered by clicking Admin->Censor->Add.
Keyword: Enter the keyword/phrase (the objectionable word/phrase) to be filtered in this field.
Click "" to save changes.
View
View items on the list of objectionable words/phrases by clicking Admin->Censor->View.
Key word: Each objectionable word/phrase is listed alphabetically.
Options: For each word/phrase, the following options are available.
Edit: Permits modification of an objectionable word/phrase. Click "Modify Censor" to save changes.
Delete: Permits deletion of an objectionable word/phrase. Confirm your intention to delete the item on the next panel.
Modify config
This panel allows modification of configuration options for this module.
Replace censored word with: If the Censor module finds objectionable text, it will be replaced with the text entered in this field. For example, "
****" will replace any objectionable word/phrase with "****".Items per page: How many objectionable items would you like to have displayed per page. Enter that value in this field. For example, "
20".Click "" to save changes.
Overview: Displays the overview panel for this module. This panel contains information about the module and how to use it.
View Statistics: This panel displays statistics about all comments on the site. From this panel the administrator can see the total number of comments and where the comments are located. Additional actions allow deletion of comments, either selective or complete.
Module name: The name of the module containing comments. Click the module name to go to that module's statistics panel containing figures for each of that module's pages that have comments associated with them. From that panel, you can delete all comments associated with a particular page.
Module pages: Displays a count of the pages within a particular module which contain comments.
Total comments: Displays a count of total comments.
Inactive comments: Displays a count of inactive comments.
Action:
Delete: By clicking "" you can delete all comments associated with a particular module. To delete all comments associated with a particular module, click "" and confirm your intention to delete on the following panel.
Delete All: Click this link to delete ALL comments associated with ALL modules. On the following panel, confirm your intention to delete all comments from all modules.
Modify config: This panel allows modification of configuration options for this module.
Default rendering depth:
1...9: From this drop-down list, select the default rendering depth for comments on the site. This setting determines how many levels of comments are displayed. For example, if you set it to "
2", Xaraya will show the top 2 levels of comments and a setting of "9" will show up to 9 levels of nested comments. It is unlikely that you'll experience 9 nested levels of comments. An example of 9 nested comments is a reply to a reply to a reply to a reply to a reply to a reply to a reply to a reply to a reply!If a message's comments go beyond the default rendering depth, a message is displayed notifying the user that the particular message has additional comments that are not displayed, and that the user can click the message to display all the comments. Suggested setting is "
9".
Default rendering style:
Nested: Comments are displayed with child comments 'nested' (indented slightly) underneath their parent comments. This is a recommended setting, as it is easy to visually track comments and sub-comments. Comments are displayed expanded.
Flat: Comments are displayed with child comments in the same level (no indentation) as their parents. Comments are displayed expanded.
Threaded: Threaded view displays comments in a tree-like structure with the parent comment at the top with child comments below. The threaded view is similar to the default view in many mail readers, along with cute threaded images. Comments are displayed collapsed.
No comments: Do not display comments. If a user turns off comments while reading comments (not in user preferences but on an actual page with comments) the only way to turn them back on at the moment is by going to user preferences.
Default sorting mode: Defines the default sorting mode for comments. Registered users can change their sort order if they wish. Default sorting mode relies on Default sorting order, below, to determine if the items are displayed in ascending or descending order.
Author: Sort comments by the author's username.
Date: Sort comments by the date/time of the comment.
Thread: Sort comments into threads.
Title: Sort comments by the title of the comment.
Default sorting order: Defines the sorting order for comments. Registered users can change their sort order if they wish. Default sorting order relies on Default sorting mode, above, to determine if the mode for sorting.
Ascending: Display oldest-to-newest / alphabetical order.
Descending: Display newest-to-oldest / reverse alphabetical order.
Allow registered users to post anonymously?: If CHECKED, an option is provided whereby a registered user can post a comment anonymously. The user name is always displayed to the site administrator.
Click "Update Configuration" to save changes.
The Hitcount module is a utility module that counts the number of hits on items on the site.
:
Module name: Click on a module name to go to that module's statistics page containing figures for each of that module's items that have hit counts associated with them.
If you click the name of a module, the next panel displays a listing of items (and, if you've CHECKED "Show the item title in statistics" in Admin->Hitcount->Modify config, the title of the item).
Click "" to sort the list by hits.
Click "" to delete the hit counts associated with a particular module or item. Note that the module and module contents are not deleted by this function. On the next panel you are asked to confirm your intention to delete. Once you confirm, the hit counts are deleted for the item.
Module items: The total number of items associated with the module.
Total hits: The total hits for all items within the module.
Grand total: The grand total of each column.
Action:
Delete: By clicking you can delete the hit counts associated with a particular module or item. Note that the module and module contents are not deleted by this function. On the next panel you are asked to confirm your intention to delete. Once you confirm, the hit counts are deleted for the item.
Delete All: By clicking you can delete all hit counts. Note that module and module contents are not deleted by this function. On the next panel you are asked to confirm your intention to delete. Once you confirm, the hit counts are deleted for all items.
: This panel allows modification of configuration options for this module.
Count Administrator Hits: If you would like for the Administrator's hits to increment the counter, CHECK this box. If you do not wish for the Administrator's hits to increment the counter, UNCHECK this box.
Number of top items shown to users: In this field, select the number of top items to display to site visitors. For example, if you wish to display the top 10 items, enter "
10" in this field.Number of items shown in statistics: In this field, enter the number of items shown per page in the administrator's statistics view (Admin->Hitcount->View Statistics-><category_name>). If you wish to display 50 items per page, enter "
50" in this field.Show the item title in statistics: CHECK this box to display the item title in Admin->Hitcount->View Statistics-><category_name>. If this box is UNCHECKED, only the item number (and not the title) is displayed in the statistics view.
Click "" to save changes.
The ratings module allows users to submit their rating of site content. There is a default configuration set, followed by a specific configuration set for any modules to which the Ratings module is hooked. It is recommended that you select one rating style for your whole site to avoid confusion.
View Statistics:
Module Name:
Module Items:
Total Ratings:
Action:
Delete: By clicking "" you can delete all ratings associated with a particular module. Clicking on a module's name takes you to that module's statistics panel which contains the figures for each of that module's items that have ratings associated with them. From there you can delete all ratings associated with a particular item.
Delete All:
Grand Total:
Modify config:
Default configuration
Rating Style: Select the rating style from the drop-down list.
Percentage: The user enters a value from "
0" to "100" to indicate their satisfaction with the content. The rating is displayed as a percentage out of 100.Number out of five: Users select a value from "
0" through "5" from the drop-down list to indicate their satisfaction with the content. "5" is the most satisfied, "0" is the least. The rating is displayed as a number out of five.Stars out of five: Users select a value from "
0" through "5" from the drop-down list to indicate their satisfaction with the content. "5" is the most satisfied, "0" is the least. The rating is displayed as stars out of five.Number out of ten: Users select a value from "
0" through "10" from the drop-down list to indicate their satisfaction with the content. "10" is the most satisfied, "0" is the least. The rating is displayed as a number out of ten.Stars out of ten: Users select a value from "
0" through "10" from the drop-down list to indicate their satisfaction with the content. "10" is the most satisfied, "0" is the least. The rating is displayed as stars out of ten.
Security Level: Select the security level for ratings from the drop-down list.
Low: Users can submit a rating multiple times.
Medium: Users can submit a rating once per day.
High: Users must be logged in and can only submit a rating once.
Configuration for hooked modules: A specific Rating Style and Security Level may be configured independently for each hooked module. Hooked modules are listed below Default Configuration, and the Rating Style and Security Levels function in the same way as in Default configuration, above.
The Search module provides site visitors full-site text search
capability. The searches may be limited by Author, Publication Type, and
Category. The search phrase is entered into the "Search for:"
box and the "" button is pressed, the
search is executed and a clickable list of results is displayed.
The documentation for this part of the Guide is being developed.
Add link:
Dynamicdata ObjectId:
Hook-Module Name:
Hook-Module Itemtype:
Hook-Module Template:
Click "" to save changes.
View links:
Module:
ItemType:
ObjectID:
Template:
Actions:
Edit:
Delete:
Modify config:
Enable Short URLs?: CHECK this box to enable Short URLs for this module. UNCHECK this box to disable Short URLs for this module. Short URL support must be enabled in Admin->Base->Modify config for Short URLs to function.
Check "" to save changes.
The Smilies module transforms text that uses smilies code into graphical images.
Add:
Smiley Code: The text entered by a site visitor to generate the smiley.
Smiley Icon Path: The path to the smiley image file.
Smiley Emotion: Text describing the emotion conveyed via the smiley. Used as mouseover text if a user hovers over the smiley.
Click "" to save changes.
View:
Smiley Code: The text entered by a site visitor to generate the smiley.
Smiley Icon: The smiley itself.
Smiley Icon Path: The path to the smiley image file.
Smiley Emotion: Text describing the emotion conveyed via the smiley.
Options:
Edit: Click the "" link next to the smiley you wish to edit. Make any required changes and click "" to save changes.
Delete: Click "" next to the smiley you wish to delete. On the next panel, confirm your intention to delete and the smiley is deleted.
This is an EXTREMELY important module for Xaraya. Perhaps the single most important module, because no other Xaraya module allows a user to enter plain old text and convert it to nice, useless ASCII art. Just kidding. This is a fun module, nothing more.
Modify config: This panel allows modification of configuration options for this module.
Available fonts: This drop-down list is simply a DISPLAY of fonts that are available for the Figlet module. Fonts must exist in the
<xarroot>/modules/figlet/xarfontsdirectory with appropriate ownership and permissions, and any new fonts you wish to install go into that directory. Note that Figlet uses FLF-format font files. Check http://www.figlet.org for information on fonts for use with Figlet.Click "" to save changes.
The MyBookmarks module gives your users a way to add their favorite bookmarks to a sitewide database. The Bookmarks block with each user's personal bookmarks, will be displayed on their Roles My Account page. The Random Bookmarks block will pull a random link from the master database of all user's bookmarks.
: Provides a general overview of the module.
: OTTO
: From this panel, you can view all bookmarks on the site. You have options for maintaining the bookmarks and adding new ones from this panel.
ID: The ID number of the bookmark.
Username: The username of the user who added the bookmark. Click the username to view User Information.
Link name: The name of the bookmark as entered by the user who added it.
URL: The URL for the bookmark as entered by the user who added it. Click the URL to visit the page.
Options:
View: Displays another view of the bookmark entry in the site's database, but does not view the actual bookmarked page.
Modify: Click this link to modify the link name and/or URL. From this panel, you may view the profile of the user who added the bookmark. Click "" to open the URL in a new window. Modify the values as necessary, then click "" to save changes, "" to preview the changes without saving, or "" to abort the modification without saving.
Delete: Click "" to delete an existing bookmark.
Note
You are not asked to confirm your intention to delete an item when clicking this link.
New: Click "New" to add a new bookmark to the site. On the following panel, enter the Link Name & URL for the link you wish to add. Click "" to save changes, "" to preview the database entry without saving, or "" to abort the addition without saving.
: This panel allows modification of configuration options for this module.
Configure Module
Short URL support:
Click "" to save changes, or "" to cancel changes.
Bookmark configuration
Modules per page:
Click "" to save changes, or "" to cancel changes.
Table of Contents
Abstract
This chapter shows you how you can maintain your site and use the tools that Xaraya offers you for the day-to-day operation of a Xaraya site.
Xaraya offers several tools to keep you informed how your site is doing, do backups of your database and help make the life easier of the average admin.
In general, Xaraya runs without any need for pre-emptive or recurring maintenance. However, some features could benefit from some attention to keep your site running smoothly. This section contains a few things that could be done on a regular basis.
Example backup script
Although many webmasters have copies of their website on their local workstations, they often neglect to make a copy of their database. A backup of both website and database needs to be done regularly to protect against catastrophic data-loss situations. Included below is a useful script for backing up the web site's database and files.
# xaraya-bu.sh | 1.12
#==============+ by Drew Vogel (drew@xaraya.com)
# This script will:
# * Backup files from the <webdir> (recursive) into a file in the
# root directory called webdir.tar.gz
# * Perform a dump of the Xaraya database into a file
# called Xaraya.sql in the root directory,
# * Archive all backup up files into one archive,
# * Copy the archive to a specified location, and
# * Clean up all its temp files.
#
# Define some variables
#
# In BACKUP_TABS, put a list of database table names, separated by a space,
# that you would like to backup from MySQL.
BACKUP_TABS="Xaraya"
#
# MYSQL_USER is your MySQL administrator username.
#
MYSQL_USER=username
#
# MYSQL_PASSWORD is your MySQL administrator password.
#
MYSQL_PASSWORD=password
#
# DATE stores the format of the filename. In this case, it results in a XAR prefix with
# a date string, like: XAR-23Oct2002.
#
DATE=$(date +XAR-%d%b%Y)
#
# Change the two lines below to the directory you want to backup.
#
cd /var/www/html
#
# The script itself
#
echo "Backing up /var/www/html/ directory to archive webdir.tar.gz..."
tar -cpzvf ~/webdir.tar.gz *
echo "...done."
cd ~/
for TAB in $BACKUP_TABS;do
echo "Creating dump of $TAB database..."
mysqldump -u $MYSQL_USER -p$MYSQL_PASSWORD -B $TAB -c -a --add-drop-table >~/$TAB.sql
echo "...done."
done
echo "Adding the files to archive $DATE.tar.gz..."
cd ~/
#
# Edit the line below to include the tablenames from the database.
#
tar -czvf $DATE.tar.gz Xaraya.sql
echo "...done."
#
# Edit the line below to specify the destination directory.
#
echo "Copying $DATE.tar.gz archive to /var/www..."
cd ~/
#
# Edit the line below to specify the destination directory.
#
cp $DATE.tar.gz /var/www/
chmod 770 /var/www/$DATE.tar.gz
#
# Edit the line below to specify the destination directory.
#
echo "...done."
echo "Cleaning up..."
cd ~/
for TAB in $BACKUP_TABS;do
echo "CLEAN UP: Deleting $TAB..."
/bin/rm $TAB.sql
echo "...done."
done
rm webdir.tar.gz
rm $DATE.tar.gz
ls -l /var/www/$DATE.tar.gz
echo "...done."
echo "Xaraya backup complete!"
Logging your site can often help with tracking down problems and odd behaviour.
To enable basic logging on your Xaraya site edit var/config.system.php and make sure the following lines exist and are not commented out: (the filename can be changed as appropriate)
$systemConfiguration['Log.LogLevel'] = 'DEBUG';
$systemConfiguration['Log.LoggerName'] = 'simple';
$systemConfiguration['Log.LoggerArgs'] = array('fileName' => 'var/logs/log.txt');
Changing the 'simple' to 'dummy' will disable the logger.
[ marcel to add content here on other loggers ]
The Site Tools Module provides a set of utilities to assist in managing cache files, and databases for your site, from within Xaraya. As time progresses, other site utilities may be added to this module, so you should check for an upgrade in Admin->Modules listings when installing new versions of Xaraya or this module.
Optimize database:
This utility allows you to optimize your database. Tables are listed with optimization status, and the amount of space saved through an optimization. At this time only MySQL databases are supported, but we expect this will be expanded to other database types with time, as well as the ability to choose from one or more databases.
Click "" to optimize your database. Optimization totals are displayed on the next panel when optimization has completed.
Backup database:
Before this option can be used, a Backup Path must be configured in Admin->Sitetools->Modify config. The path must exist and be world-writable. The backup database utility allows you to create one of four different types of database backups:
Full backup with complete inserts
Full backup with standard inserts (a smaller file)
Partial backup: all tables are listed with their number of records and you can choose the tables to backup.
Structure only: only the structure of your database will be backed up. No content.
In all options, you can choose to create a compressed gz file, or text sql file. The gz option will only be effective if your server has gz option available.
At this time only MySQL databases are supported, but we expect this will be expanded to other database types with time, as well as the ability to choose from one or more databases.
Note
Do not leave your backup file on the server in a web browsable directory. Remember to move it to a secure directory, or delete the file when you have saved it to your local computer.
Clear Cache files:
This option allows you to flush (delete) cache files in any/all of your Template, RSS, or ADODB cache directories. To select the caches to be flushed, CHECK the box. If a box is left UNCHECKED, the cache files for that directory will not be removed. Click "" to perform the deletion of cache files.
Browse Cache files:
This option allows you to list and browse all cache files in your Template cache directory, with the corresponding template file listed. By clicking on a listed file you can browse the contents which are displayed with line numbering. This is useful when debugging new templates, or isolating problems with existing templates.
Modify config:
Cache file options: Set paths to your template, RSS, and ADODB caches. These should not be changed unless you physically configure new directories for cache files. Unless you did this through the Multisite Module, you would have to make changes to the Xaraya code for this.
Backup Options: You must enter the path to the directory where your backup files will be created. The default is the
<xarroot>/var/uploadsdirectory as this is writeable (chmod 777). If you change this, make sure your backup directory exists and is writeable.Use timestamps in backup files: By checking this, a time stamp will be written into the name of any backup files that are created.
Columns for display: For partial backups, all tables are displayed for selection and inclusion into the backup. This option allows you to change the number of columns used for display.
Click "" to save changes.
This table displays the HTML tags that Xaraya will accept in content submissions, either from users or from Administrators. All content entry areas accept HTML tags based on the specifications in this table. To modify the settings, click Admin->Html->Set Allowed. Specify if the tag is '', '', or ''.
Not allowed: The HTML tag is never allowed and will be ignored in the post.
Allowed: The HTML tag is allowed without any parameters. This is useful for on-or-off text-formatting tags (for example, <b> and </b> for BOLD, <i> and </i> for ITALICS, etc.).
Allow parameters: The HTML tag is allowed with parameters. An example of a tag with parameters is <font type="Arial" color="#FF0000">.
If you would like to add an HTML tag that is not in the table, click
Admin->Html->Add and enter the HTML tag into the
text box. It is not necessary to enclose the tag in "<"
and ">". Click "" to save changes. The new tag is inserted into the
HTML tag list as "". Edit the
setting as necessary.
To delete an HTML tag from the table, click "" next to the tag. Confirm your intention to delete the tag by clicking "", or click "" to abort deletion.
Click "" to save changes.
The Mail module controls how your Xaraya system sends mail to users or groups of users. This module is a utility module that takes information from other modules installed on your Xaraya system and formats mail messages for them. This module allows you to use SMTP, SendMail, or the normal PHP Mail functions to send mail to site visitors.
: This panel allows modification of configuration options for this module.
Modify Mail Configuration
Admin Name: Enter the name of the site administrator here. For example, "
Joe Admin".Admin Email: Enter the site administrator's complete email address in this field.
Add different reply-to: If CHECKED, email messages from the site are sent with a different Reply-To Name & Address. Two additional fields become available:
Reply To Name: Enter the name that replaces the Admin Name, above.
Reply To Email: Enter the email address that replaces the Admin Email, above.
Send HTML Emails?: If CHECKED, HTML formatted emails will be sent, and two additional fields become available after clicking the "" button.
HTML Email Header: In this field, enter the complete HTML header for emails sent from this site.
HTML Email Footer: In this field, enter the complete HTML footer for emails sent from this site.
Default Word Wrap Size: Set the word-wrap size for emails sent from this site in this field. For example, set to "
78".Default Priority to send messages: From the drop-down list, select the default priority for messages that are sent from the site. Some email readers handle messages with higher priorities in different ways, marking them with a flag or playing a sound, for example.
High: Send email messages from the site marked as high priority.
Normal: Send email messages from the site marked as high priority. This is the recommendation, and the default.
Low: Send email messages from the site marked as low priority.
Default method to send mail: From the drop-down list, select the default method to be used for sending messages from the site. Use the email sub-system on the site, or select Mail to use PHP's built-in mail handling system.
SMTP: Use SMTP to send email from the site.
Sendmail: Use Sendmail to send email from the site.
Mail: Use PHP's mail functions to send email from the site.
QMail: Use QMail to send email from the site.
Filtering Options
Strings for search: You can specify custom strings of text that will be replaced in site emails. Enter each string on a single line. Do not separate with commas or other punctuation. Suggested format is "
%%string%%" (without quotes) to ensure that no conflict exists.Strings for replacement: Enter each string on a single line in the same order as the search (above). Do not separate with comma, etc.
Click "" to save changes.
The Statistics module collects data about visitors to your website. To use the Stats module, install the module, set the configuration options as you would like, and the Stats module begins to collect data.
Modify config: This panel allows modification of configuration options for this module.
Count Administrator Hits: If you wish for the hits made by the site administrator to increment the statistics, CHECK this box. If you do not wish for hits made by the site administrator to increment the stats, UNCHECK this box.
Click "" to save changes.
This panel shows who has been linking to your site and how they are locating your site. It provides an interesting look at how your site is being accessed from the internet.
View:
URL: Displays the URL from which your site is linked, or "Bookmark" if the requests originate from a user's bookmark file.
Frequency: The number of unique requests from the particular URL.
Delete Referers: Click this link to clear the listing of referers. You are asked to confirm your intention to delete and, if you confirm, the existing referers are cleared.
Modify config:
Items per page: In this field, specify the number of referers to display per page. For example, if you wish to display 100 referers, enter "
100" in this field. Click "" to save changes.
Xaraya wrapper around phpOpenTracker statistics tracking system (http://www.phpopentracker.de). No administration panel.
This module does not contain any administrator-modifiable settings, so has no administration panel.
Table of Contents
OTTO: explain webservices usage with Xaraya
Modify config:
This panel allows modification of configuration options for this module.
Blogger API publication type: From the drop-down list, select the Publiction Type for which BloggerAPI is activated, or "" if you do not wish to activate BloggerAPI.
None: Not configured: If you do not wish to use BloggerAPI, select this option.
<publication type>: From the drop-down list, select the Publiction Type for which BloggerAPI is activated.
Click "" to save changes.
Table of Contents
This section describes some Xaraya modules that don't really fit anywhere else so they are grouped together here.
The Translations module is used to translate Xaraya, its modules and themes.
The translation teams use the international sites of Xaraya, which can be accessed via [countrycode].xaraya.com, to perform the translation of Xaraya. If you would like to help out, dont hesitate to contact the project team via PMC@xaraya.com
The Window module is a port of the popular PostWrap module (for PostNuke) to Xaraya. It lets you display stand-alone external web pages from within your Xaraya site.
The Window module uses the center block to display external page(s).
Pages correspond to URLs. You can display pages off your local server, or from the Internet.
You can define a number of different options for your external page(s), among them the height and width of the display, whether only registered users may see them, and so on.
You can display as many pages as you like, each with its own settings.
The following options are available under Admin->Window:
General settings: These are the general, default settings for the URLs that are entered in this module. Specific overrides are available for URLs; see "URL-specific settings", below.
Display off-site pages:
Use buffering of output before sending:
Allow input from browser address bar:
Compare URL against URL security in database:
Only for registered users:
Add link for "Open in new window":
Use fixed title:
Auto-resize window:
Height of viewing window (in pixels). Only if Auto-resize window, above, is set to NO, in which case this field specifies the height of the content window.
Width of viewing window (in pixels or percent). If you're entering a percent, enter it with the "
%" symbol, for example, "75%".Click "" to save changes.
URL-specific settings: The site administrator can configure options on a URL-by-URL basis in this panel.
Existing URLs: View, edit, or delete existing URL records in this section of the panel.
URL address: The complete URL (including "
http://") for the site.Alias: The alias for the site as displayed to site visitors.
Options:
Edit: To edit a specific URL, click "Edit" next to it.
Delete:
New URL: Add a new URL to the module & set options.
URL address field: The complete URL (including "
http://") for the site you wish to add. For example, "http://www.bluesnews.com".Alias field: The alias for the site as displayed to site visitors. For example, "
BluesNews".Only for registered users:
Add link for "Open in new window":
Use fixed title:
Auto-resize window:
Height of viewing window (in pixels). Only if Auto-resize window, above, is set to NO, in which case this field specifies the height of the content window.
Width of viewing window (in pixels or percent). If you're entering a percent, enter it with the "
%" symbol, for example, "75%".Click "" to save changes.
Once URLs are populated in the Window module, you may open them in
your site by linking to
"http://www.mysite.com/index.php?module=window&page=<your
page>". For example, "http://www.yoursite.com/index.php?module=window&page=http://www.bluesnews.com".
or "http://www.yoursite.com/index.php?module=window&page=BluesNews".
Xaraya development used to take place with BitKeeper software. Due to several reasons development is now performed in monotone.
This module permits viewing of a BitKeeper repository. If you use BitKeeper, this module will be useful for viewing items. If you do not use BitKeeper, this module will be of little use.
View repositories:
Add repository:
Repository name: Enter the name of the repository as you want it displayed on the site.
Path: Enter the complete path to the BitKeeper repository.
Click "" to save changes.
The DocBook for this Guide is being developed.
Modify config: This panel allows modification of configuration options for this module.
Number of facilities to display per page:
Show top menu:
Configuration of hooked modules
Click "" to save changes.
The multisites module is the former way of using one install of Xaraya to manage multiple sites. Those sites are then identified by their subdomains in most cases. Xaraya 1.1 and higher offers the realms mode to manage multiple sites or slice up one site.
: Configure the Master Site from Admin->Multisites->Master config.
You can then add new sites through the menu option Admin->Multisites->Add Sites.
:
:
Number of site listings per page: In this field, enter the number of site listings to display per page. For example, if you wish to display 10 site listings per page, enter "
10" in this box.Click "" to save changes.
: This panel allows modification of configuration options for this module.
Server config: Multisites can use one of 2 possible variables either HTTP_HOST or SERVER_NAME. One or the other may not always work on your system, depending on the way the server is configured.
HTTP_HOST:
SERVER_NAME:
File Paths & Domain Types
Default Master Data Directory Path:
Domain & subdomain extensions: The common extensions are
.com,.net, and.org. If, for example, you use a subdomain or domain such aswww.domain.bizas a site, you will need to add the.bizextension to the list.If you want to use domain extensions to discriminate your sites (for example,
mysite.comis a different site thanmysite.net), make sure the text box is blank.
Click "" to save changes.
The Recommend module is a module that shows a block on your site that users can use to recommend the current page or your complete website to others. The module will show a form in which the user that wants to do the recommendation leave an extra note.
The Example module serves as the example for new modules. It is used as a template and explains several standard operations of Xaraya modules. When you want to read about development in Xaraya, then you are suggested to read the Xaraya Development Guide, also available online via the website.
The options in the admin menu are as follows:
Add Item:
Add Item:
Example name:
Example number:
Click "" to save changes.
View items:
Example Name:
Example Number:
Example Options:
Modify config: This panel allows modification of configuration options for this module.
Display example items in bold?:
Example items per page?:
Enable Short URLs?:
Click "" to save changes.
Thank you for reading the Official Xaraya Installation and Getting Started Guide!
I sincerely hope that this Guide has increased your understanding of how Xaraya functions, and that it has helped you to install and configure your own Xaraya site. Writing this Guide has been largely a solo effort that I undertook gladly. It is my pleasure to be able to give something back to the Xaraya community; the community has provided a product with which it has been a great pleasure to work.
I am very interested in hearing your comments and suggestions about this Guide. Please get in touch with me using one of the methods below:
<drew@xaraya.com>
Happy Xaraya-ing!
-drew vogel
If Xaraya successfully created your database, skip to "Administrator Account Creation". If Xaraya cannot create the database for you, you should use phpMyAdmin to create an empty database called "Xaraya" and configure access permissions. This can be a two-step process:
Using phpMyAdmin, create a user in the database if necessary
If you already have a database username & password, skip this step. To create a database user
<db-user>with password<db-user-password>, follow these steps in phpMyAdmin:Click "".
Click "" and complete the fields.
User name: Use text field: Type the name for the user in the text field. This is the same value as
<db-user>, above.Host: If the database is running on the same server as the website (this is the most common scenario), select "" from the drop-down list.
Password: Use text field: Type the password for this user in the text field. This is the same value as
<db-user-password>, above.Re-type the password to verify.
Click "" to save changes.
Using phpMyAdmin, create the empty Xaraya database (called "Xaraya")
In phpMyAdmin, follow these steps to create the database that Xaraya will use:
Create a new database called "Xaraya".
Click the "" link near the top left of the phpMyAdmin page.
Click "".
Next to the line for Xaraya, click "".
Next to
<db-user>, click "".Check all in "" and click "".
Click the "" link near the top left of the phpMyAdmin page.
Click "".
Once the empty "Xaraya" database has been created, re-run the Xaraya installer and UNCHECK "" under Database Settings Collection.
Table of Contents
If you are running Apache 2.x on your webserver and wish to support
Short URLs, you must add the directive: AcceptPathInfo
Onhttpd.conf file
(usually /etc/httpd/conf/httpd.conf on RedHat
systems). Restart Apache once the change has been saved ("apachectl
graceful" on RedHat systems). See the
documentation on the Apache website
for more information about adding this directive.
For the original article, see http://www.mahmood.tv/index.php/docs/20
I gave http://www.computerpoint.tv a make-over in less than a couple of hours, and that included installing Xaraya, importing the previous PostNuke 0.723 data AND creating the theme! Themes with BlockLayout are extremely easy. I am sure I haven't even scratched the surface or capabilities of the BlockLayout templating engine, but I got it done, and here's how:
Copy the Xaraya_Classic theme into whatever name you like your new theme to be, let's say 'MacyGray':
# cd <xarroot>/themes # cp -R Xaraya_Classic MacyGray
Reserve an ID on Xaraya.com and note the ID you've chosen. Edit the
<xarroot>/<themes_dir>/MacyGray/xartheme.phpfile and enter your Theme ID there. While in that file, change all other information that needs to change like the theme name, directory etc. In vi I do: :g/Xaraya_Classic/s//MacyGray/gthat will replace all occurances of 'Xaraya_Classic' with 'MacyGray'
To do the same for all other files in <xarroot>/<themes_dir>/MacyGray, do a grep to see where 'Xaraya_Classic' occurs then change that as I've done above in vi or whatever editor you use:
# cd themes/MacyGray # grep -R Xaraya_Classic *
This will spew all occurances of Xaraya_Classic in all the files in the directory and the subdirectories, then go to each file and do a replace as above.
Now that you have the basic framework for MacyGray, it is time to get creative!
Use your HTML editor to load
<xarroot>/<themes_dir>/MacyGray/default.xt.Load up
<xarroot>/<themes_dir>/MacyGray/style.cssfile to ensure that you're working on the complete theme and to avoid surprises! There is a LOT of information and control in thestyle.cssfile and you can change just about anything in the theme by changing values in thestyle.cssfile. It is also here that you would change the page background color, fonts to use, font attributes, etc. Again your HTML editor should give you a way to change things in the stylesheet in a graphical environment.Place graphics and other elements. Basically, create your theme here then save the files.
Check that your HTML editor didn't change the graphic paths, make sure that your graphics are in "
<xarroot>/<themes_dir>/MacyGray/images/" directory, rather than "file:///".Everything saved, make sure that the permissions on the files and directories are set appropriately.
Go to the Admin->Themes->View Themes. CHECK "" and click "". Then initialize and activate your new theme.
Go to Admin->Themes->Modify config and set your new theme as the default.
...et voila! Now you have a new theme for Xaraya!
For variables and tags to use (if you need more that is, you could check the BlockLayout RFC on Xaraya.com)
Conversion of an existing PostNuke site to Xaraya is easy. A conversion script facilitates the conversion process for PostNuke versions . The import script will not import PostNuke items if there is no specific script that handles that part of the data. During conversion, PostNuke data is converted and stored in the new Xaraya tables. The original PostNuke data is not modified in any way.
To convert from PostNuke to Xaraya, follow the steps below.
Backup existing PN database to a file, just to be safe. For example:
"mysqldump -u <username> -p -B <PostNuke_dbase_name> -c -a --add-drop-table >PNbackup.sql"
If you have many articles (more than 250 or so) on your PostNuke site, it may be necessary to increase PHP's
max_execution_timeto prevent timeouts when converting and importing data. If max_execution_time is too low, PHP may 'time out' before the articles can be imported successfully.To adjust the max_execution_time, edit
/etc/php.iniand setmax_execution_timeto120, making a note of the previous value. Save the file and exit the editor. Restart your webserver so the changes are implemented ("apachectl restart", for example).
From the Xaraya Base distribution, install a Xaraya Community site. In the Database Name field of Xaraya's installer, specify the name of your existing PostNuke database (case-sensitive). Specify a different prefix for Xaraya's tables ("
xar" is recommended) than was used for PostNuke.Install the POLLS module in Xaraya. If you skip this step, the importer will present an error when it tries to import any polls that exist on your PostNuke site.
Copy the
import_pn*.phpfiles from the Xaraya Base distribution's "/tests/import/postnuke" directory to your <xarroot> directory. Give the<xarroot>/import_pn*.phpfiles appropriate system permissions and ownership so they can be accessed via the web. For example:"cp /test/import/postnuke/import_pn*.php <xarroot>"
"cd <xarroot>"
"chown -R web:apache import_pn*.php"
"chmod -R 770 import_pn*.php"
From a browser, go to http://www.yourwebsite.com/<xarroot>/import_pn.php. Follow the on-screen steps to import each area of the PostNuke site into Xaraya.
After the conversion is complete, delete the
import_pn*.phpfiles from your <xarroot> directory. Leaving these files can present a security risk.Edit
/etc/php.iniand setmax_execution_timeback to the previous value. Save and exit the editor. Restart your webserver so the changes are implemented ("apachectl restart", for example).If you no longer intend to run PostNuke, the PostNuke tables can be deleted from the database using the command line or phpMyAdmin.
After conversion, the PostNuke tables in the database may be deleted, if desired.
NOTE: Though we install them, this appendix does NOT include information on configuring email services (Sendmail, Postfix, Squirrelmail, SpamAssassin, etc.). Configuration of this type is beyond the scope of this document.
To install RED HAT LINUX 9.0 to run Xaraya, follow these steps.
CAUTION * CAUTION * CAUTION * CAUTION * CAUTION * CAUTION * CAUTION *
=============================================================================
This procedure will COMPLETELY ERASE HARD DRIVES INSTALLED ON THIS SYSTEM. Be sure there is no important data on the drives; EVERYTHING WILL BE LOST.
Use these instructions at your own risk.
=============================================================================
CAUTION * CAUTION * CAUTION * CAUTION * CAUTION * CAUTION * CAUTION *
Get the RED HAT 9.0 installation CDs.
Boot the system from the RED HAT 9.0 installation CD. Launch the Red Hat Installer.
Perform the (optional) media check to test your installation CDs. This is strongly recommended the first time you install from a particular CD set, to make sure that it does not contain any errors. Select "" to perform the media check. Once you have checked each CD set once, it is generally not necessary to check it again and you may "" this step.
WELCOME TO RED HAT LINUX: Click "" at the Welcome screen.
LANGUAGE SELECTION: Select the language to use during installation. Click "".
KEYBOARD CONFIGURATION: Select your Keyboard Configuration. Click "".
MOUSE CONFIGURATION: Select your Mouse Configuration. Click "".
INSTALLATION TYPE: If there is already a Linux operating system installed on this machine, select "" and click "". Select "". Click "".
DISK PARTITIONING SETUP: Select "" and click "".
AUTOMATIC PARTITIONING: Select "". Click "".
A warning window gives you the opportunity to change your mind. If you are certain that you want to remove all partitions on this system, click "". If you do not want to remove all partitions on this system, click "".
CAUTION * CAUTION * CAUTION * CAUTION * CAUTION * CAUTION * CAUTION * =============================================================================
Selecting "" will erase EVERYTHING on this system.
=============================================================================
CAUTION * CAUTION * CAUTION * CAUTION * CAUTION * CAUTION * CAUTION *
DISK SETUP: You can review the changes that Red Hat will make to your computer's hard drive partitions here. Click "" to continue.
BOOT LOADER CONFIGURATION: Leave set to defaults unless you wish to change the settings. Click "".
NETWORK CONFIGURATION: Leave set to defaults unless you wish to change the settings. Click "".
FIREWALL CONFIGURATION: Select Medium (or High) Security, CHECK your network device (usually "") as a Trusted device, CHECK , , , , and . Do NOT check unless you have a specific need to support it. Click "".
ADDITIONAL LANGUAGE SUPPORT: If you wish for your Red Hat installation to support multiple languages, select them from the listing under Additional Languages. Click "".
TIME ZONE SELECTION: Select your Time zone. Click "".
SET ROOT PASSWORD: Enter the root user's password twice. Remember this password -- it is the key to administrator access to this server. Click "". Be patient -- the installer will read package information for a while, then display the next step.
PACKAGE GROUP SELECTION:
The only items that should be CHECKED for this installation are as follows. UNCHECK any other package sets. If you need to install additional features (such as Printing Support), you may do so.
Check:
X Window System
GNOME Desktop Environment
Graphical Internet
Text Based Internet -- click "" In addition to those items already checked,
Check epic
Check lynx
Check ncftp
Check pine
Server Configuration Tools
Web Server -- click "" In addition to those items already checked,
Check mod_auth_mysql
Check mod_auth_pgsql
Check php-mysql
Check php-odbc
Check php-pgsql
Mail Server -- click "". This appendix does NOT include information on configuring email services (Sendmail, Postfix, Squirrelmail, SpamAssassin, etc.). This configuration is beyond the scope of this document. In addition to those items already checked,
Check postfix
Check spamassassin
Check squirrelmail
SQL Database Server -- click ""
In addition to those items already checked,
Check mysql-server
Administration Tools
System Tools
Click "Next".
As configured above, the installation is approximately 1235 megabytes.
CAUTION * CAUTION * CAUTION * CAUTION * CAUTION * CAUTION * CAUTION *
=============================================================================
Continuing through the next step will DESTROY ANY DATA on the system.
=============================================================================
CAUTION * CAUTION * CAUTION * CAUTION * CAUTION * CAUTION * CAUTION *
ABOUT TO INSTALL: Click "Next" to begin the installation.
INSTALLING PACKAGES: The system will install from the Red Hat CDs. Insert installation CDs them as you are prompted for them, and click "OK" to continue installation when each CD has been inserted.
BOOT DISKETTE CREATION: After installation completes, the installer will offer to make a boot floppy. If your system has a floppy drive, it is highly recommended that you create a boot floppy. Select "Yes" to create a boot floppy. You need a floppy disk -- it will be completely erased. Select "No" to skip the creation of a boot floppy.
GRAPHICAL INTERFACE (X) CONFIGURATION: The Red Hat installer will attempt to detect your video card and monitor type. Click "Next" to move through these configuration options.
CUSTOMIZE GRAPHICS CONFIGURATION: Select your Color Depth and Screen Resolution from the drop-down lists.
IMPORTANT: At the bottom of this screen, set "" to . We select "" because the text mode login requires fewer system resources. Click ""Next"" to continue.
You see "Congratulations, the installation is complete". Remove all media -- the CD and the boot floppy. Click "Exit" to exit the installer and reboot into your new Red Hat 9.0 server.
When the system reboots, log in as root with the password you selected above. In the root directory, you should see a file called "
anaconda-ks.cfg". This is a record of the installation that was just performed. It is recommended that you keep this file somewhere safe -- the boot floppy is a good suggestion. Insert the floppy disk, making sure it is write-enabled.Type "
mount /mnt/floppy".Type "
cp anaconda-ks.cfg /mnt/floppy/ks.cfg".Type "
umount /mnt/floppy".
When the floppy drive's activity light goes out, remove the floppy disk, write-protect it, and keep it in a safe place, preferrably away from this server since the file we just copied contains password information. You should also delete the
anaconda-ks.cfgfile from your server ("rm anaconda-ks.cfg"). If you ever wish to perform this exact installation again, you can do so by booting from the boot CD, inserting the floppy withks.cfgon it, and typing "linux ks=floppy".Still logged in as root, type "
setup" at the command line. Use the cursor keys to move the lightbar down to "". Press ENTER. Scroll down and press the SPACEBAR next to "" (web server), "" (MySQL database server), and "" (WWW proxy cache). Press TAB to move the lightbar to OK, then press ENTER. Press TAB two times to move the lightbar to Quit, and press ENTER to leave Setup.Type "
reboot" at the command line to reboot your server. When the server reboots, the items we selected above will automatically launch during boot.UP2DATE:
When the system has rebooted, make sure that the server is connected to the internet. Then, log in as root and type "
up2date". Because Red Hat is a constantly evolving product, there are new releases of component software on a frequent basis. The Up2Date program keeps your system updated by communicating with Red Hat Network. If necessary, edit the settings that are displayed, however, generally, the defaults are acceptable. Press ENTER to save and exit, or press "q" to quit without saving.From the command line, type "
rpm --import
            /usr/share/rhn/RPM-GPG-KEY
" to import your Red Hat Network information into your installation.From the command line, type "
up2date" again. Read the information and click "Next" twice. If you are an existing Red Hat Network user, enter your username, password, and email address in the fields. If you are not an existing Red Hat Network user, choose a username and password and enter them and your email address in the fields. Use TAB to move forward through the fields and SHIFT-TAB to move backward. Using TAB, move the lightbar to "" and press ENTER to continue.Read the next screen, and click "Next" to continue. Red Hat will build a package list and ask if it can send information about your installed packages. It is suggested that you allow this information to be sent. Click "Next" to continue, and click "Next" again to send the system profile to Red Hat Network. Click "Finish" when the profile has been sent.
From the command line, type "
up2date -l" to see a listing of packages available for updating. There may be a lot of packages, so it is recommended that you type "up2date -l >update.txt" to save the list of files to "update.txt". View the list by typing "more update.txt". Each item on the list indicates a package that has been updated since the creation of the CDs from which you installed.To tell Red Hat to update packages, type the following at the command line: "
up2date <packagename>
            <packagename> ...
". You can put several packages on one line. Press ENTER and up2date will download, verify, and install the packages you specified. If an updated kernel (the core of the Linux operating system) is available and you wish to update your kernel, type "up2date -f kernel" to force the update of the kernel.Once your system is completely up-to-date, type "
reboot" to reboot your server.
IFCONFIG: From the command line, type "
ifconfig" to see the internet protocol (IP) address for this system. Make a note of the IP address.phpMyAdmin: Download the latest stable version of phpMyAdmin (in tar.gz/PHP files format) from http://phpmyadmin.sourceforge.net to a temporary directory. From the command line, type "
cd
        /tmp
", then "lynx http://phpmyadmin.sourceforge.net" to connect to the site then select the latest version of phpMyAdmin for download. Press ENTER on the file. Select a download mirror and press ENTER. Press "d" to begin the download. When it completes, click on "", and press ENTER to retain the default filename. Press "q" and "y"es to exit Lynx.To extract the archive, type "
tar -xzvf
        <phpmyadmin>.tar.gz
" (replace <phpmyadmin> with the name and version of phpMyAdmin that you just downloaded). When the extraction is complete, type "cd <phpmyadmin-dir>" (replace <phpmyadmin-dir> with the name of the directory where phpMyAdmin was extracted). Type "pico config.inc.php". This is the main configuration file for phpMyAdmin.There are four places we need to edit. Change the values for host, user, password and authentication mode to fit your environment. "Host" means the MySQL server and is usually "localhost". Also insert the correct value for $cfg['PmaAbsoluteUri']. Save the file and exit the editor.
Now we need to copy phpMyAdmin directory to the <webdir>. From within the <phpmyadmin-dir>, type "
mkdir
        <webdir>/phpmyadmin
", then type "cp * <webdir>/phpmyadmin".It is recommended that you protect the directory in which you installed phpMyAdmin. Read phpMyAdmin's Documentation.html file in the phpMyAdmin directory for more information on doing so. phpMyAdmin is now ready for use.
* MySQL: MySQL is the database that drives Xaraya. In order to configure MySQL for use, we must accomplish two things: Set a root password for the database, and create a database user & password.
Set a root password for the database: When Red Hat installs MySQL, it is not password protected, making it vulnerable. To assign a password of "yourpass" for the root user, enter the following at the command line:
"
mysqladmin -u root password yourpass"
Create a database user: We must create a database user that Xaraya will use to access the database. We'll use phpMyAdmin for this. To launch Red Hat's Desktop, type "
startx" at the command line. When the desktop appears, click the icon at the lower left of your screen that looks like a globe with a computer mouse coiled around it to launch Mozilla browser.From within the broswer, visit the directory where you installed phpMyAdmin. In this example, it should be "http://localhost/phpmyadmin".
Click Privileges->Add a new User
Enter the following information:
User Name: Enter the name for the database user, for example, "
dbuser".Host: Enter the host where the database resides. Since we're hosting the database on the same site as the webserver, select "" from the drop-down list.
Password: Enter the password for the database user.
Re-type: Enter the same password again, to verify.
Under Global Privileges, CHECK all the items in each column.
Click "" to save changes.
VERY IMPORTANT: Click the "" link under the phpMyAdmin logo in the top-left corner of your screen, then click "".
To exit the Red Hat Desktop, click the Red Hat icon in the lower left corner of the screen and select "". Click "" and "" in the confirmation window, and you are returned to the command line.
Sendmail: Sendmail is the email agent on your server. Check with your service provider for tips on configuring Sendmail.
Postfix: Postfix is another email agent on your server. Check with your service provider for tips on configuring Postfix.
SpamAssassin: SpamAssassin is a mail filter to identify spam. Check with your service provider for tips on configuring SpamAssassin.
SquirrelMail: SquirrelMail is a webmail package. Check with your service provider for tips on configuring SquirrelMail.
Your system is now ready for the installation of Xaraya.
If you really want to, you can use the old fashioned way of editing the config file yourself.
Using your text editor, edit
/tmp/xar/html/var/config.system.phpand make the following changes as necessary:Database Username: The username that will be used to connect to the database. Do not use 'root' or 'admin' account names as they present a security risk. This user should already exist and have privileges in your database. For example, if the database user was to be "db-user", change the line to:
$systemConfiguration['DB.UserName'] = 'db-user';
Database Password: The password that will be used to connect to the database. For example, if the database password was to be "db-user-password", change the line to:
$systemConfiguration['DB.Password'] = 'db-user-password';
Database Host: The host name where the database server is located. In most cases this will be 'localhost'. Otherwise, you need to include a fully qualified domain name (FQDN) here, for example, 'mybox.mydomain.com' or the IP number of the machine. For example, if the database host was to be "localhost" (meaning that the database is on the same server as Xaraya), change the line to:
$systemConfiguration['DB.Host'] = 'localhost';
Database Name: The name of the database to which to connect. Case-sensitive.
$systemConfiguration['DB.Name'] = 'Xaraya';
Database Type: The database server type.
$systemConfiguration['DB.Type'] = 'mysql';
Database TablePrefix: Used when you wish to run multiple sites off the same database. That way, user accounts will be available across all the sites. This feature is not currently implemented into Xaraya, but will be available in a future release. The prefix chosen here will be prepended to each of the tables of your database to give each a unique name across multiple installs. For example, if the database table prefix was to be "xar", change the line to look like this:
$systemConfiguration['DB.TablePrefix'] = 'xar';
Save your changes and exit your editor.